Users Manual - English
Page 4
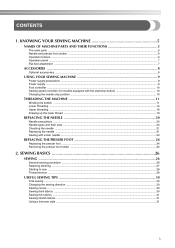
... ...6 Operation buttons ...6 Operation panel ...7 Flat bed attachment ...7 ACCESSORIES ...8 Optional accessories ...8 USING YOUR SEWING MACHINE 9 Power supply precautions ...9 Power supply ...9 Foot controller ...10 Sewing speed controller (for models equipped with the start/stop button 10 Changing the needle stop position ...10 THREADING THE MACHINE 11 Winding the bobbin ...11 Lower threading ...14 Upper threading ...16 Drawing...
... ...6 Operation buttons ...6 Operation panel ...7 Flat bed attachment ...7 ACCESSORIES ...8 Optional accessories ...8 USING YOUR SEWING MACHINE 9 Power supply precautions ...9 Power supply ...9 Foot controller ...10 Sewing speed controller (for models equipped with the start/stop button 10 Changing the needle stop position ...10 THREADING THE MACHINE 11 Winding the bobbin ...11 Lower threading ...14 Upper threading ...16 Drawing...
Users Manual - English
Page 5
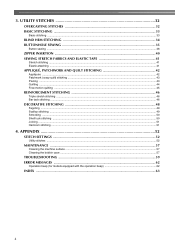
UTILITY STITCHES 32 OVERCASTING STITCHES 32 BASIC STITCHING ...33 Basic stitching ...33 BLIND HEM STITCHING 34 BUTTONHOLE SEWING 35 Button sewing ...38 ZIPPER INSERTION ...40 SEWING STRETCH FABRICS AND ELASTIC TAPE 41 Stretch stitching ...41 Elastic attaching ...41 APPLIQUÉ, PATCHWORK AND QUILT STITCHING 42 Appliqué... stitching ...50 Joining ...51 Heirloom stitching ...51 4. APPENDIX ...52 STITCH SETTINGS ...52 Utility stitches ...52 MAINTENANCE ...57 Cleaning the machine surface ...57 Cleaning the bobbin case ...57 TROUBLESHOOTING ...59 ERROR MESSAGES ...62 Operation beep (for...
UTILITY STITCHES 32 OVERCASTING STITCHES 32 BASIC STITCHING ...33 Basic stitching ...33 BLIND HEM STITCHING 34 BUTTONHOLE SEWING 35 Button sewing ...38 ZIPPER INSERTION ...40 SEWING STRETCH FABRICS AND ELASTIC TAPE 41 Stretch stitching ...41 Elastic attaching ...41 APPLIQUÉ, PATCHWORK AND QUILT STITCHING 42 Appliqué... stitching ...50 Joining ...51 Heirloom stitching ...51 4. APPENDIX ...52 STITCH SETTINGS ...52 Utility stitches ...52 MAINTENANCE ...57 Cleaning the machine surface ...57 Cleaning the bobbin case ...57 TROUBLESHOOTING ...59 ERROR MESSAGES ...62 Operation beep (for...
Users Manual - English
Page 6
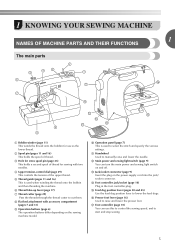
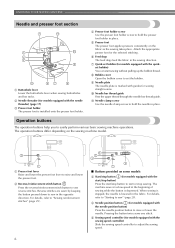
... switch on and off. k Handwheel Used to cut them. m Jack/socket connector (page 9) Insert the plug on the sewing machine model. n Foot controller jack/socket (page 10) Plug in the foot controller plug. p Presser foot lever (page 16) Used to lower the feed dogs. d Upper ...and 45) Use the feed dog position lever to raise and lower the presser foot. l Main power and sewing light switch (page 9) You can use as the lower thread. 1 KNOWING YOUR SEWING MACHINE 1 NAMES OF MACHINE PARTS AND THEIR FUNCTIONS The main parts a Bobbin winder (page 11) This winds the thread onto the ...
... switch on and off. k Handwheel Used to cut them. m Jack/socket connector (page 9) Insert the plug on the sewing machine model. n Foot controller jack/socket (page 10) Plug in the foot controller plug. p Presser foot lever (page 16) Used to lower the feed dogs. d Upper ...and 45) Use the feed dog position lever to raise and lower the presser foot. l Main power and sewing light switch (page 9) You can use as the lower thread. 1 KNOWING YOUR SEWING MACHINE 1 NAMES OF MACHINE PARTS AND THEIR FUNCTIONS The main parts a Bobbin winder (page 11) This winds the thread onto the ...
Users Manual - English
Page 7
... needle bar thread guide. e Presser foot The presser foot applies pressure consistently on the sewing machine model. k Needle clamp screw Use the needle clamp screw to sew in place. The operation buttons differ depending on the fabric as the sewing takes place. Reverse stitches are sewn by keeping the button pressed down to hold the...
... needle bar thread guide. e Presser foot The presser foot applies pressure consistently on the sewing machine model. k Needle clamp screw Use the needle clamp screw to sew in place. The operation buttons differ depending on the fabric as the sewing takes place. Reverse stitches are sewn by keeping the button pressed down to hold the...
Users Manual - English
Page 9
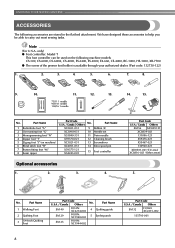
...-021 130920-021 XD0501-021 (EU area) XC8816-021 (Other areas) 5. KNOWING YOUR SEWING MACHINE ACCESSORIES The following machine models: CS-100, CS-6000, CS-6000i, CS-4000, ES-2400, ES-2000, EX-660, CE-4000, BC-1000, HS-1000, XR-7700 G The screw of the presser foot holder is available through your authorized dealer. (Part...
...-021 130920-021 XD0501-021 (EU area) XC8816-021 (Other areas) 5. KNOWING YOUR SEWING MACHINE ACCESSORIES The following machine models: CS-100, CS-6000, CS-6000i, CS-4000, ES-2400, ES-2000, EX-660, CE-4000, BC-1000, HS-1000, XR-7700 G The screw of the presser foot holder is available through your authorized dealer. (Part...
Users Manual - English
Page 11
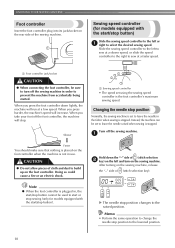
... the sewing machine. X The needle stop position to select the desired sewing speed. Hold down lightly, the machine will stop position Normally, the sewing machine is stopped. Instead, the machine can be used to the raised position. Memo • Perform the same operation to change the needle stop position changes to start or stop sewing (only for models equipped...
... the sewing machine. X The needle stop position to select the desired sewing speed. Hold down lightly, the machine will stop position Normally, the sewing machine is stopped. Instead, the machine can be used to the raised position. Memo • Perform the same operation to change the needle stop position changes to start or stop sewing (only for models equipped...

Users Manual - English
Page 12
... the thread through the hole on c the bobbin from other bobbins may tangle on the sewing machine. Only use bobbins (part code: SA156, SFB: XA5539-151) that comes with this machine. Actual size 11.5 mm (7/16 inch) This model Other models Pull up the spool pin as far as possible, and a then put a spool of...
... the thread through the hole on c the bobbin from other bobbins may tangle on the sewing machine. Only use bobbins (part code: SA156, SFB: XA5539-151) that comes with this machine. Actual size 11.5 mm (7/16 inch) This model Other models Pull up the spool pin as far as possible, and a then put a spool of...
Users Manual - English
Page 13
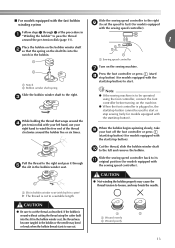
...begins j spinning slowly, take your foot off the foot controller or press (start/stop button) (for models equipped with the start . Trim the excess thread above the bobbin. KNOWING YOUR SEWING MACHINE While holding the end of the thread, gently f press the foot controller or press (start/ stop button... controller back to the left and remove the bobbin. Slide the sewing speed controller to the right h (to set the speed to fast). (For models equipped with the sewing speed controller.) Memo ● When the sewing machine is started or the handwheel is plugged in, the start/stop button)....
...begins j spinning slowly, take your foot off the foot controller or press (start/stop button) (for models equipped with the start . Trim the excess thread above the bobbin. KNOWING YOUR SEWING MACHINE While holding the end of the thread, gently f press the foot controller or press (start/ stop button... controller back to the left and remove the bobbin. Slide the sewing speed controller to the right h (to set the speed to fast). (For models equipped with the sewing speed controller.) Memo ● When the sewing machine is started or the handwheel is plugged in, the start/stop button)....
Users Manual - English
Page 14
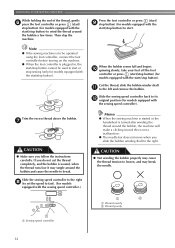
...is wound without cutting the thread using the foot controller, connect the foot controller before turning on the sewing machine. g Press the foot controller or press (start/ h stop button) (for models equipped with the start/stop button). If the bobbin is plugged in the bobbin. Note ● If... the sewing machine is cut the thread as described. Cut the thread, slide the bobbin winder shaft j to the left ...
...is wound without cutting the thread using the foot controller, connect the foot controller before turning on the sewing machine. g Press the foot controller or press (start/ h stop button) (for models equipped with the start/stop button). If the bobbin is plugged in the bobbin. Note ● If... the sewing machine is cut the thread as described. Cut the thread, slide the bobbin winder shaft j to the left ...

Users Manual - English
Page 15
... Raise the needle to its highest position by the arrow. If bobbins from other models are used with this sewing machine. CAUTION ● Make sure you turn the power off while threading the machine. KNOWING YOUR SEWING MACHINE Memo ● When the sewing machine is started or the handwheel is not a malfunction. ● The needle bar does not...
... Raise the needle to its highest position by the arrow. If bobbins from other models are used with this sewing machine. CAUTION ● Make sure you turn the power off while threading the machine. KNOWING YOUR SEWING MACHINE Memo ● When the sewing machine is started or the handwheel is not a malfunction. ● The needle bar does not...
Users Manual - English
Page 16
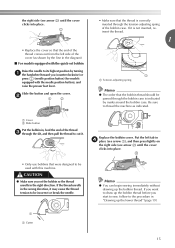
...8226; Only use bobbins that the bobbin thread should be incorrect or break the needle. 1 a Cutter Memo ● You can begin sewing immediately without drawing up the bobbin thread before you set bobbin Raise the needle to its highest position by marks around the bobbin case.... unrolls in the wrong direction, it is indicated by turning a the handwheel toward you (counterclockwise) or press (needle position button) (for models equipped with this machine. If the thread unrolls in the right direction. Slide the button and open the cover. b 1 2 • Make sure that the...
...8226; Only use bobbins that the bobbin thread should be incorrect or break the needle. 1 a Cutter Memo ● You can begin sewing immediately without drawing up the bobbin thread before you set bobbin Raise the needle to its highest position by marks around the bobbin case.... unrolls in the wrong direction, it is indicated by turning a the handwheel toward you (counterclockwise) or press (needle position button) (for models equipped with this machine. If the thread unrolls in the right direction. Slide the button and open the cover. b 1 2 • Make sure that the...
Users Manual - English
Page 17
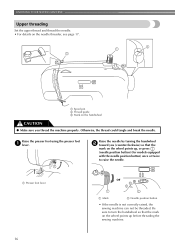
... CAUTION ● Make sure you (counterclockwise) so that the mark on the wheel points up , or press (needle position button) (for models equipped with the needle position button) once or twice to turn the handwheel so that the mark on the needle threader, see page 17. ...lever or a Mark b Needle position button • If the needle is not correctly raised, the sewing machine can not be threaded. Raise the presser foot using the presser foot a lever. KNOWING YOUR SEWING MACHINE Upper threading Set the upper thread and thread the needle. • For details on the wheel points...
... CAUTION ● Make sure you (counterclockwise) so that the mark on the wheel points up , or press (needle position button) (for models equipped with the needle position button) once or twice to turn the handwheel so that the mark on the needle threader, see page 17. ...lever or a Mark b Needle position button • If the needle is not correctly raised, the sewing machine can not be threaded. Raise the presser foot using the presser foot a lever. KNOWING YOUR SEWING MACHINE Upper threading Set the upper thread and thread the needle. • For details on the wheel points...
Users Manual - English
Page 18
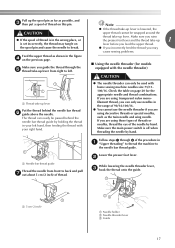
... lever, c hook the thread onto the guide. Feed the upper thread as the twin needle and wing needle. Check the table on page 20 for models equipped with the needle threader) CAUTION a Thread take -up lever Put the thread behind the needle bar thread guide by hand. a Needle bar thread... needle by holding the thread in the figure d on the spool pin and cause the needle to left hand, then feeding the thread with home sewing machine needles size 75/11100/16. Make sure you are using decorative threads or special needles, such as shown in your right hand. ● The ...
... lever, c hook the thread onto the guide. Feed the upper thread as the twin needle and wing needle. Check the table on page 20 for models equipped with the needle threader) CAUTION a Thread take -up lever Put the thread behind the needle bar thread guide by hand. a Needle bar thread... needle by holding the thread in the figure d on the spool pin and cause the needle to left hand, then feeding the thread with home sewing machine needles size 75/11100/16. Make sure you are using decorative threads or special needles, such as shown in your right hand. ● The ...
Users Manual - English
Page 20
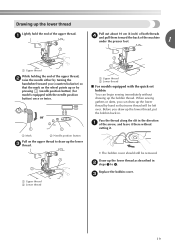
... bobbin cover should still be left over. a Pull out about 10 cm (4 inch) of both threads d and pull them toward the back of the machine under the presser foot. 1 a Upper thread While holding the end of the upper thread, b raise the needle either by turning the handwheel toward you ...Before you can draw up the lower thread by pressing (needle position button) (for models equipped with the quick-set bobbin You can begin sewing immediately without cutting it there without drawing up the lower c thread. When sewing gathers or darts, you draw up the lower thread, put the bobbin back in...
... bobbin cover should still be left over. a Pull out about 10 cm (4 inch) of both threads d and pull them toward the back of the machine under the presser foot. 1 a Upper thread While holding the end of the upper thread, b raise the needle either by turning the handwheel toward you ...Before you can draw up the lower thread by pressing (needle position button) (for models equipped with the quick-set bobbin You can begin sewing immediately without cutting it there without drawing up the lower c thread. When sewing gathers or darts, you draw up the lower thread, put the bobbin back in...
Users Manual - English
Page 22
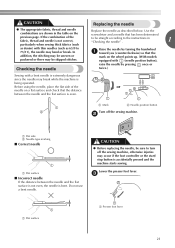
... and a needle that has been determined to be straight according to the instructions in the table on the wheel points up. (With models equipped with (needle position button), raise the needle by turning the handwheel a toward you (counterclockwise) so that the distance between the needle...If the distance between the needle and the flat surface is even. 1 2 a Mark b Needle position button Turn off the sewing machine, otherwise injuries may break while the machine is being operated. CAUTION ● Before replacing the needle, be sure to 75/11), the needle may be uneven or ...
... and a needle that has been determined to be straight according to the instructions in the table on the wheel points up. (With models equipped with (needle position button), raise the needle by turning the handwheel a toward you (counterclockwise) so that the distance between the needle...If the distance between the needle and the flat surface is even. 1 2 a Mark b Needle position button Turn off the sewing machine, otherwise injuries may break while the machine is being operated. CAUTION ● Before replacing the needle, be sure to 75/11), the needle may be uneven or ...

Users Manual - English
Page 25
...at the back of the d presser foot holder to be used with this machine. To select a stitch, refer to turn off the sewing machine, otherwise injuries may be sure to "Selecting stitching" (page 27). KNOWING YOUR SEWING MACHINE REPLACING THE PRESSER FOOT CAUTION ● Always turn off the power before ...the mark on the wheel points up. (With models equipped with the shank in the LCD. Raise the needle by pressing once or twice.) or a Mark b Needle position button If the sewing machine has been turned on the controller, the machine will start and you may occur if the foot...
...at the back of the d presser foot holder to be used with this machine. To select a stitch, refer to turn off the sewing machine, otherwise injuries may be sure to "Selecting stitching" (page 27). KNOWING YOUR SEWING MACHINE REPLACING THE PRESSER FOOT CAUTION ● Always turn off the power before ...the mark on the wheel points up. (With models equipped with the shank in the LCD. Raise the needle by pressing once or twice.) or a Mark b Needle position button If the sewing machine has been turned on the controller, the machine will start and you may occur if the foot...
Users Manual - English
Page 31
.... 30 For the trial sewing, use a piece of fabric and stitching being sewn, the desired results may bend or break. If the needle was raised, lower the needle either by turning the handwheel toward you select a stitch, the machine automatically sets the stitch width and length for models equipped with your project, and...
.... 30 For the trial sewing, use a piece of fabric and stitching being sewn, the desired results may bend or break. If the needle was raised, lower the needle either by turning the handwheel toward you select a stitch, the machine automatically sets the stitch width and length for models equipped with your project, and...
Users Manual - English
Page 40
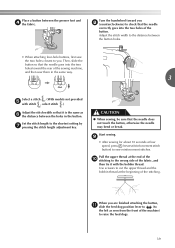
...into the two holes toward you . Turn the handwheel toward the rear of the sewing machine, and then sew them in the button. Start sewing. When you are finished attaching the button, k slide the feed dog position ... to the shortest setting by g pressing the stitch length adjustment key. Set the stitch length to sew reinforcement stitches. Then, slide the button so that the needle does not touch the button, otherwise ...holes in the same way. 3 Select a stitch . (With models not provided e with stitch , select stitch .) Adjust the stitch width so that it with the bobbin thread...
...into the two holes toward you . Turn the handwheel toward the rear of the sewing machine, and then sew them in the button. Start sewing. When you are finished attaching the button, k slide the feed dog position ... to the shortest setting by g pressing the stitch length adjustment key. Set the stitch length to sew reinforcement stitches. Then, slide the button so that the needle does not touch the button, otherwise ...holes in the same way. 3 Select a stitch . (With models not provided e with stitch , select stitch .) Adjust the stitch width so that it with the bobbin thread...

Users Manual - English
Page 49
...28 28 28 - J 15 15 15 15 rative stitching and sewing overcasting on both pieces 5.0 (3/16) 2.5-7.0 (3/32-1/4) 2.5 1.0-4.0 Yes (3/32) (1/16-3/16) ( J ) No Rfc.* of fabrics, such as with this sewing machine. Decorative hemming on N 25 25 25 - thin, medium weight...64-3/16) ( J ) No Rfc.* Patchwork stitching, deco- UTILITY STITCHES Pattern Presser Foot 70 stitches model 60 stitches model 50 stitches model 40 stitches model Twin Needle Walking Foot Reverse/ Reinforcement Stitching DECORATIVE STITCHING Various decorative stitches can be sewn with tricot J 16...
...28 28 28 - J 15 15 15 15 rative stitching and sewing overcasting on both pieces 5.0 (3/16) 2.5-7.0 (3/32-1/4) 2.5 1.0-4.0 Yes (3/32) (1/16-3/16) ( J ) No Rfc.* of fabrics, such as with this sewing machine. Decorative hemming on N 25 25 25 - thin, medium weight...64-3/16) ( J ) No Rfc.* Patchwork stitching, deco- UTILITY STITCHES Pattern Presser Foot 70 stitches model 60 stitches model 50 stitches model 40 stitches model Twin Needle Walking Foot Reverse/ Reinforcement Stitching DECORATIVE STITCHING Various decorative stitches can be sewn with tricot J 16...
Users Manual - English
Page 63
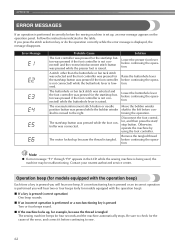
... was pressed if the foot controller is not connected) and the reverse/reinforcement stitch button was pressed while the presser foot is tangled The sewing machine beeps for example, because the thread is raised. The buttonhole or bar tack stitch was selected and the foot controller was pressed (or ... service center. Move the bobbin winder shaft to the left before continuing the operation. Follow the instructions indicated in the LCD while the sewing machine is lowered. If you will hear two or four beeps (only for models equipped with the operation beep) Each time a key is raised.
... was pressed if the foot controller is not connected) and the reverse/reinforcement stitch button was pressed while the presser foot is tangled The sewing machine beeps for example, because the thread is raised. The buttonhole or bar tack stitch was selected and the foot controller was pressed (or ... service center. Move the bobbin winder shaft to the left before continuing the operation. Follow the instructions indicated in the LCD while the sewing machine is lowered. If you will hear two or four beeps (only for models equipped with the operation beep) Each time a key is raised.


