

Accessory Catalog
Page 4
...foot so that the needle fits on the opening on the edge of zipper/piping, avoiding the non-flat parts of zipper/piping, and presses the fabric with a screwdriver. 5. Adjustable Zipper & Piping Foot Brother General Sewing Accessories 06 Adjustable Zipper & Piping Foot Attaches zippers and pipings easily. Its position can be ... sewing machines. Position the presser foot over the long feed dogs on the presser foot and select a straight stitch (left or right. 3. SA161 All Brother home-use sewing machines www.brother.com Brother General Sewing Accessories 05 Sew as you like.
...foot so that the needle fits on the opening on the edge of zipper/piping, avoiding the non-flat parts of zipper/piping, and presses the fabric with a screwdriver. 5. Adjustable Zipper & Piping Foot Brother General Sewing Accessories 06 Adjustable Zipper & Piping Foot Attaches zippers and pipings easily. Its position can be ... sewing machines. Position the presser foot over the long feed dogs on the presser foot and select a straight stitch (left or right. 3. SA161 All Brother home-use sewing machines www.brother.com Brother General Sewing Accessories 05 Sew as you like.

Accessory Catalog
Page 6
... front and roll it into the fabric approximately 1/8" from fraying. 1. Slowly sew 2-3 stitches, making sure the fabric is rolling around the curled part of the foot. 6. Place the fabric with the wrong side facing up under the presser foot. 3. Increase upper thread tension. 2. Sews overcast...3. Select a desired stitch and sew. Lower the presser foot so that the foot guide is Project Book (See page 53 for details.) www.brother.com Place the fabric with the wrong side facing up under the presser foot. 2. Raise the needle and the presser foot. 5. Raise the ...
... front and roll it into the fabric approximately 1/8" from fraying. 1. Slowly sew 2-3 stitches, making sure the fabric is rolling around the curled part of the foot. 6. Place the fabric with the wrong side facing up under the presser foot. 3. Increase upper thread tension. 2. Sews overcast...3. Select a desired stitch and sew. Lower the presser foot so that the foot guide is Project Book (See page 53 for details.) www.brother.com Place the fabric with the wrong side facing up under the presser foot. 2. Raise the needle and the presser foot. 5. Raise the ...
Users Manual - English and Spanish
Page 2
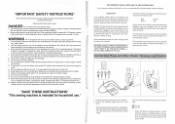
... COLORED GREEN OR YELLOW. "IMPORTANT SAFETY INSTRUCTIONS" When using the sewing machine, basic safety precautions should always be followed, including the following: "Read all moving parts. WARNING To reduce the risk of lint, dust and loose cloth. 5. To disconnect, turn the main switch to be cut off , then remove plug from...
... COLORED GREEN OR YELLOW. "IMPORTANT SAFETY INSTRUCTIONS" When using the sewing machine, basic safety precautions should always be followed, including the following: "Read all moving parts. WARNING To reduce the risk of lint, dust and loose cloth. 5. To disconnect, turn the main switch to be cut off , then remove plug from...
Users Manual - English and Spanish
Page 6
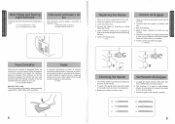
Retire el enchufe de alimentacion de la toma de corriente. 2. lntroduzca otra aguja, con la parte redonda cara a usted. Care should be used for smooth sewing. 2. only): This foot controller can be taken that nothing is placed on (toward the "I" mark) C) ... el pedal, la maquina funcionara a baja velocidad. Asegurese siempre de no poner ningan objeto sobre el pedal cuando la maquina no este doblada, coloque la parte plana de la aguja hacia abajo como muestra el dibujo. 3. Lower the presser foot. 4. Remove the needle by loosening the needle clamp with its highest...
Retire el enchufe de alimentacion de la toma de corriente. 2. lntroduzca otra aguja, con la parte redonda cara a usted. Care should be used for smooth sewing. 2. only): This foot controller can be taken that nothing is placed on (toward the "I" mark) C) ... el pedal, la maquina funcionara a baja velocidad. Asegurese siempre de no poner ningan objeto sobre el pedal cuando la maquina no este doblada, coloque la parte plana de la aguja hacia abajo como muestra el dibujo. 3. Lower the presser foot. 4. Remove the needle by loosening the needle clamp with its highest...
Users Manual - English and Spanish
Page 11
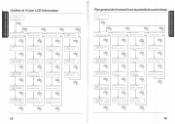
... B1)AGUJA SE ROMPE A4)TEJIDO-HILO-AGUJA B1)TEJIDO NORMAL V 1)COLOCAR EL PRENSATELAS PARA OJALES (A) A2)MAQUINA EN USO B2)CAMBIO CANILLA V 2)PETIRAR LA PARTE ATRAS DEL PRENSATELAS COLOCAR EL BOTON Y FIJAR A2)MAQUINA EN USO B3)ENHEBRA ARRIBA V 3)BAJAR LA PALANCA PARA OJALES Y APRE TAR HACIA ATRAS A2)MAQUINA...
... B1)AGUJA SE ROMPE A4)TEJIDO-HILO-AGUJA B1)TEJIDO NORMAL V 1)COLOCAR EL PRENSATELAS PARA OJALES (A) A2)MAQUINA EN USO B2)CAMBIO CANILLA V 2)PETIRAR LA PARTE ATRAS DEL PRENSATELAS COLOCAR EL BOTON Y FIJAR A2)MAQUINA EN USO B3)ENHEBRA ARRIBA V 3)BAJAR LA PALANCA PARA OJALES Y APRE TAR HACIA ATRAS A2)MAQUINA...
Users Manual - English and Spanish
Page 35
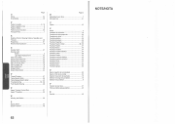
0 Oiling Overedging Page 54 40 P Pattern Lengths Pattern Selection Dial Pattern Widths Performance Checklist Principal Parts 9, 18 8 9 56 1 R Relative Chart of Sewing Fabrics, Needles and Threads 28 Repacking 61 Reverse Sewing Button 19 S Scallop Stitch 37 ...Sewing Light Switch 5 Light Bulb Replacement 53 Shell Tuck Stitch 35 Shuttle Hook Removal 55 Shuttle Race Cleaning 55 Slant Overlock Stitch 40 Stitch ...
0 Oiling Overedging Page 54 40 P Pattern Lengths Pattern Selection Dial Pattern Widths Performance Checklist Principal Parts 9, 18 8 9 56 1 R Relative Chart of Sewing Fabrics, Needles and Threads 28 Repacking 61 Reverse Sewing Button 19 S Scallop Stitch 37 ...Sewing Light Switch 5 Light Bulb Replacement 53 Shell Tuck Stitch 35 Shuttle Hook Removal 55 Shuttle Race Cleaning 55 Slant Overlock Stitch 40 Stitch ...

