

Accessory Catalog
Page 4
...the clamp screw with just right pressure. 1. Sew. Its position can be adjusted exactly on the edge of zipper/piping, avoiding the non-flat parts of the presser foot and slide the presser foot so that the needle fits on the opening on either left ). 2. Loosen the clamp screw...presser foot over the long feed dogs on the presser foot. 4. Requires Low Shank Adapter for ULT series, PC-6500, PC-8200 and PC-8500 sewing machines. SA161 All Brother home-use sewing machines www.brother.com Use these utility presser feet and accessories to add a professional finish to your sewing projects....
...the clamp screw with just right pressure. 1. Sew. Its position can be adjusted exactly on the edge of zipper/piping, avoiding the non-flat parts of the presser foot and slide the presser foot so that the needle fits on the opening on either left ). 2. Loosen the clamp screw...presser foot over the long feed dogs on the presser foot. 4. Requires Low Shank Adapter for ULT series, PC-6500, PC-8200 and PC-8500 sewing machines. SA161 All Brother home-use sewing machines www.brother.com Use these utility presser feet and accessories to add a professional finish to your sewing projects....

Accessory Catalog
Page 6
... from the edge and sew 2-3 stitches. 3. Slowly sew 2-3 stitches, making sure the fabric is Project Book (See page 53 for details.) www.brother.com Increase upper thread tension. 2. Select an overlock stitch. 2. Lower the needle into the fabric approximately 1/8" from the back and front and roll it... into the curled part of the foot. 7. Sews overcast seams to the end of the fabric behind the needle and lower the presser foot. 6. Brother General Sewing Accessories 09 Narrow Hemmer Foot Non Stick Foot Overlock Foot Picot ...
... from the edge and sew 2-3 stitches. 3. Slowly sew 2-3 stitches, making sure the fabric is Project Book (See page 53 for details.) www.brother.com Increase upper thread tension. 2. Select an overlock stitch. 2. Lower the needle into the fabric approximately 1/8" from the back and front and roll it... into the curled part of the foot. 7. Sews overcast seams to the end of the fabric behind the needle and lower the presser foot. 6. Brother General Sewing Accessories 09 Narrow Hemmer Foot Non Stick Foot Overlock Foot Picot ...
Users Manual - English
Page 2
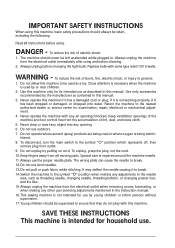
... same type rated 12V 5 watts. IMPORTANT SAFETY INSTRUCTIONS When using this machine, basic safety precautions should always be taken, including the following: Read all moving parts. Always unplug the machine from the accumulation of burns, fire, electric shock, or injury to be used as threading needle, changing needle, threading bobbin, or...
... same type rated 12V 5 watts. IMPORTANT SAFETY INSTRUCTIONS When using this machine, basic safety precautions should always be taken, including the following: Read all moving parts. Always unplug the machine from the accumulation of burns, fire, electric shock, or injury to be used as threading needle, changing needle, threading bobbin, or...
Users Manual - English
Page 4
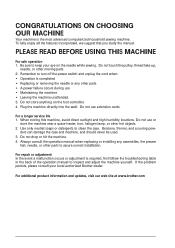
...the cord when: • Operation is completed • Replacing or removing the needle or any assemblies, the presser feet, needle, or other parts • A power failure occurs during use • Maintaining the machine • Leaving the machine unattended. 3. Always consult the operation manual.... PLEASE READ BEFORE USING THIS MACHINE For safe operation 1. For additional product information and updates, visit our web site at www.brother.com Introduction A-3 Plug the machine directly into the wall. CONGRATULATIONS ON CHOOSING OUR MACHINE Your machine is required, first follow the...
...the cord when: • Operation is completed • Replacing or removing the needle or any assemblies, the presser feet, needle, or other parts • A power failure occurs during use • Maintaining the machine • Leaving the machine unattended. 3. Always consult the operation manual.... PLEASE READ BEFORE USING THIS MACHINE For safe operation 1. For additional product information and updates, visit our web site at www.brother.com Introduction A-3 Plug the machine directly into the wall. CONGRATULATIONS ON CHOOSING OUR MACHINE Your machine is required, first follow the...
Users Manual - English
Page 7
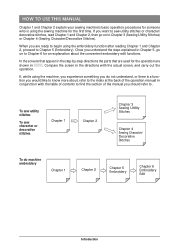
... go on to Chapter 3 (Sewing Utility Stitches) or Chapter 4 (Sewing Character/Decorative Stitches). In the screens that appear in the step-by-step directions the parts that are used for the operation are ready to begin using the sewing machine for the first time. To sew utility stitches To sew character...
... go on to Chapter 3 (Sewing Utility Stitches) or Chapter 4 (Sewing Character/Decorative Stitches). In the screens that appear in the step-by-step directions the parts that are used for the operation are ready to begin using the sewing machine for the first time. To sew utility stitches To sew character...
Users Manual - English
Page 8
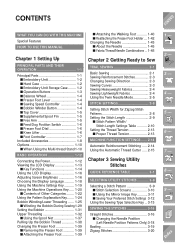
CONTENTS WHAT YOU CAN DO WITH THIS MACHINE Special Features HOW TO USE THIS MANUAL Chapter 1 Setting Up PRINCIPAL PARTS AND THEIR OPERATION 1-1 Principal Parts 1-1 s Embroidery Unit 1-2 s Hard Case 1-2 s Embroidery Unit Storage Case ........ 1-2 s Operation Buttons 1-3 s Balance Wheel 1-4 s Presser Foot Lever 1-4 s Sewing Speed Controller 1-4 s Bobbin Winder Button 1-4 s Top Cover 1-5 s Supplemental Spool ...
CONTENTS WHAT YOU CAN DO WITH THIS MACHINE Special Features HOW TO USE THIS MANUAL Chapter 1 Setting Up PRINCIPAL PARTS AND THEIR OPERATION 1-1 Principal Parts 1-1 s Embroidery Unit 1-2 s Hard Case 1-2 s Embroidery Unit Storage Case ........ 1-2 s Operation Buttons 1-3 s Balance Wheel 1-4 s Presser Foot Lever 1-4 s Sewing Speed Controller 1-4 s Bobbin Winder Button 1-4 s Top Cover 1-5 s Supplemental Spool ...
Users Manual - English
Page 10
... the Completed Pattern ...... 5-28 SEWING AN EMBROIDERY PATTERN 5-29 Sewing Attractive Finishes 5-29 s Needle Plate Cover 5-29 Basic Embroidery Method 5-30 s Embroidering Order for Pattern Parts .. 5-32 Sewing Embroidery Patterns Which Use Appliqu 5-33 s Directions for Appliqu 5-33 ADJUSTMENTS DURING THE EMBROIDERY PROCESS 5-35 The Bobbin Runs Out of Thread .......... 5-35...
... the Completed Pattern ...... 5-28 SEWING AN EMBROIDERY PATTERN 5-29 Sewing Attractive Finishes 5-29 s Needle Plate Cover 5-29 Basic Embroidery Method 5-30 s Embroidering Order for Pattern Parts .. 5-32 Sewing Embroidery Patterns Which Use Appliqu 5-33 s Directions for Appliqu 5-33 ADJUSTMENTS DURING THE EMBROIDERY PROCESS 5-35 The Bobbin Runs Out of Thread .......... 5-35...
Users Manual - English
Page 11
... 6-32 s If You Can Not Save the Pattern .... 6-33 Retrieving Saved Patterns 6-36 ENTERING STITCH DATA 7-3 Creating Stitch Data 7-3 Editing Stitch Data 7-6 s Moving a Point 7-7 s Moving Part or All of the Design ..... 7-8 s Inserting New Points 7-9 MEMORY FUNCTIONS 7-11 Storing the custom design 7-11 Retrieving a Stitch Design That Has Been Saved 7-13 1 - 2 - 3 -
... 6-32 s If You Can Not Save the Pattern .... 6-33 Retrieving Saved Patterns 6-36 ENTERING STITCH DATA 7-3 Creating Stitch Data 7-3 Editing Stitch Data 7-6 s Moving a Point 7-7 s Moving Part or All of the Design ..... 7-8 s Inserting New Points 7-9 MEMORY FUNCTIONS 7-11 Storing the custom design 7-11 Retrieving a Stitch Design That Has Been Saved 7-13 1 - 2 - 3 -
Users Manual - English
Page 12
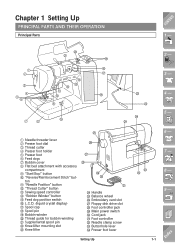
... 5 Presser foot 6 Feed dogs 7 Bobbin cover 8 Flat bed attachment with accessory compartment 9 "Start/Stop" button = "Reverse/Reinforcement Stitch" but- Chapter 1 Setting Up PRINCIPAL PARTS AND THEIR OPERATION Principal Parts CONTENTS 1 - ton A "Needle Position" button B "Thread Cutter" button C Sewing speed controller D "Bobbin Winder" button E Feed dog position switch F L.C.D. (liquid crystal display) G Spool cap...
... 5 Presser foot 6 Feed dogs 7 Bobbin cover 8 Flat bed attachment with accessory compartment 9 "Start/Stop" button = "Reverse/Reinforcement Stitch" but- Chapter 1 Setting Up PRINCIPAL PARTS AND THEIR OPERATION Principal Parts CONTENTS 1 - ton A "Needle Position" button B "Thread Cutter" button C Sewing speed controller D "Bobbin Winder" button E Feed dog position switch F L.C.D. (liquid crystal display) G Spool cap...
Users Manual - English
Page 19
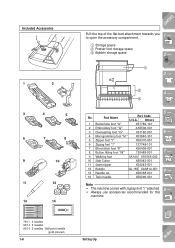
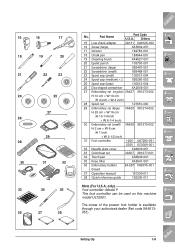
... Side Cutter X80943-001 11 Seam ripper X54243-001 12 Bobbin SA-155 XA3812-051 13 Needle set X58358-001 14 Twin needle X59296-001 5 - 6 - 7 - 8 - Part Name Part Code U.S.A. Note • The machine comes with zigzag foot "J" attached. • Always use accessories recommended for this machine. 9 - ?! 75/11 2 needles 90/14 2 needles...
... Side Cutter X80943-001 11 Seam ripper X54243-001 12 Bobbin SA-155 XA3812-051 13 Needle set X58358-001 14 Twin needle X59296-001 5 - 6 - 7 - 8 - Part Name Part Code U.S.A. Note • The machine comes with zigzag foot "J" attached. • Always use accessories recommended for this machine. 9 - ?! 75/11 2 needles 90/14 2 needles...
Users Manual - English
Page 20
... XA4813051). 1 - 2 - 3 - 4 - 5 - 6 - 7 - 8 - 9 - ?! Setting Up 1-9 Index only) Foot controller: Model P This foot controller can be used on this machine model ULT2001. Part Name Part Code U.S.A. Others 15 Low shank adapter SA131 XA6126-002 16 Screw (large) XA5904-051 17 Scissors 184783-001 18 Chalk pen 184944-001 19 Cleaning ...
... XA4813051). 1 - 2 - 3 - 4 - 5 - 6 - 7 - 8 - 9 - ?! Setting Up 1-9 Index only) Foot controller: Model P This foot controller can be used on this machine model ULT2001. Part Name Part Code U.S.A. Others 15 Low shank adapter SA131 XA6126-002 16 Screw (large) XA5904-051 17 Scissors 184783-001 18 Chalk pen 184944-001 19 Cleaning ...
Users Manual - English
Page 21
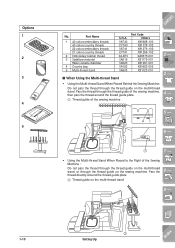
SA740 CYT40 SA741 CYT41 SA-BTS SA519 SA520 SA152 SA503 Part Code Others X80928-100 X81078-102 X81276-102 X81269-102 XA8375-001 X81175-001 X81267-001 X80922-002 X81123-001 s When Using the Multi-thread ... Right of the sewing machine, then pass the thread around the thread guide plate. 2 Thread guide on the multi-thread stand 8 - 9 - ?! 1-10 2 Setting Up Index Part Name 1 40 colors embroidery threads 40 colors country threads 22 colors embroidery threads 21 colors country threads 2 Embroidery bobbin thread 3 Stabilizer material Water soluble stabilizer...
SA740 CYT40 SA741 CYT41 SA-BTS SA519 SA520 SA152 SA503 Part Code Others X80928-100 X81078-102 X81276-102 X81269-102 XA8375-001 X81175-001 X81267-001 X80922-002 X81123-001 s When Using the Multi-thread ... Right of the sewing machine, then pass the thread around the thread guide plate. 2 Thread guide on the multi-thread stand 8 - 9 - ?! 1-10 2 Setting Up Index Part Name 1 40 colors embroidery threads 40 colors country threads 22 colors embroidery threads 21 colors country threads 2 Embroidery bobbin thread 3 Stabilizer material Water soluble stabilizer...

Users Manual - English
Page 22
Setting Up 1-11 Index No. Part Name 6 Embroidery card No. 1 Alphabet No. 2 Flower No. 3 Dinosaur No. 6 Moskowitz's World No. 7 Country Life No. 8 Holiday No. 9 Hobby Craft No. 10 Monogram Emblem No. ... No. 50 Fairy & Floral No. 52 Bear Collections No. 53 Scene No. 54 Tea Time No. 55 Gardening No. 56 Asian No. 57 Large Christmas Part Code U.S.A. Others SA298 SA299 SA300 SA303 SA304 SA305 SA306 SA307 SA311 SA312 SA313 SA314 SA315 SA316 SA319 SA320 SA321 SA322 SA323 SA325 SA327 SA328 SA329...
Setting Up 1-11 Index No. Part Name 6 Embroidery card No. 1 Alphabet No. 2 Flower No. 3 Dinosaur No. 6 Moskowitz's World No. 7 Country Life No. 8 Holiday No. 9 Hobby Craft No. 10 Monogram Emblem No. ... No. 50 Fairy & Floral No. 52 Bear Collections No. 53 Scene No. 54 Tea Time No. 55 Gardening No. 56 Asian No. 57 Large Christmas Part Code U.S.A. Others SA298 SA299 SA300 SA303 SA304 SA305 SA306 SA307 SA311 SA312 SA313 SA314 SA315 SA316 SA319 SA320 SA321 SA322 SA323 SA325 SA327 SA328 SA329...

Users Manual - English
Page 27
... press hard on the key. 1 - CAUTION Only touch the screen with your finger or the included touch pen. Adjusting Screen Brightness 6 - CAUTION • All or part of damage or malfunction.
... press hard on the key. 1 - CAUTION Only touch the screen with your finger or the included touch pen. Adjusting Screen Brightness 6 - CAUTION • All or part of damage or malfunction.
Users Manual - English
Page 31
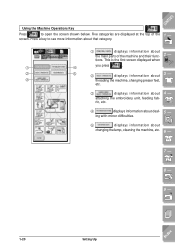
... of the machine and their func- 2 - Using the Machine Operations Key CONTENTS Press to see more information about that category. 1 displays information about the main parts of the 1 - screen.
... of the machine and their func- 2 - Using the Machine Operations Key CONTENTS Press to see more information about that category. 1 displays information about the main parts of the 1 - screen.
Users Manual - English
Page 56
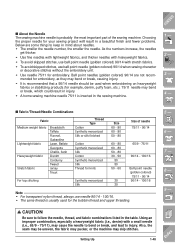
... fabric (i.e., denim) with stretch fabrics. • To avoid skipped stitches, use needle 90/14 - 100/16. • The same thread is probably the most important part of the sewing machine.
... fabric (i.e., denim) with stretch fabrics. • To avoid skipped stitches, use needle 90/14 - 100/16. • The same thread is probably the most important part of the sewing machine.

Users Manual - English
Page 58
.... • If stitches become bunched, lengthen the stitch length setting before continuing sew- Hold the fabric and thread ends in your hands away from moving parts while the machine is in injury. 4. Keep your left corner of the LCD display. Adjust the sewing speed with the speed control lever. * You can...
.... • If stitches become bunched, lengthen the stitch length setting before continuing sew- Hold the fabric and thread ends in your hands away from moving parts while the machine is in injury. 4. Keep your left corner of the LCD display. Adjust the sewing speed with the speed control lever. * You can...

Users Manual - English
Page 62
... the machine is in single needle mode could break, resulting in damage. • Be sure to Sew 2-5 Index Pass the thread through 3-8 for this machine (part code X59296-001). Before you select a stitch pattern, make sure the stitch can be used .
... the machine is in single needle mode could break, resulting in damage. • Be sure to Sew 2-5 Index Pass the thread through 3-8 for this machine (part code X59296-001). Before you select a stitch pattern, make sure the stitch can be used .

Users Manual - English
Page 87
The upper part of the screen displays a selection of overcasting stitches with explanations. Read the explanations and select the 1 - CONTENTS 3. appropriate stitch. 2 - 3 - 4 - 5 - 4. The screen displays directions for sewing the selected stitch. 6 - 7 - 8 - 9 - ?! 3-14 Sewing Utility Stitches Index
The upper part of the screen displays a selection of overcasting stitches with explanations. Read the explanations and select the 1 - CONTENTS 3. appropriate stitch. 2 - 3 - 4 - 5 - 4. The screen displays directions for sewing the selected stitch. 6 - 7 - 8 - 9 - ?! 3-14 Sewing Utility Stitches Index

Users Manual - English
Page 88
tion of the arrow selected. Press to scroll a larger section of the screen in the direction of arrow selected, and see the next part of the instructions. Press to scroll the screen in the direc- Sewing Utility Stitches 3-15 Index CONTENTS 5. Press to scroll the screen 1 line at any time to return to sew the stitch. * Press at a time, in the direction of the arrow selected. Follow the directions to the selection screen. 1 - 2 - 3 - 4 - 5 - 6 - 7 - 8 - 9 - ?!
tion of the arrow selected. Press to scroll a larger section of the screen in the direction of arrow selected, and see the next part of the instructions. Press to scroll the screen in the direc- Sewing Utility Stitches 3-15 Index CONTENTS 5. Press to scroll the screen 1 line at any time to return to sew the stitch. * Press at a time, in the direction of the arrow selected. Follow the directions to the selection screen. 1 - 2 - 3 - 4 - 5 - 6 - 7 - 8 - 9 - ?!


