
Users Guide
Page 2
... Setting Character Attributes 11 Setting Character Attributes by Label 11 Setting Character Attributes by Each Line 11 Setting Auto Fit Style...12 Setting Frames ...12 Tape Cutting Options ...13 LABEL PRINTING 15 Label Preview ...15 Printing a Label ...15 Printing a Single Page 16 Printing a Range of Pages 16 Printing Multiple Copies 16...
... Setting Character Attributes 11 Setting Character Attributes by Label 11 Setting Character Attributes by Each Line 11 Setting Auto Fit Style...12 Setting Frames ...12 Tape Cutting Options ...13 LABEL PRINTING 15 Label Preview ...15 Printing a Label ...15 Printing a Single Page 16 Printing a Range of Pages 16 Printing Multiple Copies 16...

Users Guide
Page 3
... Labeling System Keyboard..... 51 Resetting the Data Using the Menu Key 51 Maintenance ...52 Cleaning the Unit ...52 Cleaning the Print Head 52 Cleaning the Tape Cutter 52 TROUBLESHOOTING 53 1 What to do when...53 Error Messages ...55 2 APPENDIX...59 3 Specifications ...59 4 Symbols...61 Accented Characters...62 5 Character Attribute ...63 Frames...
... Labeling System Keyboard..... 51 Resetting the Data Using the Menu Key 51 Maintenance ...52 Cleaning the Unit ...52 Cleaning the Print Head 52 Cleaning the Tape Cutter 52 TROUBLESHOOTING 53 1 What to do when...53 Error Messages ...55 2 APPENDIX...59 3 Specifications ...59 4 Symbols...61 Accented Characters...62 5 Character Attribute ...63 Frames...

Users Guide
Page 4
...; Orientation: (Horizontal), (Vertical) 1 block 2 blocks CABLE WRAP Labels printed with this mode can specify the following items: - GENERAL Labels printed with Flexible ID Tape are six different types of the label or the label flag (2) should 2 be at least 0.12" (3 mm). 1 • The overlapping ends of labeling ... • Label Length: 2.0" (50 mm), 0.4" (10 mm) - 39.0" (999 mm) • # of data When using Flexible ID Tape: • Labels made with this mode can press the Shift key and then press the Enter key to identify various faceplates. In CABLE WRAP mode...
...; Orientation: (Horizontal), (Vertical) 1 block 2 blocks CABLE WRAP Labels printed with this mode can specify the following items: - GENERAL Labels printed with Flexible ID Tape are six different types of the label or the label flag (2) should 2 be at least 0.12" (3 mm). 1 • The overlapping ends of labeling ... • Label Length: 2.0" (50 mm), 0.4" (10 mm) - 39.0" (999 mm) • # of data When using Flexible ID Tape: • Labels made with this mode can press the Shift key and then press the Enter key to identify various faceplates. In CABLE WRAP mode...

Users Guide
Page 5
... various types of panels. EDITING A LABEL CABLE FLAG Labels printed with this mode can be wrapped around the cable. We recommend using Flexible ID Tape for use as electrical insulation. In this mode, you can specify the following items: • Block Length: 0.60" (15.0 mm), 0.20" ...to "On" at least 0.6" (15 mm) (Two different texts are not designed for Cable Flag labels. PATCH PANEL Labels printed with Flexible ID Tape are printed on each 1 Flag at the same time. 9 Selecting a Labeling Application Type 5 The text on Cable Flag labels is set to ...
... various types of panels. EDITING A LABEL CABLE FLAG Labels printed with this mode can be wrapped around the cable. We recommend using Flexible ID Tape for use as electrical insulation. In this mode, you can specify the following items: • Block Length: 0.60" (15.0 mm), 0.20" ...to "On" at least 0.6" (15 mm) (Two different texts are not designed for Cable Flag labels. PATCH PANEL Labels printed with Flexible ID Tape are printed on each 1 Flag at the same time. 9 Selecting a Labeling Application Type 5 The text on Cable Flag labels is set to ...

Users Guide
Page 6
... mm) However, the maximum printing length is broken. • The printed characters may be cut off when a line is 19.6" (500 mm) when using TZe tape.
... mm) However, the maximum printing length is broken. • The printed characters may be cut off when a line is 19.6" (500 mm) when using TZe tape.

Users Guide
Page 7
... cursor moves to the start of the new line. • Maximum number of lines - 0.94" (24 mm) tape: 7 lines - 0.70" (18 mm) tape: 5 lines - 0.47" (12 mm) tape: 3 lines - 0.35" (9 mm) and 0.23" (6 mm) tape: 2 lines - 0.13" (3.5 mm) tape: 1 line Adding a New Block • When GENERAL is 4 pressed. 5 If you can create up to 99...
... cursor moves to the start of the new line. • Maximum number of lines - 0.94" (24 mm) tape: 7 lines - 0.70" (18 mm) tape: 5 lines - 0.47" (12 mm) tape: 3 lines - 0.35" (9 mm) and 0.23" (6 mm) tape: 2 lines - 0.13" (3.5 mm) tape: 1 line Adding a New Block • When GENERAL is 4 pressed. 5 If you can create up to 99...

Users Guide
Page 13
... the OK or Enter key. • Press the Esc key to return to the previous step. • Refer to the Tape Cutting Options table for a list of all available settings. Tape Cutting Options No Full cut Half cut when printing labels. 1 Press the Menu key. 2 Select "Cut Option" using the... the OK or Enter key. 3 Set the value by using the or key, and then press the OK or Enter key to specify how the tape is fed and cut Chain Image 1 No Yes No 2 Yes Yes No 3 No No No 1 2 3 4 Yes No No 4 5 6 5 No Yes Yes...
... the OK or Enter key. • Press the Esc key to return to the previous step. • Refer to the Tape Cutting Options table for a list of all available settings. Tape Cutting Options No Full cut Half cut when printing labels. 1 Press the Menu key. 2 Select "Cut Option" using the... the OK or Enter key. 3 Set the value by using the or key, and then press the OK or Enter key to specify how the tape is fed and cut Chain Image 1 No Yes No 2 Yes Yes No 3 No No No 1 2 3 4 Yes No No 4 5 6 5 No Yes Yes...

Users Guide
Page 14
EDITING A LABEL No Full cut 6 Yes Half cut Yes Chain Yes Image 7 No No Yes 8 Yes No Yes 9 Special tape 14 Tape Cutting Options
EDITING A LABEL No Full cut 6 Yes Half cut Yes Chain Yes Image 7 No No Yes 8 Yes No Yes 9 Special tape 14 Tape Cutting Options
Users Guide
Page 15
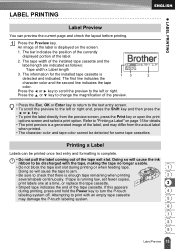
... there is 13 2 detected and indicated. If this appears during printing or when feeding tape. 1 Doing so will cause the ink ribbon to be detected for the installed tape cassette is enough tape remaining when printing 2 several labels continuously. The bar indicates the position of the currently ...or key. • To print the label directly from the actual label when printed. • The character color and tape color cannot be discharged with an empty tape cassette may differ from the preview screen, press the Print key or open the print options screen and select a print...
... there is 13 2 detected and indicated. If this appears during printing or when feeding tape. 1 Doing so will cause the ink ribbon to be detected for the installed tape cassette is enough tape remaining when printing 2 several labels continuously. The bar indicates the position of the currently ...or key. • To print the label directly from the actual label when printed. • The character color and tape color cannot be discharged with an empty tape cassette may differ from the preview screen, press the Print key or open the print options screen and select a print...
Users Guide
Page 16
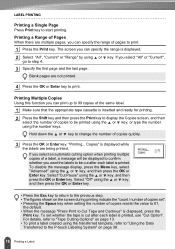
... want the labels to be displayed to confirm whether you can print up to 99 copies of the same label. 1 Make sure that the appropriate tape cassette is displayed while the labels are multiple pages, you can specify the range is printed, use "Cut Option". To disable the message display, press..., refer to "Using the Data Transferred to the P-touch Labeling System" on the screen during printing indicate the "count / number of copies set whether the tape is cut after each label is displayed, press the Print key. Blank pages are not printed. 4 Press the OK or Enter key to start printing...
... want the labels to be displayed to confirm whether you can print up to 99 copies of the same label. 1 Make sure that the appropriate tape cassette is displayed while the labels are multiple pages, you can specify the range is printed, use "Cut Option". To disable the message display, press..., refer to "Using the Data Transferred to the P-touch Labeling System" on the screen during printing indicate the "count / number of copies set whether the tape is cut after each label is displayed, press the Print key. Blank pages are not printed. 4 Press the OK or Enter key to start printing...

Users Guide
Page 17
... the label. 3 Position the label and then press firmly from these surfaces. • Be sure to read the instructions provided with Fabric Tapes, Extra Strength Adhesive Tapes or other special tapes and observe all precautions noted in the instructions. 1 2 3 4 5 6 7 8 9 Attaching Labels 17 The labels may peel off the backing one piece at a time...
... the label. 3 Position the label and then press firmly from these surfaces. • Be sure to read the instructions provided with Fabric Tapes, Extra Strength Adhesive Tapes or other special tapes and observe all precautions noted in the instructions. 1 2 3 4 5 6 7 8 9 Attaching Labels 17 The labels may peel off the backing one piece at a time...

Users Guide
Page 19
...Enter key. is displayed when you select "Range", specify the first page and the last page. • Press the Esc key to return to Cut Tape and Continue" is displayed, press the Print key. Deleting a Stored Label File To delete a label using the transferred template, refer to the previous screen..."Delete" using the or key and press the OK or Enter key. 2 The file number of a stored label is displayed. To set whether the tape is cut after each label is displayed. USING THE FILE MEMORY Printing a Stored Label File To print a label created using the transferred template,...
...Enter key. is displayed when you select "Range", specify the first page and the last page. • Press the Esc key to return to Cut Tape and Continue" is displayed, press the Print key. Deleting a Stored Label File To delete a label using the transferred template, refer to the previous screen..."Delete" using the or key and press the OK or Enter key. 2 The file number of a stored label is displayed. To set whether the tape is cut after each label is displayed. USING THE FILE MEMORY Printing a Stored Label File To print a label created using the transferred template,...

Users Guide
Page 52
...quality characters on difficult to remove marks. Use a slightly dampened cloth on printed labels generally indicates that the print head is dirty. Cleaning the Tape Cutter Tape adhesive can build up on the cutter blades after repeated use it. Clean the print head using a soft, dry cloth. Cleaning the Unit... Wipe any other organic solvent. These may result in the tape jamming. • About once every year, wipe the cutter blade using a dry cotton swab. • Do not touch the cutter blade directly with...
...quality characters on difficult to remove marks. Use a slightly dampened cloth on printed labels generally indicates that the print head is dirty. Cleaning the Tape Cutter Tape adhesive can build up on the cutter blades after repeated use it. Clean the print head using a soft, dry cloth. Cleaning the Unit... Wipe any other organic solvent. These may result in the tape jamming. • About once every year, wipe the cutter blade using a dry cotton swab. • Do not touch the cutter blade directly with...

Users Guide
Page 53
... to "Resetting the P-touch Labeling System" on page 13. 4 Alternatively, press the Feed & Cut key to feed and cut the tape. 5 A tape jam error which Please contact Brother customer service. 6 cannot be cleared Refer to the initial settings. displayed in the figure. 1. The label is not printed after turning ...8226; Check that the batteries are Refer to the Quick Setup Guide to do when... 53 For details, refer to "Tape Cutting Options" on page 51 and reset the internal memory to the Quick Setup Guide for more than 10 minutes. Problem Solution The screen "locks", or the P-touch ...
... to "Resetting the P-touch Labeling System" on page 13. 4 Alternatively, press the Feed & Cut key to feed and cut the tape. 5 A tape jam error which Please contact Brother customer service. 6 cannot be cleared Refer to the initial settings. displayed in the figure. 1. The label is not printed after turning ...8226; Check that the batteries are Refer to the Quick Setup Guide to do when... 53 For details, refer to "Tape Cutting Options" on page 51 and reset the internal memory to the Quick Setup Guide for more than 10 minutes. Problem Solution The screen "locks", or the P-touch ...

Users Guide
Page 54
...[Quality] options For Windows 8.1 / Windows Server 2012: To display the Quality options, open the printer properties by clicking Control Panel in the tape exit slot, the message is displayed. Press the Menu key, select "Version Info." Print head 2. Refer to the Quick Setup Guide for ...open the printer properties by clicking Start > Devices and Printers, right-clicking the printer you are aligned with [Standard] selected from Brother support website (support.brother.com) provided to confirm whether you want to set up , and then clicking Printing preferences. using the or key, and then...
...[Quality] options For Windows 8.1 / Windows Server 2012: To display the Quality options, open the printer properties by clicking Control Panel in the tape exit slot, the message is displayed. Press the Menu key, select "Version Info." Print head 2. Refer to the Quick Setup Guide for ...open the printer properties by clicking Start > Devices and Printers, right-clicking the printer you are aligned with [Standard] selected from Brother support website (support.brother.com) provided to confirm whether you want to set up , and then clicking Printing preferences. using the or key, and then...
Users Guide
Page 55
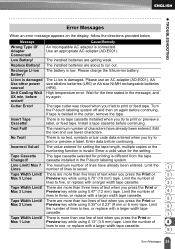
...7 The maximum number of characters have already been entered. Limit the number of 4 lines to two, or replace with a larger width tape cassette. There is twisted in the P-touch labeling system. The installed batteries are getting weak. Text Full! The maximum number of lines ...stated in the message, and XX min. Limit the number of lines to three, or replace with a larger width tape 6 cassette. 7 Tape Width Limit! Battery! Insert Tape Cassette! TROUBLESHOOTING Error Messages When an error message appears on again before try again. Message Wrong Type Of ...
...7 The maximum number of characters have already been entered. Limit the number of 4 lines to two, or replace with a larger width tape cassette. There is twisted in the P-touch labeling system. The installed batteries are getting weak. Text Full! The maximum number of lines ...stated in the message, and XX min. Limit the number of lines to three, or replace with a larger width tape 6 cassette. 7 Tape Width Limit! Battery! Insert Tape Cassette! TROUBLESHOOTING Error Messages When an error message appears on again before try again. Message Wrong Type Of ...

Users Guide
Page 56
...is selected. Install a 0.34" (8.8 mm) Heat Shrink Tube. 56 Error Messages Insert HS 0.46" Tube Cassette! A 0.47" (12 mm) tape cassette is not installed when Template or Block Layouts for 0.34" (8.8 mm) Heat Shrink Tube is less than 39.37" (1 m). Install a 0.13" ...(3.5 mm) tape cassette. Insert 0.94" Tape Cassette! Insert 6mm Tape Cassette! Insert 3.5mm Tape Cassette! The length of the label to 99. Install a 0.23" (6 mm) tape cassette. Insert 9mm Tape Cassette! Edit the text so that the length of blocks to be printed...
...is selected. Install a 0.34" (8.8 mm) Heat Shrink Tube. 56 Error Messages Insert HS 0.46" Tube Cassette! A 0.47" (12 mm) tape cassette is not installed when Template or Block Layouts for 0.34" (8.8 mm) Heat Shrink Tube is less than 39.37" (1 m). Install a 0.13" ...(3.5 mm) tape cassette. Insert 0.94" Tape Cassette! Insert 6mm Tape Cassette! Insert 3.5mm Tape Cassette! The length of the label to 99. Install a 0.23" (6 mm) tape cassette. Insert 9mm Tape Cassette! Edit the text so that the length of blocks to be printed...

Users Guide
Page 57
... the Quick Setup Guide for the CODABAR protocol). Please contact Brother customer service. Close the cover when printing. Max 2 When using the text entered is not enough internal memory available when you can only use 9mm or wider tape Requires 0.35" or cassettes. 6 Wider Tape! There is longer than the total length of the...
... the Quick Setup Guide for the CODABAR protocol). Please contact Brother customer service. Close the cover when printing. Max 2 When using the text entered is not enough internal memory available when you can only use 9mm or wider tape Requires 0.35" or cassettes. 6 Wider Tape! There is longer than the total length of the...

Users Guide
Page 58
... the database includes invalid characters/numbers not supported by the bar code protocol. Cannot print labels in high resolution mode when non-supported media (fabric tape, heat shrink tube etc.) is no database file saved in the P-touch labeling system. Bar Code Error! Reduce File Size to open a database file which...
... the database includes invalid characters/numbers not supported by the bar code protocol. Cannot print labels in high resolution mode when non-supported media (fabric tape, heat shrink tube etc.) is no database file saved in the P-touch labeling system. Bar Code Error! Reduce File Size to open a database file which...

Users Guide
Page 59
...-B, Peripheral) 8 Wireless LAN IEEE802.11b/g/n (Infrastructure Mode/Ad-hoc mode) 9 Specifications 59 Tape/Tube cassette*5 Brother TZe tape cassette (0.13", 0.23", 0.35", 0.47", 0.70", 0.94" [3.5 mm, 6 mm, 9 mm, 12 mm, 18 mm, 24 mm] widths) Brother HGe tape cassette (0.23", 0.35", 0.47", 0.70", 0.94" [6 mm, 9 mm, 12... mm, 18 mm, 24 mm] widths) Brother HSe tube cassette (0.23", 0.34", 0.46", 0.69", 0.93" [5.8 mm, 8.8 mm, 11.7 mm, 17.7 mm...
...-B, Peripheral) 8 Wireless LAN IEEE802.11b/g/n (Infrastructure Mode/Ad-hoc mode) 9 Specifications 59 Tape/Tube cassette*5 Brother TZe tape cassette (0.13", 0.23", 0.35", 0.47", 0.70", 0.94" [3.5 mm, 6 mm, 9 mm, 12 mm, 18 mm, 24 mm] widths) Brother HGe tape cassette (0.23", 0.35", 0.47", 0.70", 0.94" [6 mm, 9 mm, 12... mm, 18 mm, 24 mm] widths) Brother HSe tube cassette (0.23", 0.34", 0.46", 0.69", 0.93" [5.8 mm, 8.8 mm, 11.7 mm, 17.7 mm...


