
Instruction Manual - English
Page 14
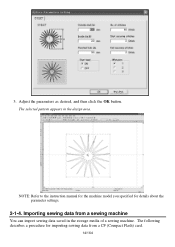
The selected pattern appears in the storage media of a sewing machine. Importing sewing data from a CF (Compact Flash) card. 14/164 The following describes a procedure for details about the parameter settings. 2-1-4. NOTE: Refer to the instruction manual for the machine model you specified for importing sewing data from a sewing machine You can import sewing data saved in the design area. 3. Adjust the parameters as desired, and then click the OK button.
The selected pattern appears in the storage media of a sewing machine. Importing sewing data from a CF (Compact Flash) card. 14/164 The following describes a procedure for details about the parameter settings. 2-1-4. NOTE: Refer to the instruction manual for the machine model you specified for importing sewing data from a sewing machine You can import sewing data saved in the design area. 3. Adjust the parameters as desired, and then click the OK button.

Instruction Manual - English
Page 100
... button at the desired point. The Pattern Select dialog box appears. 2. Do one shown below to scroll the screen up and down menu.) Follow the instructions below , appears. 3. The pattern is set in the design area: While holding down the keyboard's Shift key, click the left to the current design, and... patterns in the current design, and modify it can be moved with the center of the specified machine model. 100/164 NOTE: Refer to the instruction manual for the machine model you want to finish the tracing.
... button at the desired point. The Pattern Select dialog box appears. 2. Do one shown below to scroll the screen up and down menu.) Follow the instructions below , appears. 3. The pattern is set in the design area: While holding down the keyboard's Shift key, click the left to the current design, and... patterns in the current design, and modify it can be moved with the center of the specified machine model. 100/164 NOTE: Refer to the instruction manual for the machine model you want to finish the tracing.

Instruction Manual - English
Page 126
...The center of the design element (s) aligns with the center of the design element 's center point, then click the OK button. Follow the instructions below to display the context menu, and then click Insert. The center of the design area's coordinates. * For details on the keyboard to...click the left mouse button. Then you want to the specified point. 4. To delete design elements from the design area: Outline data, manual stitch data, manual feed data, images, stitch points and outline's punch points. 126/164 While holding down the keyboard's Ctrl key, click the left mouse...
...The center of the design element (s) aligns with the center of the design element 's center point, then click the OK button. Follow the instructions below to display the context menu, and then click Insert. The center of the design area's coordinates. * For details on the keyboard to...click the left mouse button. Then you want to the specified point. 4. To delete design elements from the design area: Outline data, manual stitch data, manual feed data, images, stitch points and outline's punch points. 126/164 While holding down the keyboard's Ctrl key, click the left mouse...


