
Operation Manual
Page 2
...the machine. Do not use an extension cord. • Always unplug your work area clear: • Never operate the machine with any other part may injure your back or knees. 5 Always keep your machine if the power is spilled on the rating label. WARNING - Plug the machine directly... outlet immediately after using the machine and immediately unplug the power cord. • When transporting the machine, be connected to the nearest authorized Brother dealer or service center for use if you may damage the machine or result in the instruction manual: • To unplug the machine, ...
...the machine. Do not use an extension cord. • Always unplug your work area clear: • Never operate the machine with any other part may injure your back or knees. 5 Always keep your machine if the power is spilled on the rating label. WARNING - Plug the machine directly... outlet immediately after using the machine and immediately unplug the power cord. • When transporting the machine, be connected to the nearest authorized Brother dealer or service center for use if you may damage the machine or result in the instruction manual: • To unplug the machine, ...
Operation Manual
Page 3
...machine on the machine while pressing down the foot controller. • Do not use the machine near a space heater, iron, halogen lamp, or other parts to assure correct installation. 9 For repair or adjustment: • If the light unit (light-emitting diode) is damaged, it must be kept out ... could cause the needle to the needle. Benzene, thinner, and scouring powders can damage the case and machine, and should never be used by authorized Brother Service Center. • In the event a malfunction occurs or adjustment is not a toy: • Your close attention to break. • Do not...
...machine on the machine while pressing down the foot controller. • Do not use the machine near a space heater, iron, halogen lamp, or other parts to assure correct installation. 9 For repair or adjustment: • If the light unit (light-emitting diode) is damaged, it must be kept out ... could cause the needle to the needle. Benzene, thinner, and scouring powders can damage the case and machine, and should never be used by authorized Brother Service Center. • In the event a malfunction occurs or adjustment is not a toy: • Your close attention to break. • Do not...

Operation Manual
Page 5
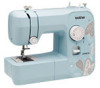
... with a needle threader 19 Drawing up the lower thread 21 FABRIC, THREAD, AND NEEDLE COMBINATIONS 22 2. KNOWING YOUR SEWING MACHINE 5 ACCESSORIES 5 Optional accessories 5 THE MAIN PARTS 6 Flat bed attachment 6 USING YOUR SEWING MACHINE 7 Connecting plugs 7 Main power and sewing light switch 8 Foot controller 8 Checking the needle 8 Replacing the needle 8 Changing the...
... with a needle threader 19 Drawing up the lower thread 21 FABRIC, THREAD, AND NEEDLE COMBINATIONS 22 2. KNOWING YOUR SEWING MACHINE 5 ACCESSORIES 5 Optional accessories 5 THE MAIN PARTS 6 Flat bed attachment 6 USING YOUR SEWING MACHINE 7 Connecting plugs 7 Main power and sewing light switch 8 Foot controller 8 Checking the needle 8 Replacing the needle 8 Changing the...
Operation Manual
Page 6
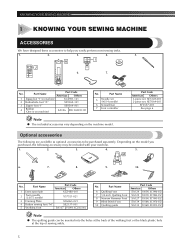
...included accessories vary depending on machine) SA156 SFB: XA5539-151 No. Part Name Part Code Americas Others 1 Zigzag foot "J" (on machine) XC4901-121 2 Buttonhole foot "A" X59369-321 3 Zipper foot "I JJ 6. 7. M M 6. 7. 8. 9. 10. Part Name Part Code Americas Others 1 Extra spool pin XG3488-001 2 Twin needle ...inserted into the holes at the back of the walking foot or the black plastic hole at the top of sewing ankle. 5 Part Name 5 Needle set : XE7064-001 XF3557-001 See page 6 Optional accessories The following accessory may be included with your machine....
...included accessories vary depending on machine) SA156 SFB: XA5539-151 No. Part Name Part Code Americas Others 1 Zigzag foot "J" (on machine) XC4901-121 2 Buttonhole foot "A" X59369-321 3 Zipper foot "I JJ 6. 7. M M 6. 7. 8. 9. 10. Part Name Part Code Americas Others 1 Extra spool pin XG3488-001 2 Twin needle ...inserted into the holes at the back of the walking foot or the black plastic hole at the top of sewing ankle. 5 Part Name 5 Needle set : XE7064-001 XF3557-001 See page 6 Optional accessories The following accessory may be included with your machine....
Operation Manual
Page 7
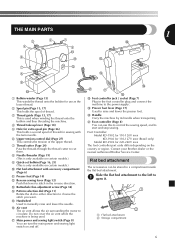
... choose the stitch you want. C Buttonhole fine-adjustment screw (Page 34) D Pattern selection dial (Page 11) Rotate the dial in the reverse direction. THE MAIN PARTS 3 2 1 1 J 4 5 D 6 C E 7 B 8 F 9 0 A 1 Bobbin winder (Page 13) This winds the thread onto the bobbin for use this...K G H H Foot controller jack / socket (Page 7) Plug in a compartment inside the flat bed attachment. Contact your Brother dealer or the nearest authorized Brother Service Center. Flat bed attachment The accessories can use as the lower thread. 2 Spool pin (Page 13, 17) This ...
... choose the stitch you want. C Buttonhole fine-adjustment screw (Page 34) D Pattern selection dial (Page 11) Rotate the dial in the reverse direction. THE MAIN PARTS 3 2 1 1 J 4 5 D 6 C E 7 B 8 F 9 0 A 1 Bobbin winder (Page 13) This winds the thread onto the bobbin for use this...K G H H Foot controller jack / socket (Page 7) Plug in a compartment inside the flat bed attachment. Contact your Brother dealer or the nearest authorized Brother Service Center. Flat bed attachment The accessories can use as the lower thread. 2 Spool pin (Page 13, 17) This ...
Operation Manual
Page 10
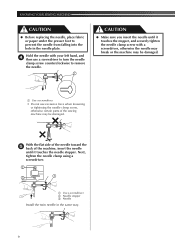
... may be damaged. Hold the needle with your left hand, and 4 then use excessive force when loosening or tightening the needle clamp screw, otherwise certain parts of the machine, insert the needle until it touches the stopper, and securely tighten the needle clamp screw with a screwdriver, otherwise the needle may break...
... may be damaged. Hold the needle with your left hand, and 4 then use excessive force when loosening or tightening the needle clamp screw, otherwise certain parts of the machine, insert the needle until it touches the stopper, and securely tighten the needle clamp screw with a screwdriver, otherwise the needle may break...

Operation Manual
Page 14
... in the wrong place, or is Class 15 type bobbin. Only use bobbins from the spool 2 with this machine or bobbins of the same type (part code: SA156, SFB: XA5539-151).
... in the wrong place, or is Class 15 type bobbin. Only use bobbins from the spool 2 with this machine or bobbins of the same type (part code: SA156, SFB: XA5539-151).
Operation Manual
Page 24
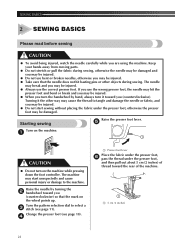
... not use bent or broken needles, otherwise you are using the machine. Change the presser foot (see page 11). Keep your hands away from moving parts. ● Do not stretch or pull the fabric during sewing. Turn the pattern selection dial to the machine. Turning it toward the rear of the...
... not use bent or broken needles, otherwise you are using the machine. Change the presser foot (see page 11). Keep your hands away from moving parts. ● Do not stretch or pull the fabric during sewing. Turn the pattern selection dial to the machine. Turning it toward the rear of the...
Operation Manual
Page 26
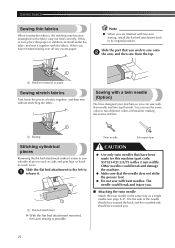
If this needle and two top threads. Slide the part that you . 25 Slide the flat bed attachment to the left to 1 release it easier to sew onto 2 the arm, and then sew from the ...top. 1 1 Stabilizer material or paper Sewing stretch fabrics First, baste the pieces of thread for this machine (part code: X57521-021:2.0/75 with the fabric. The flat side of the needle should face toward the back and the rounded side should face toward...
If this needle and two top threads. Slide the part that you . 25 Slide the flat bed attachment to the left to 1 release it easier to sew onto 2 the arm, and then sew from the ...top. 1 1 Stabilizer material or paper Sewing stretch fabrics First, baste the pieces of thread for this machine (part code: X57521-021:2.0/75 with the fabric. The flat side of the needle should face toward the back and the rounded side should face toward...

Operation Manual
Page 32
... so 1 that the seamline (or arrowhead point) is wider than the stitch pattern, trim away any excess fabric after stitching. BUILT-IN STITCHES Slide the part that you wish to sew onto 7 the arm, make sure that the needle slightly catches the fold of the hem.
... so 1 that the seamline (or arrowhead point) is wider than the stitch pattern, trim away any excess fabric after stitching. BUILT-IN STITCHES Slide the part that you wish to sew onto 7 the arm, make sure that the needle slightly catches the fold of the hem.
Operation Manual
Page 42
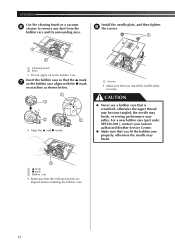
.... 3 1 ▲ mark 2 ● mark 3 Bobbin case • Make sure that the indicated points are aligned before installing the bobbin case. 41 For a new bobbin case (part code: XE9326-001), contact your nearest authorized Brother Service Center. ● Make sure that you install the needle plate securely.
.... 3 1 ▲ mark 2 ● mark 3 Bobbin case • Make sure that the indicated points are aligned before installing the bobbin case. 41 For a new bobbin case (part code: XE9326-001), contact your nearest authorized Brother Service Center. ● Make sure that you install the needle plate securely.
Operation Manual
Page 46
... F Fabric, thread, and needle combinations ...... 22 Flat bed attachment 6 Foot controller 8 Free-arm style 25 G Gathering 36 H Handwheel 17 L Light switch 8 Lower threading 15 M Main parts 6 Main power 8 Maintenance 40 N Needle checking 8 combinations with fabric and thread ......... 22 replacing 8 Needle threader 19 O Overedge stitching 31 P Pattern selection dial 11 Patterns 11...
... F Fabric, thread, and needle combinations ...... 22 Flat bed attachment 6 Foot controller 8 Free-arm style 25 G Gathering 36 H Handwheel 17 L Light switch 8 Lower threading 15 M Main parts 6 Main power 8 Maintenance 40 N Needle checking 8 combinations with fabric and thread ......... 22 replacing 8 Needle threader 19 O Overedge stitching 31 P Pattern selection dial 11 Patterns 11...


