
Users Guide
Page 2
... never be left unattended when plugged in. IMPORTANT SAFETY INSTRUCTIONS When using ." The sewing machine should always be followed, including the following: "Read all moving parts. Replace bulb with any object into water. To reduce the risk of electric shock: 1. Use this sewing machine only for its intended use by pulling...
... never be left unattended when plugged in. IMPORTANT SAFETY INSTRUCTIONS When using ." The sewing machine should always be followed, including the following: "Read all moving parts. Replace bulb with any object into water. To reduce the risk of electric shock: 1. Use this sewing machine only for its intended use by pulling...

Users Guide
Page 3
... of the operation manual to clean the case. Do not use or store the machine near a space heater, iron, halogen lamp, or other parts • A power failure occurs during use of the appliance by a person responsible for their safety. carrying the mark, rating as marked on ...operation 1. Be sure to change without notice. For a longer service life 1. When storing this product are subject to keep your local authorized Brother dealer. Use only neutral soaps or detergents to inspect and adjust the machine yourself. Benzene, thinner, and scouring powders can damage the case and...
... of the operation manual to clean the case. Do not use or store the machine near a space heater, iron, halogen lamp, or other parts • A power failure occurs during use of the appliance by a person responsible for their safety. carrying the mark, rating as marked on ...operation 1. Be sure to change without notice. For a longer service life 1. When storing this product are subject to keep your local authorized Brother dealer. Use only neutral soaps or detergents to inspect and adjust the machine yourself. Benzene, thinner, and scouring powders can damage the case and...

Users Guide
Page 4
KNOWING YOUR SEWING MACHINE 5 NAMES OF MACHINE PARTS AND THEIR FUNCTIONS 5 The main parts ...5 Needle and presser foot section ...6 Flat bed attachment ...6 ACCESSORIES ...7 OPTIONAL ACCESSORIES 7 USING YOUR SEWING MACHINE 8 Power supply precautions ...8 Power supply ...8 Foot controller ...9 Steadying the machine ...9 ...
KNOWING YOUR SEWING MACHINE 5 NAMES OF MACHINE PARTS AND THEIR FUNCTIONS 5 The main parts ...5 Needle and presser foot section ...6 Flat bed attachment ...6 ACCESSORIES ...7 OPTIONAL ACCESSORIES 7 USING YOUR SEWING MACHINE 8 Power supply precautions ...8 Power supply ...8 Foot controller ...9 Steadying the machine ...9 ...

Users Guide
Page 6
...) This controls the tension of thread. j Bobbin winder (page 10) The bobbin winder winds thread onto the bobbin for 220-240V area The foot controller part code differs depending on and off the main power and sewing light. k Handwheel Use the handwheel to cut them. p Bobbin winding pre-tension disc/thread..., which also supplies power to this switch to turn on the country or region. KNOWING YOUR SEWING MACHINE 1 KNOWING YOUR SEWING MACHINE NAMES OF MACHINE PARTS AND THEIR FUNCTIONS The main parts a Needle position selector (page 22) Shift this knob to set the stitch width.
...) This controls the tension of thread. j Bobbin winder (page 10) The bobbin winder winds thread onto the bobbin for 220-240V area The foot controller part code differs depending on and off the main power and sewing light. k Handwheel Use the handwheel to cut them. p Bobbin winding pre-tension disc/thread..., which also supplies power to this switch to turn on the country or region. KNOWING YOUR SEWING MACHINE 1 KNOWING YOUR SEWING MACHINE NAMES OF MACHINE PARTS AND THEIR FUNCTIONS The main parts a Needle position selector (page 22) Shift this knob to set the stitch width.

Users Guide
Page 8
... in the flat bed attachment. KNOWING YOUR SEWING MACHINE ACCESSORIES The following machine models: LS-2000/LS2250PRW/LS2300PRW/LS2350/LX2375. ● The screw of the presser foot holder is available through your authorized dealer. (Part code: 132730-122) ● A replacement for the factory-installed presser foot is available through your authorized dealer...
... in the flat bed attachment. KNOWING YOUR SEWING MACHINE ACCESSORIES The following machine models: LS-2000/LS2250PRW/LS2300PRW/LS2350/LX2375. ● The screw of the presser foot holder is available through your authorized dealer. (Part code: 132730-122) ● A replacement for the factory-installed presser foot is available through your authorized dealer...
Users Guide
Page 11
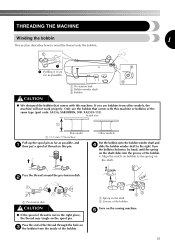
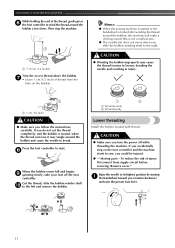
... shaft b Groove of the bobbin Turn on this machine. If you use the bobbin that comes with this machine or bobbins of the same type (part code: SA156, SABOBBIN, SFB: XA5539-151). a Pre-tension disk CAUTION ● If the spool of thread is not in as far as possible, and a then...
... shaft b Groove of the bobbin Turn on this machine. If you use the bobbin that comes with this machine or bobbins of the same type (part code: SA156, SABOBBIN, SFB: XA5539-151). a Pre-tension disk CAUTION ● If the spool of thread is not in as far as possible, and a then...
Users Guide
Page 12
... wound with thread. CAUTION ● Make sure you accidentally step on the bobbin. a 1 cm (1/2 inch) CAUTION ● Make sure you could be injured. ● -" Moving parts - a 7-10 cm (3-4 inches) Trim the excess thread above the bobbin. h When the bobbin seems full and begins i spinning slowly, take your foot off while threading...
... wound with thread. CAUTION ● Make sure you accidentally step on the bobbin. a 1 cm (1/2 inch) CAUTION ● Make sure you could be injured. ● -" Moving parts - a 7-10 cm (3-4 inches) Trim the excess thread above the bobbin. h When the bobbin seems full and begins i spinning slowly, take your foot off while threading...

Users Guide
Page 18
... break or damage may result. a Coin b Needle clamp screw • Do not apply strong force when loosening or tightening the needle clamp screw, otherwise certain parts of the machine, insert the needle until it clockwise. While holding the needle with your left hand, f use a coin to remove the needle. With the...
... break or damage may result. a Coin b Needle clamp screw • Do not apply strong force when loosening or tightening the needle clamp screw, otherwise certain parts of the machine, insert the needle until it clockwise. While holding the needle with your left hand, f use a coin to remove the needle. With the...

Users Guide
Page 19
Sewing with a twin needle (Option) We have been made for this machine (part code: 131096-121). d Use the thread from the first spool to thread c the machine to M. ● Slowly turn the handwheel toward you (counterclockwise) and check ...
Sewing with a twin needle (Option) We have been made for this machine (part code: 131096-121). d Use the thread from the first spool to thread c the machine to M. ● Slowly turn the handwheel toward you (counterclockwise) and check ...

Users Guide
Page 22
In addition, keep your hands away from all moving parts such as the needle and handwheel, otherwise injuries may occur. ● Do not pull or push the fabric too hard while sewing, otherwise injuries may ...
In addition, keep your hands away from all moving parts such as the needle and handwheel, otherwise injuries may occur. ● Do not pull or push the fabric too hard while sewing, otherwise injuries may ...

Users Guide
Page 36
... both hands while pressing the fabric with the middle and third fingers, and support the outside of the hoop with your fingers away from moving parts, especially needles. ■ Monogramming Sew the lettering at a constant speed by moving the hoop slowly. ■ Embroidering Sew along the outline of the design by...
... both hands while pressing the fabric with the middle and third fingers, and support the outside of the hoop with your fingers away from moving parts, especially needles. ■ Monogramming Sew the lettering at a constant speed by moving the hoop slowly. ■ Embroidering Sew along the outline of the design by...

Users Guide
Page 41
Otherwise, you unplug the machine before using the machine. Clean the lint from the upper e part of the free arm. 4 Remove the needle plate by using a coin or d screwdriver to remove any lint. Turn off the machine and unplug it out. a ...
Otherwise, you unplug the machine before using the machine. Clean the lint from the upper e part of the free arm. 4 Remove the needle plate by using a coin or d screwdriver to remove any lint. Turn off the machine and unplug it out. a ...

Users Guide
Page 47
... E embroidering 34 extra spool pin 18 F feed dogs flat bed attachment 66,, 40 26 foot controller 23 free-arm style 26 G gathering 36 H handwheel 5 M main parts 5 main power switch 8 monogramming 34 N needle 15 needle needle needle pbcllaaarmtethpr.e.s.ac..dr.e..wg..u..i..d....e...66..,,...14. 706 needle position selector 22 O oiling 38 P presser presser...
... E embroidering 34 extra spool pin 18 F feed dogs flat bed attachment 66,, 40 26 foot controller 23 free-arm style 26 G gathering 36 H handwheel 5 M main parts 5 main power switch 8 monogramming 34 N needle 15 needle needle needle pbcllaaarmtethpr.e.s.ac..dr.e..wg..u..i..d....e...66..,,...14. 706 needle position selector 22 O oiling 38 P presser presser...


