Operation Manual
Page 2
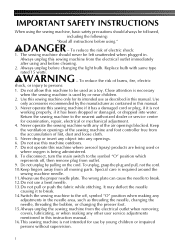
... , then remove plug from the accumulation of lint, dust and loose cloth. 5. The sewing machine should always be followed, including the following: "Read all moving parts. Never operate this instruction manual. 16.This sewing machine is not working properly, if it to break. 14.Switch the sewing machine to the symbol...
... , then remove plug from the accumulation of lint, dust and loose cloth. 5. The sewing machine should always be followed, including the following: "Read all moving parts. Never operate this instruction manual. 16.This sewing machine is not working properly, if it to break. 14.Switch the sewing machine to the symbol...
Operation Manual
Page 3
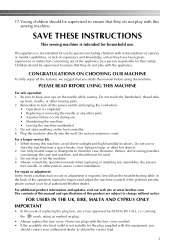
...correct lead. 2 Do not drop or hit the machine. 4. For additional product information and updates, visit our web site at www.brother.com The contents of this sewing machine. SAVE THESE INSTRUCTIONS This sewing machine is completed • Replacing or removing the needle or any ...assemblies, the presser feet, needle, or other hot objects. 2. Children should contact your local authorized Brother dealer. up lever, needle, or other parts • A power failure occurs during use . If the problem persists, please consult your authorized dealer to ensure that you...
...correct lead. 2 Do not drop or hit the machine. 4. For additional product information and updates, visit our web site at www.brother.com The contents of this sewing machine. SAVE THESE INSTRUCTIONS This sewing machine is completed • Replacing or removing the needle or any ...assemblies, the presser feet, needle, or other hot objects. 2. Children should contact your local authorized Brother dealer. up lever, needle, or other parts • A power failure occurs during use . If the problem persists, please consult your authorized dealer to ensure that you...
Operation Manual
Page 4
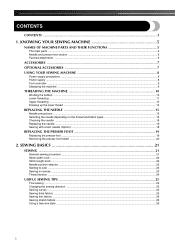
... thick fabrics ...25 Sewing thin fabrics ...26 Sewing stretch fabrics ...26 Using a free-arm style ...26 3 KNOWING YOUR SEWING MACHINE 5 NAMES OF MACHINE PARTS AND THEIR FUNCTIONS 5 The main parts ...5 Needle and presser foot section ...6 Flat bed attachment ...6 ACCESSORIES ...7 OPTIONAL ACCESSORIES 7 USING YOUR SEWING MACHINE 8 Power supply precautions ...8 Power supply ...8 Foot controller...
... thick fabrics ...25 Sewing thin fabrics ...26 Sewing stretch fabrics ...26 Using a free-arm style ...26 3 KNOWING YOUR SEWING MACHINE 5 NAMES OF MACHINE PARTS AND THEIR FUNCTIONS 5 The main parts ...5 Needle and presser foot section ...6 Flat bed attachment ...6 ACCESSORIES ...7 OPTIONAL ACCESSORIES 7 USING YOUR SEWING MACHINE 8 Power supply precautions ...8 Power supply ...8 Foot controller...
Operation Manual
Page 6
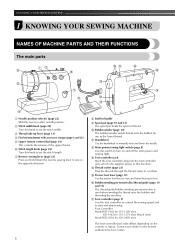
... the tension of thread. j Bobbin winder (page 10) The bobbin winder winds thread onto the bobbin for 220-240V area The foot controller part code differs depending on and off the main power and sewing light. n Thread cutter (page 23) Pass the threads through the thread cutter ... length. k Handwheel Use the handwheel to start and stop sewing. KNOWING YOUR SEWING MACHINE 1 KNOWING YOUR SEWING MACHINE NAMES OF MACHINE PARTS AND THEIR FUNCTIONS The main parts a Needle position selector (page 22) Shift this switch to turn on the country or region. q Foot controller (page 9) Use ...
... the tension of thread. j Bobbin winder (page 10) The bobbin winder winds thread onto the bobbin for 220-240V area The foot controller part code differs depending on and off the main power and sewing light. n Thread cutter (page 23) Pass the threads through the thread cutter ... length. k Handwheel Use the handwheel to start and stop sewing. KNOWING YOUR SEWING MACHINE 1 KNOWING YOUR SEWING MACHINE NAMES OF MACHINE PARTS AND THEIR FUNCTIONS The main parts a Needle position selector (page 22) Shift this switch to turn on the country or region. q Foot controller (page 9) Use ...
Operation Manual
Page 8
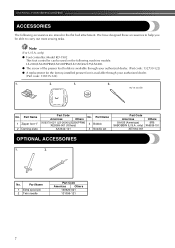
...2000/LS2250PRW/LS2300PRW/LS2350/LX2375/LS2400. ● The screw of the presser foot holder is available through your authorized dealer. (Part code: 132730-122) ● A replacement for the factory-installed presser foot is available through your authorized dealer. (Part code: 138135-122) ...151 XE7064-001 OPTIONAL ACCESSORIES 1. 2. Part Name X59370-021 (LS-2000/LS2250PRW) XE9369-001 (Others) 3 Bobbin XA3442-121 4 Needle set Part Code Americas Others SA156 (Americas) SFB: SABOBBIN (U.S.A. Part Name 1 Extra spool pin 2 Twin needle Part Code Americas Others 130920-021 131096-...
...2000/LS2250PRW/LS2300PRW/LS2350/LX2375/LS2400. ● The screw of the presser foot holder is available through your authorized dealer. (Part code: 132730-122) ● A replacement for the factory-installed presser foot is available through your authorized dealer. (Part code: 138135-122) ...151 XE7064-001 OPTIONAL ACCESSORIES 1. 2. Part Name X59370-021 (LS-2000/LS2250PRW) XE9369-001 (Others) 3 Bobbin XA3442-121 4 Needle set Part Code Americas Others SA156 (Americas) SFB: SABOBBIN (U.S.A. Part Name 1 Extra spool pin 2 Twin needle Part Code Americas Others 130920-021 131096-...

Operation Manual
Page 11
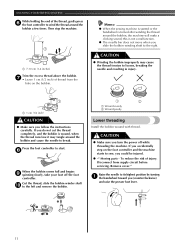
... bobbin Turn on the shaft. Turn the bobbin clockwise, by hand, until the spring on the shaft slides into the groove of the same type (part code: SA156, SABOBBIN, SFB: XA5539-151). CAUTION a Pre-tension disk b Bobbin winder shaft c Bobbin ● We designed the bobbin that comes with this machine or...
... bobbin Turn on the shaft. Turn the bobbin clockwise, by hand, until the spring on the shaft slides into the groove of the same type (part code: SA156, SABOBBIN, SFB: XA5539-151). CAUTION a Pre-tension disk b Bobbin winder shaft c Bobbin ● We designed the bobbin that comes with this machine or...
Operation Manual
Page 12
... the machine. Raise the needle to sew, you turn the power off the foot controller. CAUTION ● Make sure you could be injured. ● -" Moving parts - If you slide the bobbin winding shaft to start. Remove cover." Memo ● When the sewing machine is started or the handwheel is turned after...
... the machine. Raise the needle to sew, you turn the power off the foot controller. CAUTION ● Make sure you could be injured. ● -" Moving parts - If you slide the bobbin winding shaft to start. Remove cover." Memo ● When the sewing machine is started or the handwheel is turned after...
Operation Manual
Page 18
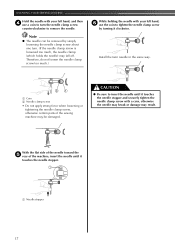
... the needle) may fall off. a Coin b Needle clamp screw • Do not apply strong force when loosening or tightening the needle clamp screw, otherwise certain parts of the machine, insert the needle until it touches the needle stopper and securely tighten the needle clamp screw with your left hand, and then...
... the needle) may fall off. a Coin b Needle clamp screw • Do not apply strong force when loosening or tightening the needle clamp screw, otherwise certain parts of the machine, insert the needle until it touches the needle stopper and securely tighten the needle clamp screw with your left hand, and then...

Operation Manual
Page 19
... of the machine. Sewing with a twin needle (Option) We have designed your machine so you (counterclockwise) and check that have been made for this machine (part code: 131096-121).
... of the machine. Sewing with a twin needle (Option) We have designed your machine so you (counterclockwise) and check that have been made for this machine (part code: 131096-121).
Operation Manual
Page 22
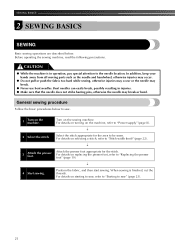
... Basic sewing operations are described below to "Replacing the presser foot" (page 19). ↓ 4 Start sewing. In addition, keep your hands away from all moving parts such as the needle and handwheel, otherwise injuries may occur. ● Do not pull or push the fabric too hard while sewing, otherwise injuries may...
... Basic sewing operations are described below to "Replacing the presser foot" (page 19). ↓ 4 Start sewing. In addition, keep your hands away from all moving parts such as the needle and handwheel, otherwise injuries may occur. ● Do not pull or push the fabric too hard while sewing, otherwise injuries may...

Operation Manual
Page 36
... to keep the stitches close together. 35 Then, sew to completely fill in the design with your fingers away from the inside and from moving parts, especially needles. ■ Monogramming Sew the lettering at the end h of the design by moving the hoop slowly. UTILITY STITCHES Grip the hoop with the...
... to keep the stitches close together. 35 Then, sew to completely fill in the design with your fingers away from the inside and from moving parts, especially needles. ■ Monogramming Sew the lettering at the end h of the design by moving the hoop slowly. UTILITY STITCHES Grip the hoop with the...

Operation Manual
Page 41
.... Clean the lint from the shuttle hook in the i same manner as described in order to remove any accumulated lint g and thread from the upper e part of the free arm. 4 Remove the needle plate by using a coin or d screwdriver to clean the lint from the retaining ring, hook, driver and race...
.... Clean the lint from the shuttle hook in the i same manner as described in order to remove any accumulated lint g and thread from the upper e part of the free arm. 4 Remove the needle plate by using a coin or d screwdriver to clean the lint from the retaining ring, hook, driver and race...
Operation Manual
Page 47
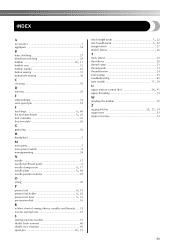
... E embroidering 34 extra spool pin 18 F feed dogs flat bed attachment 66,, 40 26 foot controller 23 free-arm style 26 G gathering 36 H handwheel 5 M main parts 5 main power switch 8 monogramming 34 N needle 15 needle needle needle pbcllaaarmtethpr.e.s.ac..dr.e..wg..u..i..d....e...66..,,...14. 706 needle position selector 22 O oiling 38 P presser presser...
... E embroidering 34 extra spool pin 18 F feed dogs flat bed attachment 66,, 40 26 foot controller 23 free-arm style 26 G gathering 36 H handwheel 5 M main parts 5 main power switch 8 monogramming 34 N needle 15 needle needle needle pbcllaaarmtethpr.e.s.ac..dr.e..wg..u..i..d....e...66..,,...14. 706 needle position selector 22 O oiling 38 P presser presser...

