Users Manual - English and Spanish
Page 2
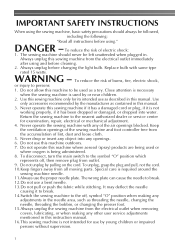
... blocked. Always unplug this machine outdoors. 7. Return the sewing machine to the nearest authorized dealer or service center for its intended use as threading the needle, changing the needle, threading the bobbin, or changing the presser foot. 15.Always unplug the sewing machine from the electrical outlet when removing covers, lubricating, or...
... blocked. Always unplug this machine outdoors. 7. Return the sewing machine to the nearest authorized dealer or service center for its intended use as threading the needle, changing the needle, threading the bobbin, or changing the presser foot. 15.Always unplug the sewing machine from the electrical outlet when removing covers, lubricating, or...
Users Manual - English and Spanish
Page 3
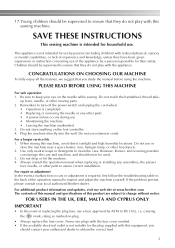
... to ensure that you should never be used. 3. For additional product information and updates, visit our web site at www.brother.com The contents of this manual and specifications of this machine, avoid direct sunlight and high humidity locations. This appliance is ...adjustment is not suitable for household use • Maintaining the machine • Leaving the machine unattended 3. Do not touch the handwheel, thread take- If the problem persists, please consult your authorized dealer to assure correct installation. SAVE THESE INSTRUCTIONS This sewing machine is completed &#...
... to ensure that you should never be used. 3. For additional product information and updates, visit our web site at www.brother.com The contents of this manual and specifications of this machine, avoid direct sunlight and high humidity locations. This appliance is ...adjustment is not suitable for household use • Maintaining the machine • Leaving the machine unattended 3. Do not touch the handwheel, thread take- If the problem persists, please consult your authorized dealer to assure correct installation. SAVE THESE INSTRUCTIONS This sewing machine is completed &#...
Users Manual - English and Spanish
Page 4
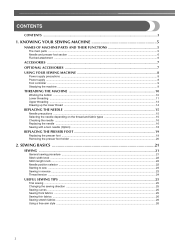
... SEWING MACHINE 8 Power supply precautions ...8 Power supply ...8 Foot controller ...9 Steadying the machine ...9 THREADING THE MACHINE 10 Winding the bobbin ...10 Lower threading ...11 Upper threading ...13 Drawing up the lower thread ...14 REPLACING THE NEEDLE 15 Needle precautions ...15 Selecting the needle depending on the...Stitch width knob ...22 Stitch length knob ...22 Needle position selector ...22 Starting to sew ...23 Sewing in reverse ...23 Thread tension ...24 USEFUL SEWING TIPS ...25 Trial sewing ...25 Changing the sewing direction ...25 Sewing curves ...25 Sewing thick fabrics...
... SEWING MACHINE 8 Power supply precautions ...8 Power supply ...8 Foot controller ...9 Steadying the machine ...9 THREADING THE MACHINE 10 Winding the bobbin ...10 Lower threading ...11 Upper threading ...13 Drawing up the lower thread ...14 REPLACING THE NEEDLE 15 Needle precautions ...15 Selecting the needle depending on the...Stitch width knob ...22 Stitch length knob ...22 Needle position selector ...22 Starting to sew ...23 Sewing in reverse ...23 Thread tension ...24 USEFUL SEWING TIPS ...25 Trial sewing ...25 Changing the sewing direction ...25 Sewing curves ...25 Sewing thick fabrics...

Users Manual - English and Spanish
Page 5
... ...38 Cleaning the machine surface ...39 Cleaning the shuttle race ...39 Cleaning the feed dogs ...40 Bobbin case tension adjustment ...41 TROUBLESHOOTING ...42 When the thread is entangled ...45 INDEX ...46 4 UTILITY STITCHES 27 USEFUL STITCHES ...27 Zigzag stitches ...27 Basic stitching ...27 Blind hem stitching ...28 Darning ...29 Over edge...
... ...38 Cleaning the machine surface ...39 Cleaning the shuttle race ...39 Cleaning the feed dogs ...40 Bobbin case tension adjustment ...41 TROUBLESHOOTING ...42 When the thread is entangled ...45 INDEX ...46 4 UTILITY STITCHES 27 USEFUL STITCHES ...27 Zigzag stitches ...27 Basic stitching ...27 Blind hem stitching ...28 Darning ...29 Over edge...
Users Manual - English and Spanish
Page 6
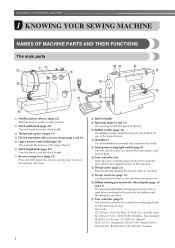
...page 13) d Flat bed attachment with accessory storage (page 6 and 26) e Upper tension control dial (page 24) This controls the tension of thread. g Reverse sewing lever (page 23) Press and hold down the reverse sewing lever to raise and lower the presser foot. o Presser foot lever (...Stitch width knob (page 22) Turn this machine. p Bobbin winding pre-tension disc/thread guide (page 10 and 13) The thread guide/bobbin winding pre-tension disc is used when winding the thread onto the bobbin and threading the machine. q Foot controller (page 9) Use the foot controller to control the sewing...
...page 13) d Flat bed attachment with accessory storage (page 6 and 26) e Upper tension control dial (page 24) This controls the tension of thread. g Reverse sewing lever (page 23) Press and hold down the reverse sewing lever to raise and lower the presser foot. o Presser foot lever (...Stitch width knob (page 22) Turn this machine. p Bobbin winding pre-tension disc/thread guide (page 10 and 13) The thread guide/bobbin winding pre-tension disc is used when winding the thread onto the bobbin and threading the machine. q Foot controller (page 9) Use the foot controller to control the sewing...
Users Manual - English and Spanish
Page 7
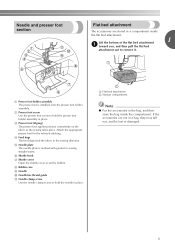
... foot section Flat bed attachment The accessories are not in a bag, they may fall out, and be lost or damaged. 6 h Bobbin case i Needle j Needle bar thread guide k Needle clamp screw Use the needle clamp screw to remove it. b Presser foot screw Use the presser foot screw to set the bobbin. e Needle...
... foot section Flat bed attachment The accessories are not in a bag, they may fall out, and be lost or damaged. 6 h Bobbin case i Needle j Needle bar thread guide k Needle clamp screw Use the needle clamp screw to remove it. b Presser foot screw Use the presser foot screw to set the bobbin. e Needle...
Users Manual - English and Spanish
Page 11
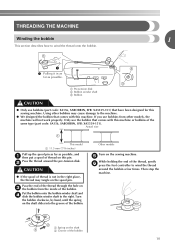
... the pre-tension disk. Using other models, the machine will not work properly. b CAUTION ● If the spool of thread is not in as far as possible, and a then put a spool of thread on this machine or bobbins of the same type (part code: SA156, SABOBBIN, SFB: XA5539-151). Pass the end.... ● We designed the bobbin that comes with this pin. e While holding the end of the bobbin. Only use bobbins from the inside of the thread, gently f press the foot controller to the right. If you use the bobbin that have been designed for this machine. Actual size This model a 11...
... the pre-tension disk. Using other models, the machine will not work properly. b CAUTION ● If the spool of thread is not in as far as possible, and a then put a spool of thread on this machine or bobbins of the same type (part code: SA156, SABOBBIN, SFB: XA5539-151). Pass the end.... ● We designed the bobbin that comes with this pin. e While holding the end of the bobbin. Only use bobbins from the inside of the thread, gently f press the foot controller to the right. If you use the bobbin that have been designed for this machine. Actual size This model a 11...
Users Manual - English and Spanish
Page 12
... parts - h When the bobbin seems full and begins spinning i slowly, take your foot off while threading the machine. CAUTION ● Winding the bobbin improperly may cause the thread tension to start. CAUTION ● Winding the bobbin improperly may tangle around the bobbin, the machine will... Disconnect from other models are used, the machine will make a clicking sound; KNOWING YOUR SEWING MACHINE Trim the excess thread above the bobbin. Cut the thread, slide the bobbin winder shaft j to loosen, breaking the needle and resulting in injury. this sewing machine. If ...
... parts - h When the bobbin seems full and begins spinning i slowly, take your foot off while threading the machine. CAUTION ● Winding the bobbin improperly may cause the thread tension to start. CAUTION ● Winding the bobbin improperly may tangle around the bobbin, the machine will... Disconnect from other models are used, the machine will make a clicking sound; KNOWING YOUR SEWING MACHINE Trim the excess thread above the bobbin. Cut the thread, slide the bobbin winder shaft j to loosen, breaking the needle and resulting in injury. this sewing machine. If ...

Users Manual - English and Spanish
Page 13
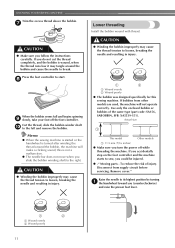
...9679; Make sure that the bobbin case is incorrectly installed, it may cause the thread tension to be used with this machine. a Bobbin case latch Unwind about 10 cm (4 inches) of thread d from the shuttle race. If the thread unrolls in the right direction. Open the shuttle cover behind the flat bed b ...attachment at the top of the shuttle race. Pull the trailing thread through the slot, down e and to the left, as shown below, until it enters the delivery eye under the tension spring. 1 a Flat bed attachment b ...
...9679; Make sure that the bobbin case is incorrectly installed, it may cause the thread tension to be used with this machine. a Bobbin case latch Unwind about 10 cm (4 inches) of thread d from the shuttle race. If the thread unrolls in the right direction. Open the shuttle cover behind the flat bed b ...attachment at the top of the shuttle race. Pull the trailing thread through the slot, down e and to the left, as shown below, until it enters the delivery eye under the tension spring. 1 a Flat bed attachment b ...
Users Manual - English and Spanish
Page 14
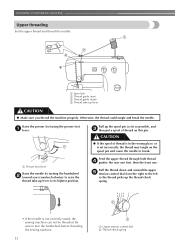
... the sewing machine can not be threaded. a Spool pin b Thread guide (rear) c Thread guide (front) d Thread take-up lever CAUTION ● Make sure you (counterclockwise) to raise the thread take-up the thread check spring. • If the needle is set incorrectly, the thread may tangle on this pin. CAUTION...its highest position. KNOWING YOUR SEWING MACHINE Upper threading Set the upper thread and thread the needle. Feed the upper thread through both thread d guides: the rear one first, then the front one. Be sure to the left so the thread picks up lever to break. a Presser ...
... the sewing machine can not be threaded. a Spool pin b Thread guide (rear) c Thread guide (front) d Thread take-up lever CAUTION ● Make sure you (counterclockwise) to raise the thread take-up the thread check spring. • If the needle is set incorrectly, the thread may tangle on this pin. CAUTION...its highest position. KNOWING YOUR SEWING MACHINE Upper threading Set the upper thread and thread the needle. Feed the upper thread through both thread d guides: the rear one first, then the front one. Be sure to the left so the thread picks up lever to break. a Presser ...
Users Manual - English and Spanish
Page 15
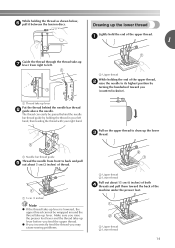
... between the tension discs. a 1 Guide the thread through the thread take-up the lower c thread. The thread can easily be wrapped around the thread take -up lever is lowered, the upper thread cannot be passed behind the needle bar thread h guide above the needle. a Upper thread b Lower thread 14 a Needle bar thread guide Thread the needle from right to left hand...
... between the tension discs. a 1 Guide the thread through the thread take-up the lower c thread. The thread can easily be wrapped around the thread take -up lever is lowered, the upper thread cannot be passed behind the needle bar thread h guide above the needle. a Upper thread b Lower thread 14 a Needle bar thread guide Thread the needle from right to left hand...
Users Manual - English and Spanish
Page 16
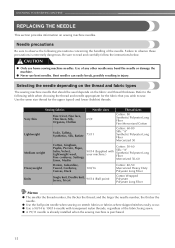
... a 90/14 to the following precautions concerning the handling of the needle. CAUTION ● Only use bent needles. Use the same size thread for the fabric that should be used depends on sewing machine needles. Refer to 100/16 needle with your machine.) Cotton: 50-60 Silk...Cotton, Gingham, Poplin, Percale, Pique, Satin, Velvet, Lightweight wool, Fine corduroy, Suitings, Linen, Muslin 90/14 (Supplied with transparent nylon threads, regardless of any other needle may bend the needle or damage the machine. ● Never use home sewing machine needles. Bent needles can easily...
... a 90/14 to the following precautions concerning the handling of the needle. CAUTION ● Only use bent needles. Use the same size thread for the fabric that should be used depends on sewing machine needles. Refer to 100/16 needle with your machine.) Cotton: 50-60 Silk...Cotton, Gingham, Poplin, Percale, Pique, Satin, Velvet, Lightweight wool, Fine corduroy, Suitings, Linen, Muslin 90/14 (Supplied with transparent nylon threads, regardless of any other needle may bend the needle or damage the machine. ● Never use home sewing machine needles. Bent needles can easily...
Users Manual - English and Spanish
Page 17
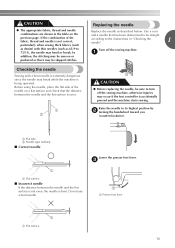
...(such as denim) with thin needles (such as described below. Raise the needle to turn off the sewing machine. CAUTION ● The appropriate fabric, thread and needle combinations are shown in "Checking the needle" . 1 Turn off the sewing machine, otherwise injuries may occur if the foot controller is accidentally pressed... the stitching may be uneven or puckered or there may be skipped stitches. Before using the needle, place the flat side of the fabric, thread and needle is being operated. If the combination of the needle on the previous page. Lower the presser foot lever.
...(such as denim) with thin needles (such as described below. Raise the needle to turn off the sewing machine. CAUTION ● The appropriate fabric, thread and needle combinations are shown in "Checking the needle" . 1 Turn off the sewing machine, otherwise injuries may occur if the foot controller is accidentally pressed... the stitching may be uneven or puckered or there may be skipped stitches. Before using the needle, place the flat side of the fabric, thread and needle is being operated. If the combination of the needle on the previous page. Lower the presser foot lever.
Users Manual - English and Spanish
Page 19
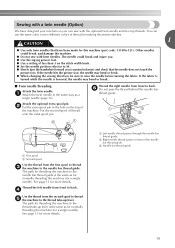
...the hole on the stitch width knob. ● Set the needle position selector to the needle bar thread guide. b Right needle thread passes in the same way as for normally threading the machine (for a single needle). Other needles could break and injure you (counterclockwise) and check that.... The needle could break, and damage the machine. ● Do not sew with the optional twin needle and two top threads. Thread the left needle from the first spool to thread c the machine to M. ● Slowly turn the handwheel toward you . ● Use the zigzag presser foot. ●...
...the hole on the stitch width knob. ● Set the needle position selector to the needle bar thread guide. b Right needle thread passes in the same way as for normally threading the machine (for a single needle). Other needles could break and injure you (counterclockwise) and check that.... The needle could break, and damage the machine. ● Do not sew with the optional twin needle and two top threads. Thread the left needle from the first spool to thread c the machine to M. ● Slowly turn the handwheel toward you . ● Use the zigzag presser foot. ●...
Users Manual - English and Spanish
Page 21
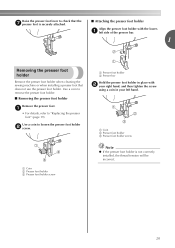
... holder Remove the presser foot holder when cleaning the sewing machine or when installing a presser foot that the g presser foot is not correctly installed, the thread tension will be incorrect. 20 Raise the presser foot lever to check that does not use the presser foot holder. a • For details, refer to...
... holder Remove the presser foot holder when cleaning the sewing machine or when installing a presser foot that the g presser foot is not correctly installed, the thread tension will be incorrect. 20 Raise the presser foot lever to check that does not use the presser foot holder. a • For details, refer to...
Users Manual - English and Spanish
Page 22
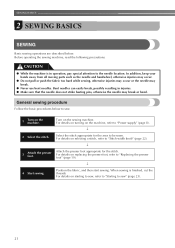
... on the sewing machine. For details on the machine. Position the fabric, and then start sewing. CAUTION ● While the machine is finished, cut the threads. Attach the presser foot appropriate for the area to sew" (page 23). 21 In addition, keep your hands away from all moving parts such as...
... on the sewing machine. For details on the machine. Position the fabric, and then start sewing. CAUTION ● While the machine is finished, cut the threads. Attach the presser foot appropriate for the area to sew" (page 23). 21 In addition, keep your hands away from all moving parts such as...
Users Manual - English and Spanish
Page 23
... width in the fabric. ● Always set the selector to M when using the twin needle, the knob should be adjusted according to the fabric and thread being used for sewing on page 31.) 3. This selector should always be used for making a Satin Stitch (a close to the edge of the zigzag stitch...
... width in the fabric. ● Always set the selector to M when using the twin needle, the knob should be adjusted according to the fabric and thread being used for sewing on page 31.) 3. This selector should always be used for making a Satin Stitch (a close to the edge of the zigzag stitch...

Users Manual - English and Spanish
Page 24
...Presser foot lever Slowly press down the reverse sewing lever a while sewing. h X The machine stops sewing. a 5 cm (2 inches) While holding the end of the thread and the e fabric with your right hand to lower the needle to the starting point of the stitching. To sew forward, release the reverse sewing... the presser foot lever. Raise the presser foot lever. Press and hold down on the sewing machine. SEWING BASICS Starting to lock the threads at the end of the seam or wherever reinforcement is needed. c a Presser foot lever Place the fabric under the presser foot, pass d the...
...Presser foot lever Slowly press down the reverse sewing lever a while sewing. h X The machine stops sewing. a 5 cm (2 inches) While holding the end of the thread and the e fabric with your right hand to lower the needle to the starting point of the stitching. To sew forward, release the reverse sewing... the presser foot lever. Raise the presser foot lever. Press and hold down on the sewing machine. SEWING BASICS Starting to lock the threads at the end of the seam or wherever reinforcement is needed. c a Presser foot lever Place the fabric under the presser foot, pass d the...
Users Manual - English and Spanish
Page 25
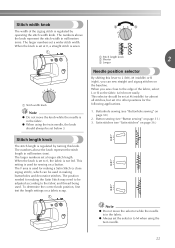
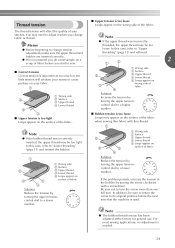
...fabric with a screwdriver. If the problem persists, increase the tension in the bobbin by turning the upper tension- In this case, refer to "Upper threading" (page 13) and rethread. 1 5 2 ■ Correct tension Correct tension is important as too much or too little tension will affect the ... a lower number. control dial to turn the screw more than one full turn. Note ● If the upper thread was incorrectly inserted, the upper thread may appear on the surface of fabric Solution Increase the tension by turning the upper tensioncontrol dial to its original position ...
...fabric with a screwdriver. If the problem persists, increase the tension in the bobbin by turning the upper tension- In this case, refer to "Upper threading" (page 13) and rethread. 1 5 2 ■ Correct tension Correct tension is important as too much or too little tension will affect the ... a lower number. control dial to turn the screw more than one full turn. Note ● If the upper thread was incorrectly inserted, the upper thread may appear on the surface of fabric Solution Increase the tension by turning the upper tensioncontrol dial to its original position ...
Users Manual - English and Spanish
Page 26
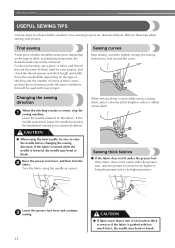
For the trial sewing, use a piece of fabric and thread that will be achieved. If the fabric is turned while the needle is pushed with your project. Sewing thick fabrics ■ If the fabric does ... stitch, select a shorter stitch length in the fabric). SEWING BASICS USEFUL SEWING TIPS Various ways to achieve better results for your project, and check the thread tension and stitch length and width. Refer to sew around the curve. Trial sewing A trial piece of fabric should be sure to raise the needle...
For the trial sewing, use a piece of fabric and thread that will be achieved. If the fabric is turned while the needle is pushed with your project. Sewing thick fabrics ■ If the fabric does ... stitch, select a shorter stitch length in the fabric). SEWING BASICS USEFUL SEWING TIPS Various ways to achieve better results for your project, and check the thread tension and stitch length and width. Refer to sew around the curve. Trial sewing A trial piece of fabric should be sure to raise the needle...


