Users Manual - English and Spanish
Page 2
... precautions should never be used as contained in this sewing machine only for its intended use as threading the needle, changing the needle, threading the bobbin, or changing the presser foot. 15.Always unplug the sewing machine from outlet. 9. Always unplug this sewing machine from the electrical outlet immediately after using...
... precautions should never be used as contained in this sewing machine only for its intended use as threading the needle, changing the needle, threading the bobbin, or changing the presser foot. 15.Always unplug the sewing machine from outlet. 9. Always unplug this sewing machine from the electrical outlet immediately after using...
Users Manual - English and Spanish
Page 4
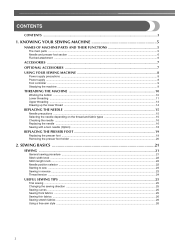
... bed attachment ...6 ACCESSORIES ...7 OPTIONAL ACCESSORIES 7 USING YOUR SEWING MACHINE 8 Power supply precautions ...8 Power supply ...8 Foot controller ...9 Steadying the machine ...9 THREADING THE MACHINE 10 Winding the bobbin ...10 Lower threading ...11 Upper threading ...13 Drawing up the lower thread ...14 REPLACING THE NEEDLE 15 Needle precautions ...15 Selecting the needle depending on...
... bed attachment ...6 ACCESSORIES ...7 OPTIONAL ACCESSORIES 7 USING YOUR SEWING MACHINE 8 Power supply precautions ...8 Power supply ...8 Foot controller ...9 Steadying the machine ...9 THREADING THE MACHINE 10 Winding the bobbin ...10 Lower threading ...11 Upper threading ...13 Drawing up the lower thread ...14 REPLACING THE NEEDLE 15 Needle precautions ...15 Selecting the needle depending on...

Users Manual - English and Spanish
Page 5
APPENDIX ...38 MAINTENANCE ...38 Oiling ...38 Changing the bulb ...38 Cleaning the machine surface ...39 Cleaning the shuttle race ...39 Cleaning the feed dogs ...40 Bobbin case tension adjustment ...41 TROUBLESHOOTING ...42 When the thread is entangled ...45 INDEX ...46 4 UTILITY STITCHES 27 USEFUL STITCHES ...27 Zigzag stitches ...27 Basic stitching ......
APPENDIX ...38 MAINTENANCE ...38 Oiling ...38 Changing the bulb ...38 Cleaning the machine surface ...39 Cleaning the shuttle race ...39 Cleaning the feed dogs ...40 Bobbin case tension adjustment ...41 TROUBLESHOOTING ...42 When the thread is entangled ...45 INDEX ...46 4 UTILITY STITCHES 27 USEFUL STITCHES ...27 Zigzag stitches ...27 Basic stitching ......
Users Manual - English and Spanish
Page 6
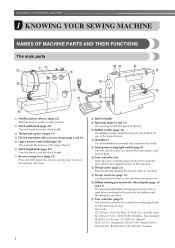
...10 and 13) The spool pin holds the spool of the upper thread. p Bobbin winding pre-tension disc/thread guide (page 10 and 13) The thread guide/bobbin winding pre-tension disc is used when winding the thread onto the bobbin and threading the machine. Part code; c Thread take-up lever (page 13...this machine. f Stitch length knob (page 22) Turn this knob to turn on and off the main power and sewing light. j Bobbin winder (page 10) The bobbin winder winds thread onto the bobbin for use as the lower thread. b Stitch width knob (page 22) Turn this switch to set the stitch width. l Main...
...10 and 13) The spool pin holds the spool of the upper thread. p Bobbin winding pre-tension disc/thread guide (page 10 and 13) The thread guide/bobbin winding pre-tension disc is used when winding the thread onto the bobbin and threading the machine. Part code; c Thread take-up lever (page 13...this machine. f Stitch length knob (page 22) Turn this knob to turn on and off the main power and sewing light. j Bobbin winder (page 10) The bobbin winder winds thread onto the bobbin for use as the lower thread. b Stitch width knob (page 22) Turn this switch to set the stitch width. l Main...
Users Manual - English and Spanish
Page 7
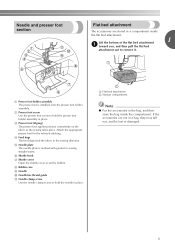
...holder assembly The presser foot is marked with guides for the selected stitching. b Presser foot screw Use the presser foot screw to set the bobbin. Attach the appropriate presser foot for sewing straight seams. f Shuttle hook g Shuttle cover Open the shuttle cover to hold the needle in ...the bag, and then store the bag inside the flat bed attachment. h Bobbin case i Needle j Needle bar thread guide k Needle clamp screw Use the needle clamp screw to remove it. a Flat bed attachment b Storage compartment Note...
...holder assembly The presser foot is marked with guides for the selected stitching. b Presser foot screw Use the presser foot screw to set the bobbin. Attach the appropriate presser foot for sewing straight seams. f Shuttle hook g Shuttle cover Open the shuttle cover to hold the needle in ...the bag, and then store the bag inside the flat bed attachment. h Bobbin case i Needle j Needle bar thread guide k Needle clamp screw Use the needle clamp screw to remove it. a Flat bed attachment b Storage compartment Note...

Users Manual - English and Spanish
Page 8
Part Name 3 Bobbin 4 Needle set Part Code Americas SA156 (Americas) SABOBBIN (U.S.A. Note (For U.S.A. No. KNOWING YOUR SEWING MACHINE ACCESSORIES The following machine models: LS-2000/LS2250PRW/LS2300PRW. ● The screw of the presser foot holder is available through your authorized dealer. (Part code: 132730-122) ● A replacement for the factory-installed presser ...
Part Name 3 Bobbin 4 Needle set Part Code Americas SA156 (Americas) SABOBBIN (U.S.A. Note (For U.S.A. No. KNOWING YOUR SEWING MACHINE ACCESSORIES The following machine models: LS-2000/LS2250PRW/LS2300PRW. ● The screw of the presser foot holder is available through your authorized dealer. (Part code: 132730-122) ● A replacement for the factory-installed presser ...
Users Manual - English and Spanish
Page 11
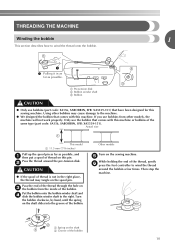
...SA156, SABOBBIN, SFB: XA5539-151) that comes with this machine. Other models Turn on this sewing machine. a Pre-tension disk b Bobbin winder shaft c Bobbin CAUTION ● Only use the bobbin that have been designed for this pin. b CAUTION ● If the spool of the same type (part code: SA156, SABOBBIN, SFB.... Actual size This model a 11.5 mm (7/16 inches) Pull up the spool pin as far as possible. Put the bobbin onto the bobbin winder shaft and d slide the bobbin winder shaft to wind the thread around the pre-tension disk. e While holding the end of the thread, gently f press...
...SA156, SABOBBIN, SFB: XA5539-151) that comes with this machine. Other models Turn on this sewing machine. a Pre-tension disk b Bobbin winder shaft c Bobbin CAUTION ● Only use the bobbin that have been designed for this pin. b CAUTION ● If the spool of the same type (part code: SA156, SABOBBIN, SFB.... Actual size This model a 11.5 mm (7/16 inches) Pull up the spool pin as far as possible. Put the bobbin onto the bobbin winder shaft and d slide the bobbin winder shaft to wind the thread around the pre-tension disk. e While holding the end of the thread, gently f press...
Users Manual - English and Spanish
Page 12
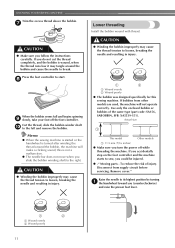
... runs low it may cause the thread tension to loosen, breaking the needle and resulting in injury. 1 2 a Wound evenly b Wound poorly ● The bobbin was designed specifically for this is not a malfunction. ● The needle bar does not move when you do not cut the thread completely, and the... bobbin is turned after winding the thread around the bobbin and cause the needle to break. If you accidentally step on the foot controller and the machine starts to loosen, breaking...
... runs low it may cause the thread tension to loosen, breaking the needle and resulting in injury. 1 2 a Wound evenly b Wound poorly ● The bobbin was designed specifically for this is not a malfunction. ● The needle bar does not move when you do not cut the thread completely, and the... bobbin is turned after winding the thread around the bobbin and cause the needle to break. If you accidentally step on the foot controller and the machine starts to loosen, breaking...

Users Manual - English and Spanish
Page 13
...spring. 1 a Flat bed attachment b Shuttle cover Remove the bobbin case by the latch, fully insert f the bobbin case into the shuttle race, and then release the latch. • Make sure the bobbin case finger fits into the machine. a Bobbin case finger b Notch Close the shuttle cover. g CAUTION .... a Tension spring Hold the bobbin case by pulling its latch c toward you set the bobbin so the thread unrolls in the wrong direction, it out from a full bobbin, and then insert the bobbin into the bobbin case. • Only use bobbins that the bobbin case is incorrectly installed, it...
...spring. 1 a Flat bed attachment b Shuttle cover Remove the bobbin case by the latch, fully insert f the bobbin case into the shuttle race, and then release the latch. • Make sure the bobbin case finger fits into the machine. a Bobbin case finger b Notch Close the shuttle cover. g CAUTION .... a Tension spring Hold the bobbin case by pulling its latch c toward you set the bobbin so the thread unrolls in the wrong direction, it out from a full bobbin, and then insert the bobbin into the bobbin case. • Only use bobbins that the bobbin case is incorrectly installed, it...
Users Manual - English and Spanish
Page 16
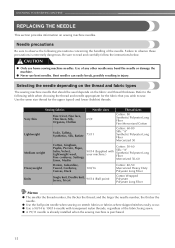
... The sewing machine needle that you wish to observe the following table when choosing the thread and needle appropriate for the upper (spool) and lower (bobbin) threads.
... The sewing machine needle that you wish to observe the following table when choosing the thread and needle appropriate for the upper (spool) and lower (bobbin) threads.
Users Manual - English and Spanish
Page 25
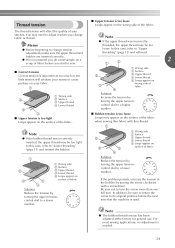
... upper thread may need to adjust it when you start to a lower number. In this case, refer to "Lower threading" (page 11) and reinsert the bobbin. 2 3 5 4 a Wrong side b Surface c Upper thread d Lower thread e Loops appear on surface of fabric 1 2 3 a Wrong side b Surface c Upper ... on your fabric. 1 a Wrong side 2 b Surface c Upper thread d Lower thread 3 4 ■ Upper tension is needed. 24 Note ● The bobbin thread tension has been adjusted at the factory for general use. control dial to sew. In this case, refer to "Upper threading" (page 13) and...
... upper thread may need to adjust it when you start to a lower number. In this case, refer to "Lower threading" (page 11) and reinsert the bobbin. 2 3 5 4 a Wrong side b Surface c Upper thread d Lower thread e Loops appear on surface of fabric 1 2 3 a Wrong side b Surface c Upper ... on your fabric. 1 a Wrong side 2 b Surface c Upper thread d Lower thread 3 4 ■ Upper tension is needed. 24 Note ● The bobbin thread tension has been adjusted at the factory for general use. control dial to sew. In this case, refer to "Upper threading" (page 13) and...
Users Manual - English and Spanish
Page 33
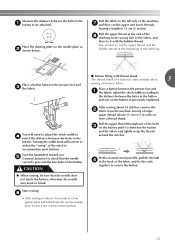
Pull the fabric to the left side of the machine, g and then cut the upper thread and the bobbin thread at a low speed, press and hold down the reverse sewing lever to sew a few reinforcement stitches. 32 Pull the upper thread at the end ... the fabric and tie the ends together to accommodate most buttons. Place a button between the presser foot and c the fabric. ■ Button fitting with the bobbin thread. Turn the handwheel toward you e (counterclockwise) to check that the needle does not touch the button, otherwise the needle may bend or break. Start...
Pull the fabric to the left side of the machine, g and then cut the upper thread and the bobbin thread at a low speed, press and hold down the reverse sewing lever to sew a few reinforcement stitches. 32 Pull the upper thread at the end ... the fabric and tie the ends together to accommodate most buttons. Place a button between the presser foot and c the fabric. ■ Button fitting with the bobbin thread. Turn the handwheel toward you e (counterclockwise) to check that the needle does not touch the button, otherwise the needle may bend or break. Start...
Users Manual - English and Spanish
Page 37
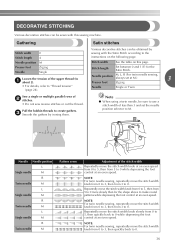
Needle position M, L, R (For twin needle sewing, always set the needle position selector to 0. c Smooth the gathers by sewing with this page. Pull the bobbin threads to "Thread tension" (page 24). NOTE: For twin needle sewing, repeatedly move the stitch width knob at an even speed from 0 to 5, then from 3 ...
Needle position M, L, R (For twin needle sewing, always set the needle position selector to 0. c Smooth the gathers by sewing with this page. Pull the bobbin threads to "Thread tension" (page 24). NOTE: For twin needle sewing, repeatedly move the stitch width knob at an even speed from 0 to 5, then from 3 ...
Users Manual - English and Spanish
Page 40
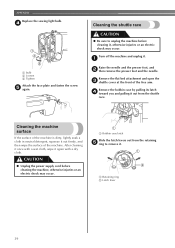
Turn off the machine and unplug it again with a wet cloth, wipe it . a Bobbin case latch Slide the latch levers out from the shuttle race. d Cleaning the shuttle race CAUTION ● Be sure to remove it , otherwise injuries or ... e ring to unplug the machine before cleaning the machine, otherwise injuries or an electric shock may occur. APPENDIX Replace the sewing light bulb. Remove the bobbin case by pulling its latch d toward you and pulling it out firmly, and then wipe the surface of the free arm.
Turn off the machine and unplug it again with a wet cloth, wipe it . a Bobbin case latch Slide the latch levers out from the shuttle race. d Cleaning the shuttle race CAUTION ● Be sure to remove it , otherwise injuries or ... e ring to unplug the machine before cleaning the machine, otherwise injuries or an electric shock may occur. APPENDIX Replace the sewing light bulb. Remove the bobbin case by pulling its latch d toward you and pulling it out firmly, and then wipe the surface of the free arm.
Users Manual - English and Spanish
Page 41
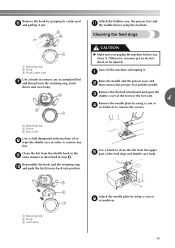
Remove the hook by using a coin or f screwdriver. 40 Attach the bobbin case, the presser foot and k the needle before you clean it. a Retaining ring b Driver c Race body Use a cloth dampened with machine oil to remove any ...
Remove the hook by using a coin or f screwdriver. 40 Attach the bobbin case, the presser foot and k the needle before you clean it. a Retaining ring b Driver c Race body Use a cloth dampened with machine oil to remove any ...
Users Manual - English and Spanish
Page 42
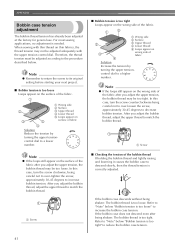
... be too loose. In this case, turn the screw counterclockwise being careful not to over -loosen the screw, approximately 30-45 degrees to match the bobbin thread. Therefore, the thread tension must be adjusted adequately with thin thread on wrong side of the fabric. 1 5 2 3 4 a Wrong side b .... 1 2 3 a Wrong side b Surface c Upper thread d Lower thread e Loops appear on 5 surface of the fabric after being shaken: The bobbin thread is too tight Loops appear on the wrong side of fabric Solution Increase the tension by turning the upper tensioncontrol dial to match the...
... be too loose. In this case, turn the screw counterclockwise being careful not to over -loosen the screw, approximately 30-45 degrees to match the bobbin thread. Therefore, the thread tension must be adjusted adequately with thin thread on wrong side of the fabric. 1 5 2 3 4 a Wrong side b .... 1 2 3 a Wrong side b Surface c Upper thread d Lower thread e Loops appear on 5 surface of the fabric after being shaken: The bobbin thread is too tight Loops appear on the wrong side of fabric Solution Increase the tension by turning the upper tensioncontrol dial to match the...
Users Manual - English and Spanish
Page 43
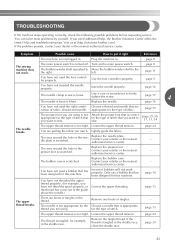
... not used a bobbin that has been designed for example, you are nation of fabric. page 16 You have not fitted the spool properly, or the thread has come out of stitch. - Choose a thread and needle that you need additional help, the Brother Solutions Center offers ...upper threading. Replace the needle plate. The area around the hole in the shuttle race. Contact your retailer or the nearest - Replace the bobbin case. Contact your retailer or the nearest authorized service center. - authorized service center. Loosen the upper thread tension. page 24 The thread...
... not used a bobbin that has been designed for example, you are nation of fabric. page 16 You have not fitted the spool properly, or the thread has come out of stitch. - Choose a thread and needle that you need additional help, the Brother Solutions Center offers ...upper threading. Replace the needle plate. The area around the hole in the shuttle race. Contact your retailer or the nearest - Replace the bobbin case. Contact your retailer or the nearest authorized service center. - authorized service center. Loosen the upper thread tension. page 24 The thread...
Users Manual - English and Spanish
Page 44
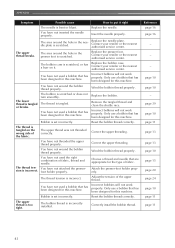
...presser foot. Contact your retailer or the nearest authorised service center. Remove the tangled thread and clean the shuttle race. Bobbin is tangled on it right The needle is incorrect. The thread is set incorrectly. The thread tension is set incorrectly. ...page 10 - You have not attached the presserfoot holder properly. You have not inserted the needle properly. The bobbin case is incorrectly installed. Wind the bobbin thread properly. The upper thread was not threaded correctly. Replace the needle. You have not used the right ...
...presser foot. Contact your retailer or the nearest authorised service center. Remove the tangled thread and clean the shuttle race. Bobbin is tangled on it right The needle is incorrect. The thread is set incorrectly. The thread tension is set incorrectly. ...page 10 - You have not attached the presserfoot holder properly. You have not inserted the needle properly. The bobbin case is incorrectly installed. Wind the bobbin thread properly. The upper thread was not threaded correctly. Replace the needle. You have not used the right ...

Users Manual - English and Spanish
Page 45
...for the type of fabric, thread and needle. Replace the needle. Remove the needle plate cover and clean the plate and the shuttle race. Incorrect bobbins will not work properly. Remove the tangle thread. The thread is too thick. page 38 44 Replace the needle. page 16 If you are ... for the type of fabric. Symptom Possible cause How to put it more often, oil every day. page 15 The needle is scratched. The bobbin case is bent or blunt. If the thread is tangled in the shuttle race, clean the shuttle race. If the thread is tangled in the...
...for the type of fabric, thread and needle. Replace the needle. Remove the needle plate cover and clean the plate and the shuttle race. Incorrect bobbins will not work properly. Remove the tangle thread. The thread is too thick. page 38 44 Replace the needle. page 16 If you are ... for the type of fabric. Symptom Possible cause How to put it more often, oil every day. page 15 The needle is scratched. The bobbin case is bent or blunt. If the thread is tangled in the shuttle race, clean the shuttle race. If the thread is tangled in the...
Users Manual - English and Spanish
Page 46
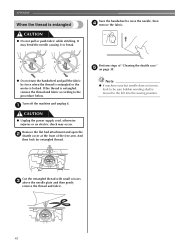
.... a CAUTION ● Unplug the power supply cord, otherwise injuries or an electric shock may bend the needle causing it . And then look to be sure bobbin winding shaft is entangled, remove the thread and fabric according to raise the needle, then d remove the fabric. Cut the entangled thread with small scissors...
.... a CAUTION ● Unplug the power supply cord, otherwise injuries or an electric shock may bend the needle causing it . And then look to be sure bobbin winding shaft is entangled, remove the thread and fabric according to raise the needle, then d remove the fabric. Cut the entangled thread with small scissors...


