Quick Setup Guide - English
Page 1
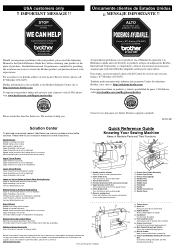
... may be entangled in the shuttle and/or feed dog assemblies Bobbin is not correct Incorrect bobbin being used Quick Reference Guide Knowing Your Sewing Machine Name of Machine Parts and Their Functions 12 3 5 6 8 9 0 D 7 F E C 4 1 Needle position selector Shift this lever to help you...tension is also available at our Brother Solutions Center site at www.brothermall.com. Brother International Corporation is committed to providing the assistance necessary to raise and lower the presser foot N Main Power/Sewing Light Switch Turns your machine/sewing light on Top or Bottom of...
... may be entangled in the shuttle and/or feed dog assemblies Bobbin is not correct Incorrect bobbin being used Quick Reference Guide Knowing Your Sewing Machine Name of Machine Parts and Their Functions 12 3 5 6 8 9 0 D 7 F E C 4 1 Needle position selector Shift this lever to help you...tension is also available at our Brother Solutions Center site at www.brothermall.com. Brother International Corporation is committed to providing the assistance necessary to raise and lower the presser foot N Main Power/Sewing Light Switch Turns your machine/sewing light on Top or Bottom of...
Users Manual - English and Spanish
Page 2
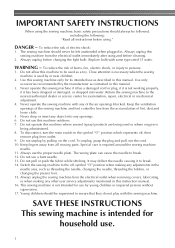
... a damaged cord or plug, if it is being used by young children or impaired persons without supervision. 17. Never operate the sewing machine with same type rated 15 watts. To unplug, grasp the plug and pull, not the cord. 10. Do not pull or push...free from all instructions before using and before changing the light bulb. IMPORTANT SAFETY INSTRUCTIONS When using the sewing machine, basic safety precautions should always be followed, including the following: "Read all moving parts. Keep fingers away from the accumulation of electric shock: 1. WARNING - Do not use by or ...
... a damaged cord or plug, if it is being used by young children or impaired persons without supervision. 17. Never operate the sewing machine with same type rated 15 watts. To unplug, grasp the plug and pull, not the cord. 10. Do not pull or push...free from all instructions before using and before changing the light bulb. IMPORTANT SAFETY INSTRUCTIONS When using the sewing machine, basic safety precautions should always be followed, including the following: "Read all moving parts. Keep fingers away from the accumulation of electric shock: 1. WARNING - Do not use by or ...

Users Manual - English and Spanish
Page 3
... parts. 2. FOR USERS IN THE UK, EIRE, MALTA AND CYPRUS ONLY IMPORTANT • In the event of the operation manual to inspect and adjust the machine yourself. Children should be used. 3. up lever, needle, or other hot objects. 2. Remember to keep your eye on the needle while sewing...for their safety. For a longer service life 1. For additional product information and updates, visit our web site at www.brother.com The contents of this machine, avoid direct sunlight and high humidity locations. When storing this manual and specifications of the appliance by a person responsible for...
... parts. 2. FOR USERS IN THE UK, EIRE, MALTA AND CYPRUS ONLY IMPORTANT • In the event of the operation manual to inspect and adjust the machine yourself. Children should be used. 3. up lever, needle, or other hot objects. 2. Remember to keep your eye on the needle while sewing...for their safety. For a longer service life 1. For additional product information and updates, visit our web site at www.brother.com The contents of this machine, avoid direct sunlight and high humidity locations. When storing this manual and specifications of the appliance by a person responsible for...
Users Manual - English and Spanish
Page 4
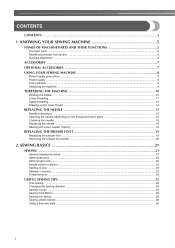
KNOWING YOUR SEWING MACHINE 5 NAMES OF MACHINE PARTS AND THEIR FUNCTIONS 5 The main parts ...5 Needle and presser foot section ...6 Flat bed attachment ...6 ACCESSORIES ...7 OPTIONAL ACCESSORIES 7 USING YOUR SEWING MACHINE 8 Power supply precautions ...8 Power supply ...8 Foot controller ...9 Steadying the machine ...9 THREADING THE MACHINE 10 Winding the bobbin ...10 Lower threading ...11 Upper threading ...13 Drawing up the lower thread ...14 REPLACING...
KNOWING YOUR SEWING MACHINE 5 NAMES OF MACHINE PARTS AND THEIR FUNCTIONS 5 The main parts ...5 Needle and presser foot section ...6 Flat bed attachment ...6 ACCESSORIES ...7 OPTIONAL ACCESSORIES 7 USING YOUR SEWING MACHINE 8 Power supply precautions ...8 Power supply ...8 Foot controller ...9 Steadying the machine ...9 THREADING THE MACHINE 10 Winding the bobbin ...10 Lower threading ...11 Upper threading ...13 Drawing up the lower thread ...14 REPLACING...
Users Manual - English and Spanish
Page 6
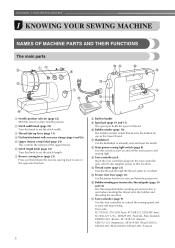
... attachment with accessory storage (page 6 and 26) e Upper tension control dial (page 24) This controls the tension of thread. KNOWING YOUR SEWING MACHINE 1 KNOWING YOUR SEWING MACHINE NAMES OF MACHINE PARTS AND THEIR FUNCTIONS The main parts a Needle position selector (page 22) Shift this lever to raise and lower the presser foot. j Bobbin winder (page 10) The...
... attachment with accessory storage (page 6 and 26) e Upper tension control dial (page 24) This controls the tension of thread. KNOWING YOUR SEWING MACHINE 1 KNOWING YOUR SEWING MACHINE NAMES OF MACHINE PARTS AND THEIR FUNCTIONS The main parts a Needle position selector (page 22) Shift this lever to raise and lower the presser foot. j Bobbin winder (page 10) The...
Users Manual - English and Spanish
Page 8
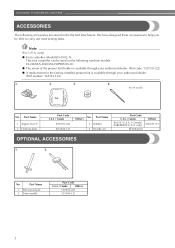
...SEWING MACHINE ACCESSORIES The following machine models: LS-2000/LS-2020/LS2250PRW/LS-30. ● The screw of the presser foot holder is available through your authorized dealer. (Part code: 132730-122) ● A replacement for the factory-installed presser foot is available through your authorized dealer. (Part... foot controller can be able to carry out most sewing tasks. Part Name 1 Extra spool pin 2 Twin needle Part Code U.S.A. / Canada Others 130920-021 131096-121 7 Part Name 1 Zipper foot "I" 2 Darning plate Part Code U.S.A. / Canada X59370-021 XA3442-121 Others No...
...SEWING MACHINE ACCESSORIES The following machine models: LS-2000/LS-2020/LS2250PRW/LS-30. ● The screw of the presser foot holder is available through your authorized dealer. (Part code: 132730-122) ● A replacement for the factory-installed presser foot is available through your authorized dealer. (Part... foot controller can be able to carry out most sewing tasks. Part Name 1 Extra spool pin 2 Twin needle Part Code U.S.A. / Canada Others 130920-021 131096-121 7 Part Name 1 Zipper foot "I" 2 Darning plate Part Code U.S.A. / Canada X59370-021 XA3442-121 Others No...
Users Manual - English and Spanish
Page 11
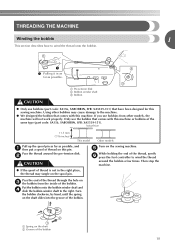
... onto the bobbin winder shaft and d slide the bobbin winder shaft to the right. If you use bobbins (part code: SA156, SABOBBIN, SFB: XA5539-151) that have been designed for this sewing machine. THREADING THE MACHINE Winding the bobbin 1 This section describes how to wind the thread onto the bobbin. 1 Pulling it in the...
... onto the bobbin winder shaft and d slide the bobbin winder shaft to the right. If you use bobbins (part code: SA156, SABOBBIN, SFB: XA5539-151) that have been designed for this sewing machine. THREADING THE MACHINE Winding the bobbin 1 This section describes how to wind the thread onto the bobbin. 1 Pulling it in the...
Users Manual - English and Spanish
Page 12
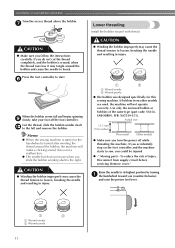
...part code: SA156, SABOBBIN, SFB: XA5539-151). If you (counterclockwise) and raise the presser foot lever. 1 2 a Wound evenly b Wound poorly 11 Remove cover." Press the foot controller to the left and remove the bobbin. CAUTION ● Winding the bobbin improperly may tangle around the bobbin, the machine...Actual size 11.5 mm (7/16 inches) This model Other models ● Make sure you follow the instructions carefully. KNOWING YOUR SEWING MACHINE Trim the excess thread above the bobbin. CAUTION ● Make sure you turn the power off the foot controller. h When ...
...part code: SA156, SABOBBIN, SFB: XA5539-151). If you (counterclockwise) and raise the presser foot lever. 1 2 a Wound evenly b Wound poorly 11 Remove cover." Press the foot controller to the left and remove the bobbin. CAUTION ● Winding the bobbin improperly may tangle around the bobbin, the machine...Actual size 11.5 mm (7/16 inches) This model Other models ● Make sure you follow the instructions carefully. KNOWING YOUR SEWING MACHINE Trim the excess thread above the bobbin. CAUTION ● Make sure you turn the power off the foot controller. h When ...
Users Manual - English and Spanish
Page 18
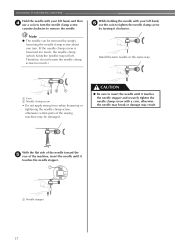
...screw about one turn the needle clamp screw counterclockwise to remove the needle. With the flat side of the needle toward the e rear of the sewing machine may be removed by turning it touches the needle stopper. a Needle stopper 17 Note ● The needle can be damaged. a Coin b ...Needle clamp screw • Do not apply strong force when loosening or tightening the needle clamp screw, otherwise certain parts of the machine, insert the needle until it touches the needle stopper and securely tighten the needle clamp screw with your left hand, f use a coin ...
...screw about one turn the needle clamp screw counterclockwise to remove the needle. With the flat side of the needle toward the e rear of the sewing machine may be removed by turning it touches the needle stopper. a Needle stopper 17 Note ● The needle can be damaged. a Coin b ...Needle clamp screw • Do not apply strong force when loosening or tightening the needle clamp screw, otherwise certain parts of the machine, insert the needle until it touches the needle stopper and securely tighten the needle clamp screw with your left hand, f use a coin ...

Users Manual - English and Spanish
Page 19
... guide. Thread the left needle from front to back. See page 13 for more details. c Needle bar thread guide 18 Sewing with a twin needle (Option) We have been made for this machine (part code: 131096-121). Other needles could break and injure you. ● Use the zigzag presser foot. ● Use a.... ● Set the needle position selector to raise the needle before turning the fabric. The needle could break, and damage the machine. ● Do not sew with the optional twin needle and two top threads. If the fabric is turned while the needle is the same as for normally ...
... guide. Thread the left needle from front to back. See page 13 for more details. c Needle bar thread guide 18 Sewing with a twin needle (Option) We have been made for this machine (part code: 131096-121). Other needles could break and injure you. ● Use the zigzag presser foot. ● Use a.... ● Set the needle position selector to raise the needle before turning the fabric. The needle could break, and damage the machine. ● Do not sew with the optional twin needle and two top threads. If the fabric is turned while the needle is the same as for normally ...

Users Manual - English and Spanish
Page 22
...For details on selecting a stitch, refer to sew. 1 Turn on the machine. In addition, keep your hands away from all moving parts such as the needle and handwheel, otherwise injuries may occur. ● Do not pull or push the fabric too hard while sewing, otherwise injuries may occur or the needle ...may break or bend. General sewing procedure Follow...
...For details on selecting a stitch, refer to sew. 1 Turn on the machine. In addition, keep your hands away from all moving parts such as the needle and handwheel, otherwise injuries may occur. ● Do not pull or push the fabric too hard while sewing, otherwise injuries may occur or the needle ...may break or bend. General sewing procedure Follow...
Users Manual - English and Spanish
Page 47
... parts 5 main power switch 8 monogramming 34 N needle 15 needle bar thread guide 6 needle clamp screw 6, 17 needle plate 6, 40 needle position selector 22 O oiling 38 P presser foot 6, 19 presser foot holder 6, 20 presser foot lever 5, 13 pre-tension disk 10 R relative chart of sewing fabrics, needles and threads .....15 reverse sewing lever 23 S sewing machine...
... parts 5 main power switch 8 monogramming 34 N needle 15 needle bar thread guide 6 needle clamp screw 6, 17 needle plate 6, 40 needle position selector 22 O oiling 38 P presser foot 6, 19 presser foot holder 6, 20 presser foot lever 5, 13 pre-tension disk 10 R relative chart of sewing fabrics, needles and threads .....15 reverse sewing lever 23 S sewing machine...


