Operation Manual
Page 1
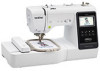
We recommend that you keep this document before using the machine. Operation Manual Embroidery and Sewing Machine Product Code: 888-M20 Be sure to read this document nearby for future reference.
We recommend that you keep this document before using the machine. Operation Manual Embroidery and Sewing Machine Product Code: 888-M20 Be sure to read this document nearby for future reference.

Operation Manual
Page 6
...23 Replacing the presser foot 23 Removing and attaching the presser foot holder 24 Chapter 2 SEWING BASICS 25 Sewing 25 Stitch types 25 Basic sewing 25 Sewing reverse/reinforcement stitches 27 Combining Stitch Patterns 27 Automatic reverse/reinforcement stitching 28 Automatically cutting the... linked characters 73 Using the Memory Function 74 Saving embroidery patterns 75 Retrieving embroidery patterns 75 Chapter 5 APPENDIX 77 Care and Maintenance 77 Restrictions on oiling 77 Precautions on storing the machine 77 Cleaning the race 77 Touch panel is malfunctioning ...
...23 Replacing the presser foot 23 Removing and attaching the presser foot holder 24 Chapter 2 SEWING BASICS 25 Sewing 25 Stitch types 25 Basic sewing 25 Sewing reverse/reinforcement stitches 27 Combining Stitch Patterns 27 Automatic reverse/reinforcement stitching 28 Automatically cutting the... linked characters 73 Using the Memory Function 74 Saving embroidery patterns 75 Retrieving embroidery patterns 75 Chapter 5 APPENDIX 77 Care and Maintenance 77 Restrictions on oiling 77 Precautions on storing the machine 77 Cleaning the race 77 Touch panel is malfunctioning ...
Operation Manual
Page 7
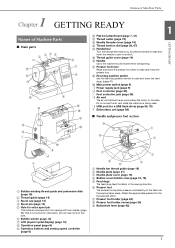
...) to raise and lower the needle to raise and lower the presser foot. G Presser foot lever Raise and lower the presser foot lever to sew one stitch. H Feed dog position switch Use the feed dog position switch to raise and lower the feed dogs. (page 47) I Main ... air vent allows the air surrounding the motor to circulate. E Thread guide cover (page 14) F Handle Carry the machine by its handle when transporting. N USB port (for a USB flash drive) (page 55, 75) O Embroidery unit (page 58) ■ Needle and presser foot section i a h b GETTING READY 1 s t u y 1 Bobbin winding thread...
...) to raise and lower the needle to raise and lower the presser foot. G Presser foot lever Raise and lower the presser foot lever to sew one stitch. H Feed dog position switch Use the feed dog position switch to raise and lower the feed dogs. (page 47) I Main ... air vent allows the air surrounding the motor to circulate. E Thread guide cover (page 14) F Handle Carry the machine by its handle when transporting. N USB port (for a USB flash drive) (page 55, 75) O Embroidery unit (page 58) ■ Needle and presser foot section i a h b GETTING READY 1 s t u y 1 Bobbin winding thread...

Operation Manual
Page 8
... Selected pattern settings and messages are not displayed on the LCD. 4 Help key Press to get help on using the machine. 5 Settings key Press to set the needle stop sewing. Names of Machine Parts ■ Operation buttons ■ Operation panel and operation keys b a a cd e 1 "Start/Stop" button...the presser foot, etc. Pressing the button twice sews one stitch. 4 Thread cutter button Press the thread cutter button after sewing is 8 mm or more . 6 Embroidery key Press this key to embroider. 7 Utility stitch key Press this key to sew a utility stitch or decorative stitch. 8 Back key...
... Selected pattern settings and messages are not displayed on the LCD. 4 Help key Press to get help on using the machine. 5 Settings key Press to set the needle stop sewing. Names of Machine Parts ■ Operation buttons ■ Operation panel and operation keys b a a cd e 1 "Start/Stop" button...the presser foot, etc. Pressing the button twice sews one stitch. 4 Thread cutter button Press the thread cutter button after sewing is 8 mm or more . 6 Embroidery key Press this key to embroider. 7 Utility stitch key Press this key to sew a utility stitch or decorative stitch. 8 Back key...

Operation Manual
Page 14
... that are saved in for regular servicing. (Contact your authorized Brother dealer for operation keys. (page 13) J Display the service count which is the internal machine number for the embroidery display area. H Select whether to take your machine in a folder labeled "bPocket". ■ Sewing settings 1 2 3 5 Select the embroidery frame to be selected according to change the default...
... that are saved in for regular servicing. (Contact your authorized Brother dealer for operation keys. (page 13) J Display the service count which is the internal machine number for the embroidery display area. H Select whether to take your machine in a folder labeled "bPocket". ■ Sewing settings 1 2 3 5 Select the embroidery frame to be selected according to change the default...

Operation Manual
Page 15
...button lights up in the bobbin aligns with this machine. Press e to return to previous screen. ■ If the machine does not respond when an operation key is being used for the upper threading. • When winding bobbin for embroidery, be . Otherwise the thread may cause damage to...inch). c Winding/Installing the Bobbin CAUTION • Only use thread appropriate for this machine or bobbins of the same type (SA156/SFB: XA5539-151/SFB). Memo • When winding the bobbin for sewing utility stitches, use the plastic bobbin that the thread unwinds to set desired level. ...
...button lights up in the bobbin aligns with this machine. Press e to return to previous screen. ■ If the machine does not respond when an operation key is being used for the upper threading. • When winding bobbin for embroidery, be . Otherwise the thread may cause damage to...inch). c Winding/Installing the Bobbin CAUTION • Only use thread appropriate for this machine or bobbins of the same type (SA156/SFB: XA5539-151/SFB). Memo • When winding the bobbin for sewing utility stitches, use the plastic bobbin that the thread unwinds to set desired level. ...

Operation Manual
Page 23
... 90/14 - 100/16 75/11 - 90/14 ■ Transparent nylon thread Use a home sewing machine topstitching needle, regardless of the fabric or thread. ■ Embroidery needles Use a 75/11 home sewing machine needle for the fabric that you wish to sew. - Stitch length mm (inch) Fine stitches 1.8-2.5 (1/16-3/32) Regular stitches 2.0-3.0 (1/16-1/8) Coarse stitches 2.5-4.0 (3/32...
... 90/14 - 100/16 75/11 - 90/14 ■ Transparent nylon thread Use a home sewing machine topstitching needle, regardless of the fabric or thread. ■ Embroidery needles Use a 75/11 home sewing machine needle for the fabric that you wish to sew. - Stitch length mm (inch) Fine stitches 1.8-2.5 (1/16-3/32) Regular stitches 2.0-3.0 (1/16-1/8) Coarse stitches 2.5-4.0 (3/32...

Operation Manual
Page 70
...securely baste it in place with basting stitches. • If thin fabric is finished. ■ 3. Thread the machine with an iron-on those in place with the embroidery thread, lower the presser foot lever, and then press the "Start/Stop" button to the fabric. After the ...piece Attach stabilizer material to be used to attach the appliqué piece to the machine. a 1 Position of appliqué 2 Base material a b Remove the embroidery frame from the embroidery frame until all sewing is used will not appear. Affixing the appliqué piece to the base fabric Lightly...
...securely baste it in place with basting stitches. • If thin fabric is finished. ■ 3. Thread the machine with an iron-on those in place with the embroidery thread, lower the presser foot lever, and then press the "Start/Stop" button to the fabric. After the ...piece Attach stabilizer material to be used to attach the appliqué piece to the machine. a 1 Position of appliqué 2 Base material a b Remove the embroidery frame from the embroidery frame until all sewing is used will not appear. Affixing the appliqué piece to the base fabric Lightly...

Operation Manual
Page 79
... this machine, it should be oiled by the user. Restrictions on and use organic solvents or detergents. This machine was manufactured with a dry cloth. Cleaning the race Sewing performance will...holder. • For details, refer to extend the life of your authorized Brother dealer or the nearest Brother authorized service center. Slide the needle plate cover toward you to raise the needle... machine is attached. Remove the flat bed attachment or the embroidery unit e if either is dirty, lightly soak a cloth in any of the locations described below, otherwise damage to the machine...
... this machine, it should be oiled by the user. Restrictions on and use organic solvents or detergents. This machine was manufactured with a dry cloth. Cleaning the race Sewing performance will...holder. • For details, refer to extend the life of your authorized Brother dealer or the nearest Brother authorized service center. Slide the needle plate cover toward you to raise the needle... machine is attached. Remove the flat bed attachment or the embroidery unit e if either is dirty, lightly soak a cloth in any of the locations described below, otherwise damage to the machine...
Operation Manual
Page 85
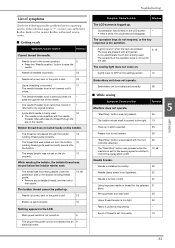
... is no stitch selected. 25 Presser foot is not lowered. 26 "Start/Stop" button was pressed while the machine is set for the user. 6, 13 The sewing light does not come on the bobbin-winding thread guide. • Remove any entangled thread, and then wind...the bobbin thread was incorrectly wound onto the bobbin. Main power switch is incompatible with the needle threader. Embroidery unit is "*", contact your authorized Brother dealer or the nearest Brother authorized service center. ■ Getting ready Symptom, Cause/solution Reference Cannot thread the needle. Needle is ...
... is no stitch selected. 25 Presser foot is not lowered. 26 "Start/Stop" button was pressed while the machine is set for the user. 6, 13 The sewing light does not come on the bobbin-winding thread guide. • Remove any entangled thread, and then wind...the bobbin thread was incorrectly wound onto the bobbin. Main power switch is incompatible with the needle threader. Embroidery unit is "*", contact your authorized Brother dealer or the nearest Brother authorized service center. ■ Getting ready Symptom, Cause/solution Reference Cannot thread the needle. Needle is ...

Operation Manual
Page 88
...Cause/solution Reference Fabric was pulled, pushed or fed at an angle 25 while it was being sewn. • Sew while guiding the fabric with your authorized Brother dealer for the proper stabilizer. See your hands so that the fabric is not being used. 86 Support the ...it does not get caught or snagged. The thread is snagged or caught on something. - • Stop the machine and place the fabric so that it is set . 67 Embroidery bobbin thread intended for use stabilizing material, especially with stretch fabrics, lightweight fabrics, fabrics with a coarse weave, or...
...Cause/solution Reference Fabric was pulled, pushed or fed at an angle 25 while it was being sewn. • Sew while guiding the fabric with your authorized Brother dealer for the proper stabilizer. See your hands so that the fabric is not being used. 86 Support the ...it does not get caught or snagged. The thread is snagged or caught on something. - • Stop the machine and place the fabric so that it is set . 67 Embroidery bobbin thread intended for use stabilizing material, especially with stretch fabrics, lightweight fabrics, fabrics with a coarse weave, or...
Operation Manual
Page 90
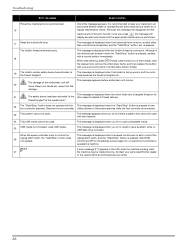
... the This message is displayed when the "Start/Stop" button is pressed to sew foot controller attached. This message is displayed when you try to function once you... message is displayed when the buttonhole lever is down, a stitch other reasons related to operate the machine. 27 F** If error message [F**] appears in the settings screen (page 12), or use incompatible media...running out. This message appears before embroidery unit moves. Load USB media. When the speed controller is set to an authorized Brother dealer or nearest Brother authorized service center for 21 The safety...
... the This message is displayed when the "Start/Stop" button is pressed to sew foot controller attached. This message is displayed when you try to function once you... message is displayed when the buttonhole lever is down, a stitch other reasons related to operate the machine. 27 F** If error message [F**] appears in the settings screen (page 12), or use incompatible media...running out. This message appears before embroidery unit moves. Load USB media. When the speed controller is set to an authorized Brother dealer or nearest Brother authorized service center for 21 The safety...


