
Accessories catalog
Page 36
...Bi-level spring action guide (8 mm) 2 Gathering Foot SA171 3 Heavyweight Foot SA173 4 Very Narrow Foot SA172 5 Needle felting attachment SA180B Metal bobbins (5 pcs.) Canette en métal (5 pcs) Metallspulen (5 Stück) 6 Metalen Spoeltjes (5 stuks) Bobinas de metal (5piezas) ... SAWT5 SAWT5 SAWT7 SAWT2 SAWT1 SAWT1 SAWT3 Embroidery accessories 1 PE-DESIGN11 2 PE-DESIGN PLUS 3 Embroidery thread sets 4 Bobbin threads 5 Prewound Embroidery Bobbin threads 6 Iron-on Backing Stabilizer 7 Water soluble stabilizer 8 Water soluble stabilizer (non-woven fabric) 9 Software Upgrade ...
...Bi-level spring action guide (8 mm) 2 Gathering Foot SA171 3 Heavyweight Foot SA173 4 Very Narrow Foot SA172 5 Needle felting attachment SA180B Metal bobbins (5 pcs.) Canette en métal (5 pcs) Metallspulen (5 Stück) 6 Metalen Spoeltjes (5 stuks) Bobinas de metal (5piezas) ... SAWT5 SAWT5 SAWT7 SAWT2 SAWT1 SAWT1 SAWT3 Embroidery accessories 1 PE-DESIGN11 2 PE-DESIGN PLUS 3 Embroidery thread sets 4 Bobbin threads 5 Prewound Embroidery Bobbin threads 6 Iron-on Backing Stabilizer 7 Water soluble stabilizer 8 Water soluble stabilizer (non-woven fabric) 9 Software Upgrade ...

Accessories catalog
Page 38
...WT14 WT15 WT15 WT17 WT7 WT9 WT9 WT13 Embroidery accessories 1 PE-DESIGN11 2 PE-DESIGN PLUS 3 Embroidery thread sets 4 Bobbin threads 5 Prewound Embroidery Bobbin threads 6 Iron-on Backing Stabilizer 7 Water soluble stabilizer 8 Water soluble stabilizer (non-woven fabric) 9 Software Upgrade ...-level spring action guide (8 mm) F046 2 Gathering Foot F047 3 Heavyweight Foot 4 Very Narrow Foot F049 F048 5 Needle felting attachment NFA1 Metal bobbins (5 pcs.) Canette en métal (5 pcs) Metallspulen (5 Stück) 6 Metalen Spoeltjes (5 stuks) Bobinas de metal (5piezas) Spolina...
...WT14 WT15 WT15 WT17 WT7 WT9 WT9 WT13 Embroidery accessories 1 PE-DESIGN11 2 PE-DESIGN PLUS 3 Embroidery thread sets 4 Bobbin threads 5 Prewound Embroidery Bobbin threads 6 Iron-on Backing Stabilizer 7 Water soluble stabilizer 8 Water soluble stabilizer (non-woven fabric) 9 Software Upgrade ...-level spring action guide (8 mm) F046 2 Gathering Foot F047 3 Heavyweight Foot 4 Very Narrow Foot F049 F048 5 Needle felting attachment NFA1 Metal bobbins (5 pcs.) Canette en métal (5 pcs) Metallspulen (5 Stück) 6 Metalen Spoeltjes (5 stuks) Bobinas de metal (5piezas) Spolina...

Accessories catalog
Page 39
... Frame (360 × 360) - PRMHA50/PRMFA50/PRMFA50AP Magnetic Frame (50 × 50)/ Arm-E - PRSWT1/VRWT1/VRWT1CN Wide Table Yes PRTT1 Tubular Frame Table Yes PRBW1 Bobbin Winder Yes PRPUGK1/PRUGK1 Upgrade Kit - *1) Need to have the ver.4.10 and later *2) Need to have the ver.4.30 and later *3) Need to have...
... Frame (360 × 360) - PRMHA50/PRMFA50/PRMFA50AP Magnetic Frame (50 × 50)/ Arm-E - PRSWT1/VRWT1/VRWT1CN Wide Table Yes PRTT1 Tubular Frame Table Yes PRBW1 Bobbin Winder Yes PRPUGK1/PRUGK1 Upgrade Kit - *1) Need to have the ver.4.10 and later *2) Need to have the ver.4.30 and later *3) Need to have...

Operation Manual
Page 6
... ...13 Changing the initial needle position ...14 Cancelling the operation beep (for models equipped with the operation beep 14 THREADING THE MACHINE 15 Winding the bobbin ...15 Lower threading ...20 Upper threading ...23 Drawing up the lower thread ...28 REPLACING THE NEEDLE 29 Needle precautions ...29 Needle types and their uses...
... ...13 Changing the initial needle position ...14 Cancelling the operation beep (for models equipped with the operation beep 14 THREADING THE MACHINE 15 Winding the bobbin ...15 Lower threading ...20 Upper threading ...23 Drawing up the lower thread ...28 REPLACING THE NEEDLE 29 Needle precautions ...29 Needle types and their uses...

Operation Manual
Page 8
... foot "G" XE6305-101 4 Monogramming foot "N" XD0810-031 5 Zipper foot "I" X59370-021 6 Blind stitch foot "R" XC4051-031 7 Button fitting foot "M" XE2137-001 8 Seam ripper XZ5082-001 9 Bobbin (4) (One is difficult for thick seams to be used on the machine model. 1. 2. 3. 4. 5. 6. 7. 8. 9. 10. 11. 12. 13. 75/11 1 needle 90/14 1 needle 100/16...
... foot "G" XE6305-101 4 Monogramming foot "N" XD0810-031 5 Zipper foot "I" X59370-021 6 Blind stitch foot "R" XC4051-031 7 Button fitting foot "M" XE2137-001 8 Seam ripper XZ5082-001 9 Bobbin (4) (One is difficult for thick seams to be used on the machine model. 1. 2. 3. 4. 5. 6. 7. 8. 9. 10. 11. 12. 13. 75/11 1 needle 90/14 1 needle 100/16...

Operation Manual
Page 10
... operation panel differs depending on and off. Do not cover the air vent while the sewing machine is used when winding the thread onto the bobbin and then threading the machine. o Foot controller jack/socket (page 13) Plug in this to control the sewing speed, and to cut them. i Spool ... motor to raise and lower the presser foot. s Thread guide cover (page 17 and 23) Pass the thread under this thread guide when winding the bobbin thread and threading the machine. j Handwheel This is used to select the stitch and specify the various settings. p Feed dog position lever (page 55 and...
... operation panel differs depending on and off. Do not cover the air vent while the sewing machine is used when winding the thread onto the bobbin and then threading the machine. o Foot controller jack/socket (page 13) Plug in this to control the sewing speed, and to cut them. i Spool ... motor to raise and lower the presser foot. s Thread guide cover (page 17 and 23) Pass the thread under this thread guide when winding the bobbin thread and threading the machine. j Handwheel This is used to select the stitch and specify the various settings. p Feed dog position lever (page 55 and...

Operation Manual
Page 11
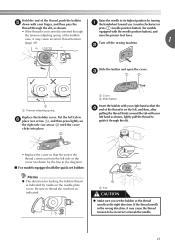
... appropriate presser foot for models equipped with the quick- g Needle plate cover Remove the needle plate cover to set the bobbin. j Bobbin cover Open the bobbin cover to clean the race. c Presser foot holder The presser foot is depressed. m Presser foot lever Raise and lower...speed. 9 For details, refer to "Sewing reinforcement stitches" (page 40). ■ Buttons provided on the fabric as the sewing takes place. set bobbin (for the selected stitching. 1 f Needle plate cover release Use when removing the needle plate cover. a Needle threader (for sewing straight seams. ...
... appropriate presser foot for models equipped with the quick- g Needle plate cover Remove the needle plate cover to set the bobbin. j Bobbin cover Open the bobbin cover to clean the race. c Presser foot holder The presser foot is depressed. m Presser foot lever Raise and lower...speed. 9 For details, refer to "Sewing reinforcement stitches" (page 40). ■ Buttons provided on the fabric as the sewing takes place. set bobbin (for the selected stitching. 1 f Needle plate cover release Use when removing the needle plate cover. a Needle threader (for sewing straight seams. ...

Operation Manual
Page 17
... This model Other models As shown, press down on the fast bobbin winding, see page 18. 1 a Bobbin-winding thread guide b Bobbin winder shaft c Bobbin CAUTION ● Only use bobbins from other bobbins may cause damage to the machine. ● We designed the bobbin that have been designed for this sewing machine. X The spool ... b CAUTION ● Do not grab the bar to raise the spool pin, otherwise, the spool pin may become tangled if the bobbin winder is used without raising the spool pin. 15 Remove the spool cap. The thread may bend or break. THREADING THE MACHINE Winding the...
... This model Other models As shown, press down on the fast bobbin winding, see page 18. 1 a Bobbin-winding thread guide b Bobbin winder shaft c Bobbin CAUTION ● Only use bobbins from other bobbins may cause damage to the machine. ● We designed the bobbin that have been designed for this sewing machine. X The spool ... b CAUTION ● Do not grab the bar to raise the spool pin, otherwise, the spool pin may become tangled if the bobbin winder is used without raising the spool pin. 15 Remove the spool cap. The thread may bend or break. THREADING THE MACHINE Winding the...

Operation Manual
Page 18
... spool cap, and leave a small space between the cap and the spool. a Thread guide cover 16 If the spool cap is too small for the bobbin c onto the spool pin. c b Slide the spool cap onto the spool pin. KNOWING YOUR SEWING MACHINE Fully insert the spool of thread for the spool...
... spool cap, and leave a small space between the cap and the spool. a Thread guide cover 16 If the spool cap is too small for the bobbin c onto the spool pin. c b Slide the spool cap onto the spool pin. KNOWING YOUR SEWING MACHINE Fully insert the spool of thread for the spool...

Operation Manual
Page 19
...be used to start sewing (only for models equipped with the start /stop button) to wind the thread around the bobbin. k • Leave 1 cm (3/8 inch) of the bobbin-winding thread guide, and then wind the thread counterclockwise CAUTION between the discs, pulling it in , the start/stop ... start /stop the machine. i While holding the end of the thread straight up. a Spring on the sewing machine. Put the bobbin onto the bobbin winder shaft h and slide the bobbin winder shaft to the right. If you follow the instructions carefully. Turn on the shaft b Notch c 7-10 cm (2-3/4 - 3-...
...be used to start sewing (only for models equipped with the start /stop button) to wind the thread around the bobbin. k • Leave 1 cm (3/8 inch) of the bobbin-winding thread guide, and then wind the thread counterclockwise CAUTION between the discs, pulling it in , the start/stop ... start /stop the machine. i While holding the end of the thread straight up. a Spring on the sewing machine. Put the bobbin onto the bobbin winder shaft h and slide the bobbin winder shaft to the right. If you follow the instructions carefully. Turn on the shaft b Notch c 7-10 cm (2-3/4 - 3-...

Operation Manual
Page 20
...-tension disk (page 15). b Follow steps a through g of the thread clockwise around the d pre-tension disk with your left and remove the bobbin. a Sewing speed controller Press the foot controller or press (start/ m stop button). KNOWING YOUR SEWING MACHINE Slide the sewing speed controller to the ...(to set the speed to fast). (For models equipped with the sewing speed controller.) CAUTION ● Not winding the bobbin properly may break the needle. When the bobbin seems full and begins n spinning slowly, take your foot off the foot controller or press (start/stop button) (for...
...-tension disk (page 15). b Follow steps a through g of the thread clockwise around the d pre-tension disk with your left and remove the bobbin. a Sewing speed controller Press the foot controller or press (start/ m stop button). KNOWING YOUR SEWING MACHINE Slide the sewing speed controller to the ...(to set the speed to fast). (For models equipped with the sewing speed controller.) CAUTION ● Not winding the bobbin properly may break the needle. When the bobbin seems full and begins n spinning slowly, take your foot off the foot controller or press (start/stop button) (for...

Operation Manual
Page 21
... shaft to the right. 19 a Sewing speed controller Turn on the machine. ● When the foot controller is plugged in the bobbin winder seat. this is wound without cutting the thread using the foot controller, connect the foot controller before turning on the sewing machine. ...start. Note ● If the sewing machine is to the left, and then remove the bobbin from the shaft. 1 a Slit in bobbin winder seat (with the start / h stop button) (for models equipped with built-in the bobbin or the needle may break the needle. g Press the foot controller or press (start /stop...
... shaft to the right. 19 a Sewing speed controller Turn on the machine. ● When the foot controller is plugged in the bobbin winder seat. this is wound without cutting the thread using the foot controller, connect the foot controller before turning on the sewing machine. ...start. Note ● If the sewing machine is to the left, and then remove the bobbin from the shaft. 1 a Slit in bobbin winder seat (with the start / h stop button) (for models equipped with built-in the bobbin or the needle may break the needle. g Press the foot controller or press (start /stop...

Operation Manual
Page 22
...or break the needle. 20 CAUTION ● Make sure you turn the power off the sewing machine. CAUTION ● Winding the bobbin improperly may cause the thread tension to loosen, breaking the needle and resulting in the wrong direction, it may cause the thread ... to sew, you (counterclockwise) or press (needle position button) (for this sewing machine. c 1 2 1 2 a Wound evenly b Wound poorly ● The bobbin was designed specifically for models equipped with thread. • For more details on the needle plate cover. Actual size 11.5 mm (7/16 inch) This model...
...or break the needle. 20 CAUTION ● Make sure you turn the power off the sewing machine. CAUTION ● Winding the bobbin improperly may cause the thread tension to loosen, breaking the needle and resulting in the wrong direction, it may cause the thread ... to sew, you (counterclockwise) or press (needle position button) (for this sewing machine. c 1 2 1 2 a Wound evenly b Wound poorly ● The bobbin was designed specifically for models equipped with thread. • For more details on the needle plate cover. Actual size 11.5 mm (7/16 inch) This model...
Operation Manual
Page 23
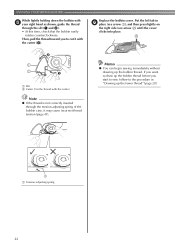
..., as indicated. case, it may cause the thread tension to be incorrect or break the needle. 21 Hold the end of the thread, push the bobbin e down with your left hand as shown, lightly pull the thread to guide it through the slit. • Replace the cover so that the d end... button), and the tension-adjusting spring of the cover (as shown by the line in the diagram). ■ For models equipped with the quick-set bobbin Memo ● The direction for models • If the thread is indicated by turning a the handwheel toward you set the...
..., as indicated. case, it may cause the thread tension to be incorrect or break the needle. 21 Hold the end of the thread, push the bobbin e down with your left hand as shown, lightly pull the thread to guide it through the slit. • Replace the cover so that the d end... button), and the tension-adjusting spring of the cover (as shown by the line in the diagram). ■ For models equipped with the quick-set bobbin Memo ● The direction for models • If the thread is indicated by turning a the handwheel toward you set the...
Operation Manual
Page 24
... right side (see arrow b) until the cover clicks into place. Put the left tab in "Drawing up the bobbin thread. a Slit b Cutter (Cut the thread with the cutter (c). Replace the bobbin cover. Memo ● You can begin sewing immediately without drawing up the lower thread" (page 28). 1 a... cause incorrect thread tension (page 41). KNOWING YOUR SEWING MACHINE While lightly holding down the bobbin with e your right hand as shown, guide the thread through the tension-adjusting spring of the bobbin case, it with the cutter.) Note ● If the thread is not correctly inserted...
... right side (see arrow b) until the cover clicks into place. Put the left tab in "Drawing up the bobbin thread. a Slit b Cutter (Cut the thread with the cutter (c). Replace the bobbin cover. Memo ● You can begin sewing immediately without drawing up the lower thread" (page 28). 1 a... cause incorrect thread tension (page 41). KNOWING YOUR SEWING MACHINE While lightly holding down the bobbin with e your right hand as shown, guide the thread through the tension-adjusting spring of the bobbin case, it with the cutter.) Note ● If the thread is not correctly inserted...

Operation Manual
Page 30
...) so that some thread will be removed. a Mark b Needle position button Pull on the wheel points up the lower c thread. • The bobbin cover should still be left over. Before you can begin sewing immediately without cutting it there without drawing up the lower thread Lightly hold the... once or twice. c a Upper thread b Lower thread 28 a Upper thread While holding the end of the arrow, and leave it . Replace the bobbin cover. Pass the thread along the slit in the direction a of the upper thread, b raise the needle either by hand so that the mark on...
...) so that some thread will be removed. a Mark b Needle position button Pull on the wheel points up the lower c thread. • The bobbin cover should still be left over. Before you can begin sewing immediately without cutting it there without drawing up the lower thread Lightly hold the... once or twice. c a Upper thread b Lower thread 28 a Upper thread While holding the end of the arrow, and leave it . Replace the bobbin cover. Pass the thread along the slit in the direction a of the upper thread, b raise the needle either by hand so that the mark on...

Operation Manual
Page 34
... needle, refer to select an appropriate stitch, otherwise the needle may break or the machine may be damaged. ● Select a stitch width of the d bobbin winder shaft. a Twin needle b Extra spool pin CAUTION ● Use only twin needles that the thread winds off from front to steps a through the eye... 5.0 mm (3/16 inch) or less, otherwise the needle may break or the machine may be sewn with the twin needle, refer to the back. a Bobbin winder shaft b Extra spool pin c Thread spool Install the thread spool and thread the upper e thread. Instead, thread the twin needle by hand, from...
... needle, refer to select an appropriate stitch, otherwise the needle may break or the machine may be damaged. ● Select a stitch width of the d bobbin winder shaft. a Twin needle b Extra spool pin CAUTION ● Use only twin needles that the thread winds off from front to steps a through the eye... 5.0 mm (3/16 inch) or less, otherwise the needle may break or the machine may be sewn with the twin needle, refer to the back. a Bobbin winder shaft b Extra spool pin c Thread spool Install the thread spool and thread the upper e thread. Instead, thread the twin needle by hand, from...
Operation Manual
Page 43
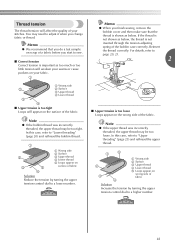
...21. 2 2 3 4 a Wrong side b Surface c Upper thread d Lower thread ■ Upper tension is not inserted through the tension-adjusting spring of the bobbin case correctly. Note ● If the upper thread was incorrectly threaded, the upper thread may be too loose. Memo ● We recommend that the thread... your stitches. Thread tension The thread tension will affect the quality of your fabric. 1 Memo ● When you finish sewing, remove the bobbin cover and then make sure that you do a test sample on scrap of a fabric before you change fabric or thread. You may be ...
...21. 2 2 3 4 a Wrong side b Surface c Upper thread d Lower thread ■ Upper tension is not inserted through the tension-adjusting spring of the bobbin case correctly. Note ● If the upper thread was incorrectly threaded, the upper thread may be too loose. Memo ● We recommend that the thread... your stitches. Thread tension The thread tension will affect the quality of your fabric. 1 Memo ● When you finish sewing, remove the bobbin cover and then make sure that you do a test sample on scrap of a fabric before you change fabric or thread. You may be ...
Operation Manual
Page 45
... may not feed when thick seams are being sewn and the presser foot is sewn, the presser foot will return to the needle or the bobbin hook race, it may bend or break.
... may not feed when thick seams are being sewn and the presser foot is sewn, the presser foot will return to the needle or the bobbin hook race, it may bend or break.

Operation Manual
Page 58
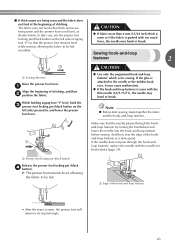
... to the distance between the button holes. i • After sewing for about 10 seconds at . 56 Use scissors to cut the upper thread and the bobbin thread at the end of the j stitching to the wrong side of the stitching. Pull the upper thread at the beginning of the fabric, and... then tie it with the bobbin thread. When you h (counterclockwise) to check that the needle does not touch the button, otherwise the needle may bend or break. UTILITY STITCHES Turn ...
... to the distance between the button holes. i • After sewing for about 10 seconds at . 56 Use scissors to cut the upper thread and the bobbin thread at the end of the j stitching to the wrong side of the stitching. Pull the upper thread at the beginning of the fabric, and... then tie it with the bobbin thread. When you h (counterclockwise) to check that the needle does not touch the button, otherwise the needle may bend or break. UTILITY STITCHES Turn ...


