
Procedure for sewing a DST file using PC - English
Page 1
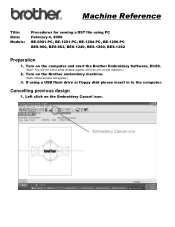
...-PC, BE-1204-PC, BE-1206-PC BES-960, BES-962, BES-1240, BES-1260, BES-1262 Preparation 1. Turn on the computer and start the Brother Embroidery Software, ECSC. (Note: You will appear.) 3. Embroidery Cancel icon Machine Reference Title: Date: Models: Procedures for sewing a DST file using a USB flash drive or floppy...
...-PC, BE-1204-PC, BE-1206-PC BES-960, BES-962, BES-1240, BES-1260, BES-1262 Preparation 1. Turn on the computer and start the Brother Embroidery Software, ECSC. (Note: You will appear.) 3. Embroidery Cancel icon Machine Reference Title: Date: Models: Procedures for sewing a DST file using a USB flash drive or floppy...
Procedure for sewing a DST file using PC - English
Page 12
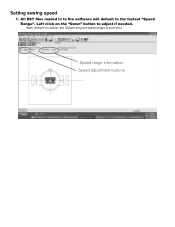
All DST files loaded in to the software will default to start with.) Speed range information Speed adjustment buttons Setting sewing speed 1. Left click on the "Down" button to adjust if needed. (Note: 800spm for tubular and 700spm are good speed ranges to the fastest "Speed Range".
All DST files loaded in to the software will default to start with.) Speed range information Speed adjustment buttons Setting sewing speed 1. Left click on the "Down" button to adjust if needed. (Note: 800spm for tubular and 700spm are good speed ranges to the fastest "Speed Range".
Instruction Manual - English
Page 1
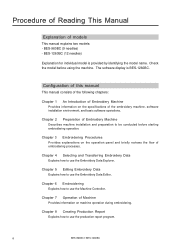
...before using the machine. Chapter 8 Creating Production Report Explains how to use the production report program. 6 BES-960BC • BES-1260BC Check the model before starting embroidering operation. Chapter 2 Preparation of embroidering processes. Chapter 5 Editing Embroidery Data Explains how to use the ...Embroidery Data Editor. Chapter 7 Operation of models This manual explains two models: - BES-1260BC (12 needles) Explanation for individual model is BES-1260BC. BES-960BC (9 needles) - The software display is provided by identifying the model name.
...before using the machine. Chapter 8 Creating Production Report Explains how to use the production report program. 6 BES-960BC • BES-1260BC Check the model before starting embroidering operation. Chapter 2 Preparation of embroidering processes. Chapter 5 Editing Embroidery Data Explains how to use the ...Embroidery Data Editor. Chapter 7 Operation of models This manual explains two models: - BES-1260BC (12 needles) Explanation for individual model is BES-1260BC. BES-960BC (9 needles) - The software display is provided by identifying the model name.
Instruction Manual - English
Page 3
... 26 2. Names of Embroidery Hoop and Frame 49 3-5. Installation 28 2-1. Mounting of Bobbin 47 3-3. Preparation for Embroidering 64 Run the Software 65 Turn on the Machine Power 65 8 BES-960BC • BES-1260BC Replacement of Cotton Stand 37 2-6. Specifications 16 2. Configuration of Personal Computer to Needle Bar Case 39 2-7. Help...18 2-5. Connection...
... 26 2. Names of Embroidery Hoop and Frame 49 3-5. Installation 28 2-1. Mounting of Bobbin 47 3-3. Preparation for Embroidering 64 Run the Software 65 Turn on the Machine Power 65 8 BES-960BC • BES-1260BC Replacement of Cotton Stand 37 2-6. Specifications 16 2. Configuration of Personal Computer to Needle Bar Case 39 2-7. Help...18 2-5. Connection...
Instruction Manual - English
Page 12
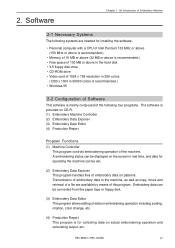
...data for collecting data on patterns. BES-960BC • BES-1260BC 17 Transmission of embroidery data to the machine, as well as copy, move and retrieval of a file are needed for installing the software. • Personal computer with a CPU of Intel Pentium 133...resolution in 256 colors (1280 x 1024 in 65000 colors is recommended.) • Windows 95 2-2 Configuration of Software This software is mainly composed of the following four programs. The software is provided on CD-R. (1) Embroidery Machine Controller (2) Embroidery Data Explorer (3) Embroidery Data Editor (4) Production Report ...
...data for collecting data on patterns. BES-960BC • BES-1260BC 17 Transmission of embroidery data to the machine, as well as copy, move and retrieval of a file are needed for installing the software. • Personal computer with a CPU of Intel Pentium 133...resolution in 256 colors (1280 x 1024 in 65000 colors is recommended.) • Windows 95 2-2 Configuration of Software This software is mainly composed of the following four programs. The software is provided on CD-R. (1) Embroidery Machine Controller (2) Embroidery Data Explorer (3) Embroidery Data Editor (4) Production Report ...
Instruction Manual - English
Page 13
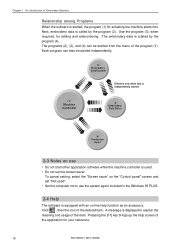
...Production report 2-3 Notes on use the system agent included in the Windows 95 PLUS. 2-4 Help The software is started from the menu of the program (1). Pressing the [F1] key brings up the help...by the program (4). Next, embroidery data is displayed to use • Do not start other application software while the machine controller is totaled by the program (2). To cancel setting, select the "Screen saver" ... An Introduction of Embroidery Machine Relationship among Programs When the software is equipped with an on-line help screen of the application for your reference. 18 BES-960BC...
...Production report 2-3 Notes on use the system agent included in the Windows 95 PLUS. 2-4 Help The software is started from the menu of the program (1). Pressing the [F1] key brings up the help...by the program (4). Next, embroidery data is displayed to use • Do not start other application software while the machine controller is totaled by the program (2). To cancel setting, select the "Screen saver" ... An Introduction of Embroidery Machine Relationship among Programs When the software is equipped with an on-line help screen of the application for your reference. 18 BES-960BC...
Instruction Manual - English
Page 14
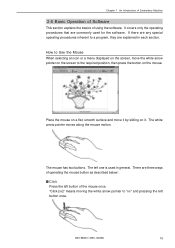
... covers only the operating procedures that are three ways of operating the mouse button as described below: s Click Press the left button of using the software. If there are any special operating procedures inherent to Use the Mouse When selecting an icon or a menu displayed on the screen, move it . ...The left button once. BES-960BC • BES-1260BC 19 Place the mouse on a flat, smooth surface and move the white arrow pointer on the screen to "xx" and pressing the left one is...
... covers only the operating procedures that are three ways of operating the mouse button as described below: s Click Press the left button of using the software. If there are any special operating procedures inherent to Use the Mouse When selecting an icon or a menu displayed on the screen, move it . ...The left button once. BES-960BC • BES-1260BC 19 Place the mouse on a flat, smooth surface and move the white arrow pointer on the screen to "xx" and pressing the left one is...
Instruction Manual - English
Page 16
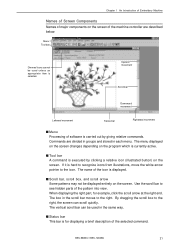
s Scroll bar, scroll box, and scroll arrow Some patterns may not be displayed entirely on the screen. BES-960BC • BES-1260BC 21 If it is currently active. Use the scroll bar to the icon. The vertical scroll bar can scroll quickly. The menu displayed on...commands. By dragging the scroll box to the right. Upward movement Scroll bar Downward movement Leftward movement Status bar Rightward movement s Menu Processing of software is for example, click the scroll arrow at the right end. Commands are described below: Menu Tool bar Dimmed icons cannot be used unless an...
s Scroll bar, scroll box, and scroll arrow Some patterns may not be displayed entirely on the screen. BES-960BC • BES-1260BC 21 If it is currently active. Use the scroll bar to the icon. The vertical scroll bar can scroll quickly. The menu displayed on...commands. By dragging the scroll box to the right. Upward movement Scroll bar Downward movement Leftward movement Status bar Rightward movement s Menu Processing of software is for example, click the scroll arrow at the right end. Commands are described below: Menu Tool bar Dimmed icons cannot be used unless an...
Instruction Manual - English
Page 17
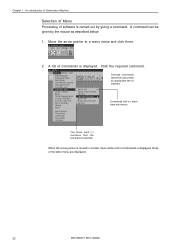
Move the arrow pointer to another menu while a list of commands is displayed, those of the latter menu are displayed. 22 BES-960BC • BES-1260BC Commands with a T mark have sub menus. The check mark (√) indicates that the command is displayed. When the arrow pointer is moved to a menu name ... unless an appropriate item is selected. Dimmed commands cannot be given by giving a command. Chapter 1 An Introduction of Embroidery Machine Selection of Menu Processing of software is carried out by the mouse as described below: 1.
Move the arrow pointer to another menu while a list of commands is displayed, those of the latter menu are displayed. 22 BES-960BC • BES-1260BC Commands with a T mark have sub menus. The check mark (√) indicates that the command is displayed. When the arrow pointer is moved to a menu name ... unless an appropriate item is selected. Dimmed commands cannot be given by giving a command. Chapter 1 An Introduction of Embroidery Machine Selection of Menu Processing of software is carried out by the mouse as described below: 1.
Instruction Manual - English
Page 38
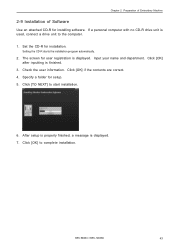
Click [OK] after inputting is displayed. 7. Specify a folder for installation. BES-960BC • BES-1260BC 43 Setting the CD-R starts the installation program automatically. 2. After setup is properly finished, a message is finished. 3. Click [OK] to start...installation. 6. Set the CD-R for setup. 5. Input your name and department. Click [OK] if the contents are correct. 4. The screen for installing software. Check the user information. Click [TO NEXT] to complete installation. If a personal computer with no CD-R drive unit is displayed. Chapter 2 Preparation of...
Click [OK] after inputting is displayed. 7. Specify a folder for installation. BES-960BC • BES-1260BC 43 Setting the CD-R starts the installation program automatically. 2. After setup is properly finished, a message is finished. 3. Click [OK] to start...installation. 6. Set the CD-R for setup. 5. Input your name and department. Click [OK] if the contents are correct. 4. The screen for installing software. Check the user information. Click [TO NEXT] to complete installation. If a personal computer with no CD-R drive unit is displayed. Chapter 2 Preparation of...
Instruction Manual - English
Page 56
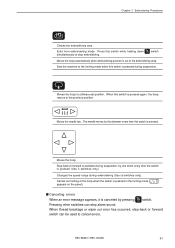
Moves the hoop. Carries out inching of the embroidering area. BES-960BC • BES-1260BC 61 Chapter 3 Embroidering Procedures Checks the embroidering area. Sets the machine to the inching mode when this switch is canceled by one stitch every time ... VE switches only). Press this switch is pressed again, the hoop returns to cancel errors. When this switch while holding down switch STOP simultaneously to software-set position. STOP Pressing other switches can be used to the previous position. Moves the needle bar. Exits from embroidering mode.
Moves the hoop. Carries out inching of the embroidering area. BES-960BC • BES-1260BC 61 Chapter 3 Embroidering Procedures Checks the embroidering area. Sets the machine to the inching mode when this switch is canceled by one stitch every time ... VE switches only). Press this switch is pressed again, the hoop returns to cancel errors. When this switch while holding down switch STOP simultaneously to software-set position. STOP Pressing other switches can be used to the previous position. Moves the needle bar. Exits from embroidering mode.
Instruction Manual - English
Page 59
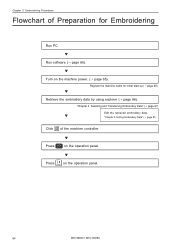
... and Transferring Embroidery Data" (¡ page 67) Edit the retrieved embroidery data. START 64 BES-960BC • BES-1260BC Chapter 3 Embroidering Procedures Flowchart of the machine controller. w Press on the operation panel. w Run software (¡ page 65). w "Chapter 5 Editing Embroidery Data" (¡ page 91) Click of Preparation for initial start-up (¡...
... and Transferring Embroidery Data" (¡ page 67) Edit the retrieved embroidery data. START 64 BES-960BC • BES-1260BC Chapter 3 Embroidering Procedures Flowchart of the machine controller. w Press on the operation panel. w Run software (¡ page 65). w "Chapter 5 Editing Embroidery Data" (¡ page 91) Click of Preparation for initial start-up (¡...
Instruction Manual - English
Page 60
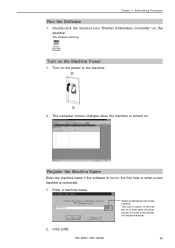
... when a new machine is moved to the machine. 2. Chapter 3 Embroidering Procedures Run the Software 1. Click [OK]. This color is shown on the desktop. BES-960BC • BES-1260BC 65 The computer screen changes when the machine is turned on the Machine Power 1. Select an... identifying color for a while when the arrow pointer is connected. 1. Double-click the shortcut icon "Brother Embroidery Controller" on the title bar for the machine. The software starts up...
... when a new machine is moved to the machine. 2. Chapter 3 Embroidering Procedures Run the Software 1. Click [OK]. This color is shown on the desktop. BES-960BC • BES-1260BC 65 The computer screen changes when the machine is turned on the Machine Power 1. Select an... identifying color for a while when the arrow pointer is connected. 1. Double-click the shortcut icon "Brother Embroidery Controller" on the title bar for the machine. The software starts up...
Instruction Manual - English
Page 67
.... • 256 colors • High color (16 bits) • Full-color (24 bits) Select the display color using "Color Pallet". 72 BES-960BC • BES-1260BC Exit from Tool menu. 3. Chapter 4 Selecting and Transferring Embroidery Data To select data on "Screen" of the control panel to adjust display color. Before starting...
.... • 256 colors • High color (16 bits) • Full-color (24 bits) Select the display color using "Color Pallet". 72 BES-960BC • BES-1260BC Exit from Tool menu. 3. Chapter 4 Selecting and Transferring Embroidery Data To select data on "Screen" of the control panel to adjust display color. Before starting...

Instruction Manual - English
Page 123
Chapter 6 Embroidering Language Changes display language. Select display language among "Available Languages". Displays the local language. 1. Exit and rerun the software. 128 BES-960BC • BES-1260BC Select [Language] from Configuration menu (Tool menu when the power to machine is selected, the list for "Available Languages" may not be displayed properly. 3. s The ...
Chapter 6 Embroidering Language Changes display language. Select display language among "Available Languages". Displays the local language. 1. Exit and rerun the software. 128 BES-960BC • BES-1260BC Select [Language] from Configuration menu (Tool menu when the power to machine is selected, the list for "Available Languages" may not be displayed properly. 3. s The ...

Instruction Manual - English
Page 134
...be clicked when the machine window is used to close the folder. Changing window size Several square buttons with figures are used to end the software or to change the window size. This button cannot be aligned. Chapter 6 Embroidering 2. These buttons are displayed at the right end of... the window size changes to the full size of the title bar. BES-960BC • BES-1260BC 139 Select [Arrange Icons] from Window menu. If this button is clicked when running an ordinary software, it is available for minimized windows. 1. s This command is displayed on the task bar in...
...be clicked when the machine window is used to close the folder. Changing window size Several square buttons with figures are used to end the software or to change the window size. This button cannot be aligned. Chapter 6 Embroidering 2. These buttons are displayed at the right end of... the window size changes to the full size of the title bar. BES-960BC • BES-1260BC 139 Select [Arrange Icons] from Window menu. If this button is clicked when running an ordinary software, it is available for minimized windows. 1. s This command is displayed on the task bar in...

Instruction Manual - English
Page 196
... is divided by commas and recorded as a text file. Converts the production report data to be read in each item is mainly used for a spreadsheet software or data base software. Data in spreadsheet software. 1. The file name "Untitled. csv" automatically appears. BES-960BC • BES...
... is divided by commas and recorded as a text file. Converts the production report data to be read in each item is mainly used for a spreadsheet software or data base software. Data in spreadsheet software. 1. The file name "Untitled. csv" automatically appears. BES-960BC • BES...

Instruction Manual - English
Page 198
When dragging for selection When selecting [Select All] 2. BES-960BC • BES-1260BC 203 This allows use of the production report on other word processing software. 1. Select [Select All] from Edit menu or click . 3. The area is copied or cut. Select [Copy] from Edit menu, or drag and select the area to be copied. Copied data is saved until another data is copied as text data. Chapter 8 Creating Production Report Copying Report Data Copies the selected area as text data. Start a word processing software and select [Paste] from Edit menu.
When dragging for selection When selecting [Select All] 2. BES-960BC • BES-1260BC 203 This allows use of the production report on other word processing software. 1. Select [Select All] from Edit menu or click . 3. The area is copied or cut. Select [Copy] from Edit menu, or drag and select the area to be copied. Copied data is saved until another data is copied as text data. Chapter 8 Creating Production Report Copying Report Data Copies the selected area as text data. Start a word processing software and select [Paste] from Edit menu.
Instruction Manual - English
Page 230
... embroidery software cannot. • Is the selection of colors is set to the bottom of the editor, the explorer or the production report disappears during operation. • The machine controller screen was clicked so that the current screen is preset. panel screen. Move the mouse to 256. BES-960BC • BES-1260BC...
... embroidery software cannot. • Is the selection of colors is set to the bottom of the editor, the explorer or the production report disappears during operation. • The machine controller screen was clicked so that the current screen is preset. panel screen. Move the mouse to 256. BES-960BC • BES-1260BC...


