
Users Manual - English and Spanish
Page 2
...electrical outlet immediately after using the machine and immediately unplug the power cord. • When transporting the machine, be sure to the needle. Keep ventilation openings of burns, fire, electric shock, or injury to persons. 2 Always unplug the machine from the electrical outlet... the machine directly into the electrical outlet. otherwise, the machine, power cord or garment being administered. • Do not use bent or damaged needles. 1 Do not use the machine near a heat source, such as an odor, heat, discoloration or deformation, stop using , when cleaning, when...
...electrical outlet immediately after using the machine and immediately unplug the power cord. • When transporting the machine, be sure to the needle. Keep ventilation openings of burns, fire, electric shock, or injury to persons. 2 Always unplug the machine from the electrical outlet... the machine directly into the electrical outlet. otherwise, the machine, power cord or garment being administered. • Do not use bent or damaged needles. 1 Do not use the machine near a heat source, such as an odor, heat, discoloration or deformation, stop using , when cleaning, when...
Users Manual - English and Spanish
Page 3
...Light unit (light-emitting diode) is damaged, it could cause the needle to ensure that this machine, avoid direct sunlight and high humidity locations. For additional product information, visit our web site at www.brother.com SAVE THESE INSTRUCTIONS This machine is not suitable for its intended ...use as described in the needle area. • Do not use a fuse approved by authorized dealer. • In the...
...Light unit (light-emitting diode) is damaged, it could cause the needle to ensure that this machine, avoid direct sunlight and high humidity locations. For additional product information, visit our web site at www.brother.com SAVE THESE INSTRUCTIONS This machine is not suitable for its intended ...use as described in the needle area. • Do not use a fuse approved by authorized dealer. • In the...

Users Manual - English and Spanish
Page 4
... 5 Flat bed attachment 5 USING YOUR SEWING MACHINE 6 Connecting plugs 6 Main power and sewing light switch 7 Foot controller 7 Checking the needle 7 Replacing the needle 7 Changing the presser foot 8 THE CONTROLS 9 Pattern selection dial 9 Stretch stitching 9 Patterns and stitch names 10 Stitch length dial 12 ...threading 15 Lower threading (for models equipped with a quick-set bobbin 16 Upper threading 17 Using the needle threader (for models equipped with a twin needle (Option 25 Thread tension 27 3. SEWING BASICS 23 Please read before sewing 23 Starting sewing 23 ...
... 5 Flat bed attachment 5 USING YOUR SEWING MACHINE 6 Connecting plugs 6 Main power and sewing light switch 7 Foot controller 7 Checking the needle 7 Replacing the needle 7 Changing the presser foot 8 THE CONTROLS 9 Pattern selection dial 9 Stretch stitching 9 Patterns and stitch names 10 Stitch length dial 12 ...threading 15 Lower threading (for models equipped with a quick-set bobbin 16 Upper threading 17 Using the needle threader (for models equipped with a twin needle (Option 25 Thread tension 27 3. SEWING BASICS 23 Please read before sewing 23 Starting sewing 23 ...
Users Manual - English and Spanish
Page 5
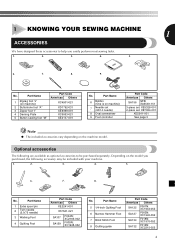
...XC1944-052 SA127 F003N: XC1945-052 SA134 F018N: XC1976-052 SA132 F016N: XC2215-052 4 Part Name 1 Extra spool pin 2 Twin needle (2.0/75 needle) 3 Walking Foot 4 Quilting Foot Part Code Americas Others XE2241-001 X57521-021 SA107 SA129 F034N: XC2165-002 F005N: XC1948-052 ...on the machine model. Optional accessories The following accessory may be purchased separately. Part Name 6 Bobbin (One is on machine) 7 Needle set (90/14 needle) 8 Oval screwdriver 9 Foot controller Part Code Americas Others SA156 SFB: XA5539-151 3-piece set: XE5328-001 2-piece set: XE7064...
...XC1944-052 SA127 F003N: XC1945-052 SA134 F018N: XC1976-052 SA132 F016N: XC2215-052 4 Part Name 1 Extra spool pin 2 Twin needle (2.0/75 needle) 3 Walking Foot 4 Quilting Foot Part Code Americas Others XE2241-001 X57521-021 SA107 SA129 F034N: XC2165-002 F005N: XC1948-052 ...on the machine model. Optional accessories The following accessory may be purchased separately. Part Name 6 Bobbin (One is on machine) 7 Needle set (90/14 needle) 8 Oval screwdriver 9 Foot controller Part Code Americas Others SA156 SFB: XA5539-151 3-piece set: XE5328-001 2-piece set: XE7064...
Users Manual - English and Spanish
Page 6
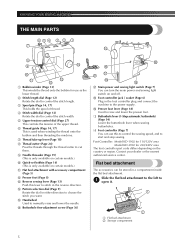
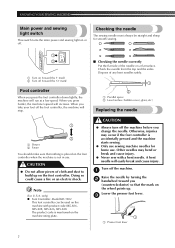
... threading the machine. 7 Thread take-up lever (Page 18) 8 Thread cutter (Page 24) Pass the threads through the thread cutter to cut them. 9 Needle threader (Page 19) (This is only available on certain models.) 0 Quick-set bobbin (Page 16) (This is only available on certain models.) A Flat .... Contact your dealer or the nearest authorized service center. Slide the flat bed attachment to the left to manually raise and lower the needle. Flat bed attachment The accessories can be stored in the foot controller plug and connect the machine to start and stop sewing. Foot Controller...
... threading the machine. 7 Thread take-up lever (Page 18) 8 Thread cutter (Page 24) Pass the threads through the thread cutter to cut them. 9 Needle threader (Page 19) (This is only available on certain models.) 0 Quick-set bobbin (Page 16) (This is only available on certain models.) A Flat .... Contact your dealer or the nearest authorized service center. Slide the flat bed attachment to the left to manually raise and lower the needle. Flat bed attachment The accessories can be stored in the foot controller plug and connect the machine to start and stop sewing. Foot Controller...
Users Manual - English and Spanish
Page 8
... 1 2 1 Turn on the wheel points up on the foot controller when the machine is placed on the foot controller. Checking the needle The sewing needle must always be used on the machine rating plate. CAUTION ● Always turn off . CAUTION ● Do not allow pieces of cloth... off (toward the 'O' mark) Foot controller When you press the foot controller down lightly, the machine will easily break and cause injury. Other needles may occur if the foot controller is accidentally pressed and the machine starts sewing. ● Only use . KNOWING YOUR SEWING MACHINE Main power and...
... 1 2 1 Turn on the wheel points up on the foot controller when the machine is placed on the foot controller. Checking the needle The sewing needle must always be used on the machine rating plate. CAUTION ● Always turn off . CAUTION ● Do not allow pieces of cloth... off (toward the 'O' mark) Foot controller When you press the foot controller down lightly, the machine will easily break and cause injury. Other needles may occur if the foot controller is accidentally pressed and the machine starts sewing. ● Only use . KNOWING YOUR SEWING MACHINE Main power and...
Users Manual - English and Spanish
Page 9
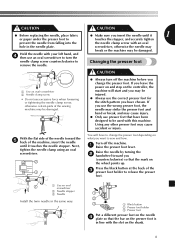
... foot holder to release the presser foot. 1 1 Use an oval screwdriver 2 Needle stopper 3 Needle Install the twin needle in the same way. 1 2 3 1 Black button 2 Presser foot holder 3 Presser foot Put a different presser foot on the needle 4 plate so that the mark on the wheel points up. Press the black ...● Only use presser feet that have to be damaged. With the flat side of the machine, insert the needle until it touches the needle stopper. Next, tighten the needle clamp using an oval screwdriver. 2 3 You will start and you may be used with the slot on the ...
... foot holder to release the presser foot. 1 1 Use an oval screwdriver 2 Needle stopper 3 Needle Install the twin needle in the same way. 1 2 3 1 Black button 2 Presser foot holder 3 Presser foot Put a different presser foot on the needle 4 plate so that the mark on the wheel points up. Press the black ...● Only use presser feet that have to be damaged. With the flat side of the machine, insert the needle until it touches the needle stopper. Next, tighten the needle clamp using an oval screwdriver. 2 3 You will start and you may be used with the slot on the ...
Users Manual - English and Spanish
Page 10
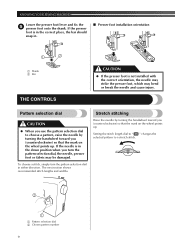
... fix the 5 presser foot onto the shank. Setting the stitch length dial to " " changes the selected pattern to choose a pattern, raise the needle by turning the handwheel toward you (counterclockwise) so that the mark on the wheel points up . If the presser foot is in the correct place...If the presser foot is in the down position when you turn the pattern selection dial in either direction. If the needle is not installed with the correct orientation, the needle may strike the presser foot, which may be damaged. Pattern selection dial CAUTION ● When you use the pattern...
... fix the 5 presser foot onto the shank. Setting the stitch length dial to " " changes the selected pattern to choose a pattern, raise the needle by turning the handwheel toward you (counterclockwise) so that the mark on the wheel points up . If the presser foot is in the correct place...If the presser foot is in the down position when you turn the pattern selection dial in either direction. If the needle is not installed with the correct orientation, the needle may strike the presser foot, which may be damaged. Pattern selection dial CAUTION ● When you use the pattern...

Users Manual - English and Spanish
Page 11
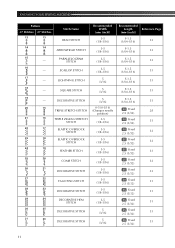
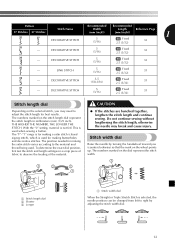
... 36 37 24 25 26 27 Pattern 37 Stitches 27 Stitches 1 1 Stitch Name 1-STEP AUTOMATIC BUTTONHOLE Recommended Width (mm (inch)) 3-5 (1/8 - 3/16) 2 2 0-5 (0-3/16) STRAIGHT STITCH (Changes needle position) 3 3 ZIGZAG STITCH 0-5 (0-3/16) 4 4 BLIND HEM STITCH 3-5 (1/8-3/16) 5 5 SHELL TUCK STITCH 3-5 (1/8-3/16) 6 6 ELASTIC STITCH 3-5 (1/8-3/16) 7 7 STRETCH BLIND HEM 3-5 STITCH (1/8-3/16) 8 8 SCALLOP STITCH 3-5 (1/8-3/16) 9 9 DOUBLE ACTION...
... 36 37 24 25 26 27 Pattern 37 Stitches 27 Stitches 1 1 Stitch Name 1-STEP AUTOMATIC BUTTONHOLE Recommended Width (mm (inch)) 3-5 (1/8 - 3/16) 2 2 0-5 (0-3/16) STRAIGHT STITCH (Changes needle position) 3 3 ZIGZAG STITCH 0-5 (0-3/16) 4 4 BLIND HEM STITCH 3-5 (1/8-3/16) 5 5 SHELL TUCK STITCH 3-5 (1/8-3/16) 6 6 ELASTIC STITCH 3-5 (1/8-3/16) 7 7 STRETCH BLIND HEM 3-5 STITCH (1/8-3/16) 8 8 SCALLOP STITCH 3-5 (1/8-3/16) 9 9 DOUBLE ACTION...
Users Manual - English and Spanish
Page 12
... 24 DECORATIVE HEM STITCH 30 25 DECORATIVE STITCH 31 26 DECORATIVE STITCH Recommended Width (mm (inch)) 3-5 (1/8-3/16) 3-5 (1/8-3/16) 3-5 (1/8-3/16) 3-5 (1/8-3/16) 5 (3/16) 5 (3/16) 5 (3/16) 0-5 (0-3/16) (Changes needle position) 3-5 (1/8-3/16) 3-5 (1/8-3/16) 3-5 (1/8-3/16) 3-5 (1/8-3/16) 3-5 (1/8-3/16) 3-5 (1/8-3/16) 3-5 (1/8-3/16) 3-5 (1/8-3/16) 3-5 (1/8-3/16) 5 (3/16) 5 (3/16) Recommended Length Reference Page (mm (inch)) F-1.5 (1/64-1/16) 33 F-1.5 (1/64-1/16) 33 F-1.5 (1/64...
... 24 DECORATIVE HEM STITCH 30 25 DECORATIVE STITCH 31 26 DECORATIVE STITCH Recommended Width (mm (inch)) 3-5 (1/8-3/16) 3-5 (1/8-3/16) 3-5 (1/8-3/16) 3-5 (1/8-3/16) 5 (3/16) 5 (3/16) 5 (3/16) 0-5 (0-3/16) (Changes needle position) 3-5 (1/8-3/16) 3-5 (1/8-3/16) 3-5 (1/8-3/16) 3-5 (1/8-3/16) 3-5 (1/8-3/16) 3-5 (1/8-3/16) 3-5 (1/8-3/16) 3-5 (1/8-3/16) 3-5 (1/8-3/16) 5 (3/16) 5 (3/16) Recommended Length Reference Page (mm (inch)) F-1.5 (1/64-1/16) 33 F-1.5 (1/64-1/16) 33 F-1.5 (1/64...
Users Manual - English and Spanish
Page 13
... button. To determine the exact dial position, first test the stitch and length settings on the wheel points up. Stitch width dial Raise the needle by adjusting the stitch width dial. 12 The position needed for making buttonholes and decorative stitches. DECORATIVE STITCH 5 (3/16) Fixed 33 2.5 (3/... right by turning the handwheel toward you may break and cause injury. Do not continue sewing without lengthening the stitch length, otherwise the needle may need to observe the feeding of the material. 1 2 3 1 CAUTION ● If the stitches are bunched together, lengthen the...
... button. To determine the exact dial position, first test the stitch and length settings on the wheel points up. Stitch width dial Raise the needle by adjusting the stitch width dial. 12 The position needed for making buttonholes and decorative stitches. DECORATIVE STITCH 5 (3/16) Fixed 33 2.5 (3/... right by turning the handwheel toward you may break and cause injury. Do not continue sewing without lengthening the stitch length, otherwise the needle may need to observe the feeding of the material. 1 2 3 1 CAUTION ● If the stitches are bunched together, lengthen the...
Users Manual - English and Spanish
Page 14
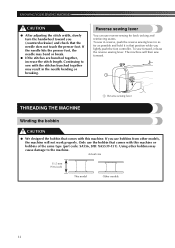
... THREADING THE MACHINE Winding the bobbin CAUTION ● We designed the bobbin that position while you lightly push the foot controller. If the needle hits the presser foot, the needle may result in that comes with this machine or bobbins of the same type (part code: SA156, SFB: XA5539-151). To sew... sew in reverse, push the reverse sewing lever in as far as possible and hold it in the needle bending or breaking. Reverse sewing lever You can use the bobbin that the needle does not touch the presser foot. If you use bobbins from other bobbins may cause damage to sew ...
... THREADING THE MACHINE Winding the bobbin CAUTION ● We designed the bobbin that position while you lightly push the foot controller. If the needle hits the presser foot, the needle may result in that comes with this machine or bobbins of the same type (part code: SA156, SFB: XA5539-151). To sew... sew in reverse, push the reverse sewing lever in as far as possible and hold it in the needle bending or breaking. Reverse sewing lever You can use the bobbin that the needle does not touch the presser foot. If you use bobbins from other bobbins may cause damage to sew ...

Users Manual - English and Spanish
Page 16
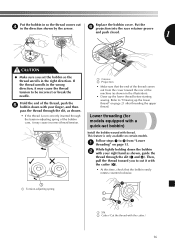
...; Make sure you (counterclockwise) and raise the presser foot lever. If you could be injured. Raise the needle by sliding it may tangle around the bobbin and cause the needle to loosen, and may cause the thread tension to break. Then stop the machine. Trim the excess thread above...7 1 1 1 cm (1/2 inch) CAUTION ● Make sure you . 1 Note ● When the sewing machine is started or the handwheel is not a malfunction. ● The needle bar does not move when you do not cut the excess thread completely before threading the lower thread. • See page 13 for the details...
...; Make sure you (counterclockwise) and raise the presser foot lever. If you could be injured. Raise the needle by sliding it may tangle around the bobbin and cause the needle to loosen, and may cause the thread tension to break. Then stop the machine. Trim the excess thread above...7 1 1 1 cm (1/2 inch) CAUTION ● Make sure you . 1 Note ● When the sewing machine is started or the handwheel is not a malfunction. ● The needle bar does not move when you do not cut the excess thread completely before threading the lower thread. • See page 13 for the details...
Users Manual - English and Spanish
Page 17
... that the end of the machine (as shown. • If the thread is only available on certain models. Refer to be incorrect or break the needle. Replace the bobbin cover. This feature is not correctly inserted through the slit (1 and 2). Then, pull the thread toward the rear of the thread comes...
... that the end of the machine (as shown. • If the thread is only available on certain models. Refer to be incorrect or break the needle. Replace the bobbin cover. This feature is not correctly inserted through the slit (1 and 2). Then, pull the thread toward the rear of the thread comes...
Users Manual - English and Spanish
Page 18
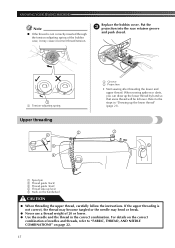
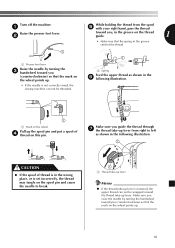
... the handwheel CAUTION ● When threading the upper thread, carefully follow the instructions. Refer to "FABRIC, THREAD, AND NEEDLE COMBINATIONS" on the correct combination of 20 or lower. ● Use the needle and the thread in "Drawing up the lower thread" (page 21). 1 5 1 Spool pin 2 Thread guide (...not correctly inserted through the tension-adjusting spring of the bobbin case, it may bend or break. ● Never use a thread weight of needles and threads, refer to the steps in the correct combination. Put the 3 projection into the race retainer groove and push closed. 12 1...
... the handwheel CAUTION ● When threading the upper thread, carefully follow the instructions. Refer to "FABRIC, THREAD, AND NEEDLE COMBINATIONS" on the correct combination of 20 or lower. ● Use the needle and the thread in "Drawing up the lower thread" (page 21). 1 5 1 Spool pin 2 Thread guide (...not correctly inserted through the tension-adjusting spring of the bobbin case, it may bend or break. ● Never use a thread weight of needles and threads, refer to the steps in the correct combination. Put the 3 projection into the race retainer groove and push closed. 12 1...
Users Manual - English and Spanish
Page 19
..., the upper thread can not be threaded. 1 Spring Feed the upper thread as shown in the groove catches the thread. 1 1 1 Presser foot lever Raise the needle by turning the handwheel toward you (counterclockwise) so that the spring in the 6 following illustration. 1 1 Mark on the wheel Pull up the spool pin and...; If the spool of thread is in the wrong place, or is set incorrectly, the thread may tangle on the spool pin and cause the needle to break. 1 1 Thread take-up lever Memo ● If the thread take-up lever is not correctly raised, the sewing machine can not be wrapped...
..., the upper thread can not be threaded. 1 Spring Feed the upper thread as shown in the groove catches the thread. 1 1 1 Presser foot lever Raise the needle by turning the handwheel toward you (counterclockwise) so that the spring in the 6 following illustration. 1 1 Mark on the wheel Pull up the spool pin and...; If the spool of thread is in the wrong place, or is set incorrectly, the thread may tangle on the spool pin and cause the needle to break. 1 1 Thread take-up lever Memo ● If the thread take-up lever is not correctly raised, the sewing machine can not be wrapped...
Users Manual - English and Spanish
Page 20
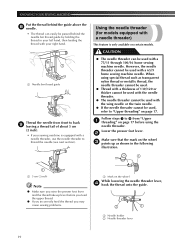
... thread. ● If you incorrectly feed the thread you may cause sewing problems. 1 Mark on the wheel While lowering the needle threader lever, 4 hook the thread onto the guide. 2 1 1 Needle holder 2 Needle threader lever 19 Lower the presser foot lever. 2 Make sure that the mark on the wheel 3 points up lever before using...
... thread. ● If you incorrectly feed the thread you may cause sewing problems. 1 Mark on the wheel While lowering the needle threader lever, 4 hook the thread onto the guide. 2 1 1 Needle holder 2 Needle threader lever 19 Lower the presser foot lever. 2 Make sure that the mark on the wheel 3 points up lever before using...

Users Manual - English and Spanish
Page 21
...with force or it may bend the needle. ● If the thread does not pass through the needle. 1 1 2 3 1 Needle holder 2 Needle threader lever 3 Guide Pull down the needle threader lever as 5 much as possible, and then turn the 6 needle threader lever toward the front of the needle, start from you ). Raise the ...9 20 The hook will pull the thread through the eye of the machine (toward you ). Raise the needle threader lever. 7 Pull the loop of the thread passed through 8 the eye of the needle toward the rear of the machine. 1 12 1 Hook 2 Thread • Hold the thread in front...
...with force or it may bend the needle. ● If the thread does not pass through the needle. 1 1 2 3 1 Needle holder 2 Needle threader lever 3 Guide Pull down the needle threader lever as 5 much as possible, and then turn the 6 needle threader lever toward the front of the needle, start from you ). Raise the ...9 20 The hook will pull the thread through the eye of the machine (toward you ). Raise the needle threader lever. 7 Pull the loop of the thread passed through 8 the eye of the needle toward the rear of the machine. 1 12 1 Hook 2 Thread • Hold the thread in front...
Users Manual - English and Spanish
Page 22
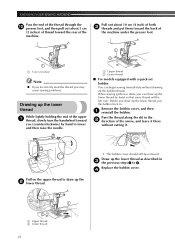
... cutting it. Replace the bobbin cover. 4 21 Pull out about 5 cm (2 inches) of thread toward you (counterclockwise) by hand to lower and then raise the needle. 1 2 1 Upper thread 2 Lower thread ■ For models equipped with a quick-set bobbin You can draw up the lower thread by hand so that some thread...
... cutting it. Replace the bobbin cover. 4 21 Pull out about 5 cm (2 inches) of thread toward you (counterclockwise) by hand to lower and then raise the needle. 1 2 1 Upper thread 2 Lower thread ■ For models equipped with a quick-set bobbin You can draw up the lower thread by hand so that some thread...
Users Manual - English and Spanish
Page 23
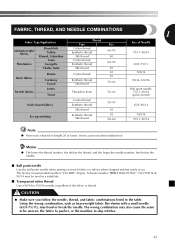
...cause the seam to be used as heavyweight fabric like denim with a small needle (65/9-75/11), may bend or break the needle. FABRIC, THREAD, AND NEEDLE COMBINATIONS 1 Fabric Type/Application Medium weight fabrics Thin fabrics Broadcloth Taffeta Flannel, ... thread Silk thread Size 60-90 50 60-90 50 30 50 50-60 Size of Needle 75/11-90/14 65/9-75/11 100/16 90/14-100/16 Stretch fabrics Jersey Tricot ...Thread for knits 50-60 Ball point needle 75/11-90/14 (gold colored) Easily frayed fabrics Cotton thread Synthetic thread 50-90 65/9-...
...cause the seam to be used as heavyweight fabric like denim with a small needle (65/9-75/11), may bend or break the needle. FABRIC, THREAD, AND NEEDLE COMBINATIONS 1 Fabric Type/Application Medium weight fabrics Thin fabrics Broadcloth Taffeta Flannel, ... thread Silk thread Size 60-90 50 60-90 50 30 50 50-60 Size of Needle 75/11-90/14 65/9-75/11 100/16 90/14-100/16 Stretch fabrics Jersey Tricot ...Thread for knits 50-60 Ball point needle 75/11-90/14 (gold colored) Easily frayed fabrics Cotton thread Synthetic thread 50-90 65/9-...


