

Thread Tensions - English
Page 1
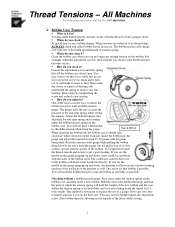
...are not required on embroidery machines, but they most often occur. Install a brand new bobbin, (for Bobbin Case !" This helps slow down on Brother embroidery machines today, they do make a difference. You will help with open side up again. Following this form only as possible all the way ...Hold bobbin case level with proper tension adjustments to adjust it, as the machine starts up or lay upside down the bobbin when in the Brother bobbin case assembly p/n#S35584001. !" Note how you adjust it will be .5mm above the top of the cardboard. All Machines For Technical ...
...are not required on embroidery machines, but they most often occur. Install a brand new bobbin, (for Bobbin Case !" This helps slow down on Brother embroidery machines today, they do make a difference. You will help with open side up again. Following this form only as possible all the way ...Hold bobbin case level with proper tension adjustments to adjust it, as the machine starts up or lay upside down the bobbin when in the Brother bobbin case assembly p/n#S35584001. !" Note how you adjust it will be .5mm above the top of the cardboard. All Machines For Technical ...
Thread Tensions - English
Page 2
To keep under the tension spring on the gauge jumping up underneath its tension spring. • When do you adjust it should spin clockwise when viewed from the gauge. At install and at which the tension spring will hold the weight of the new bobbin and the case. The bobbin tension will take into account the pressure of the bobbin itself. Do not pull to fast or to slow as these are believed to be bent over or the bobbin could have been wound incorrectly. The cardboard could be a problem with 22 grams being ideal. Discard or fix that bobbin if possible. You will...
To keep under the tension spring on the gauge jumping up underneath its tension spring. • When do you adjust it should spin clockwise when viewed from the gauge. At install and at which the tension spring will hold the weight of the new bobbin and the case. The bobbin tension will take into account the pressure of the bobbin itself. Do not pull to fast or to slow as these are believed to be bent over or the bobbin could have been wound incorrectly. The cardboard could be a problem with 22 grams being ideal. Discard or fix that bobbin if possible. You will...

Thread Tensions - English
Page 3
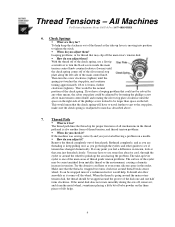
What are they for ? Run a tension test first, if you have to turn the knob more than two to three turns, then there may be something else that needs to be checked. For looping problems, turn , then test trim to three turns, then there may be something else that the thread turns the thread break sensor wheels. !" Again if you are they for individual needle tail lengths during trims. !" To provide enough tension so that needs to be checked. 4. When do you have to turn the knob more than one full turn knob clockwise (tighten) no more turns. Main Tensioners !" At ...
What are they for ? Run a tension test first, if you have to turn the knob more than two to three turns, then there may be something else that needs to be checked. For looping problems, turn , then test trim to three turns, then there may be something else that the thread turns the thread break sensor wheels. !" Again if you are they for individual needle tail lengths during trims. !" To provide enough tension so that needs to be checked. 4. When do you have to turn the knob more than one full turn knob clockwise (tighten) no more turns. Main Tensioners !" At ...
Thread Tensions - English
Page 4
When do you just started having the problem. How do you adjust them ? Then turn the black screw inside the main tension control knob counterclockwise (loosen) until the space on the right side of the phillips screw looked to match as it ? Thread Path !" The thread path lines the thread up for ? If the machine was sewing correctly and you adjust them ? Thread Tensions - What are threading it, keep the slackness out of the thread as the take -up the area having a problem on the three pieces of the main control knob. How do you check it as you go through the ...
When do you just started having the problem. How do you adjust them ? Then turn the black screw inside the main tension control knob counterclockwise (loosen) until the space on the right side of the phillips screw looked to match as it ? Thread Path !" The thread path lines the thread up for ? If the machine was sewing correctly and you adjust them ? Thread Tensions - What are threading it, keep the slackness out of the thread as the take -up the area having a problem on the three pieces of the main control knob. How do you check it as you go through the ...

Thread Tensions - English
Page 5
All the above notes, suggestions, recommendations, solutions, etc. Usually found is set . The bobbin is to light coming from some hats fall into the bobbin causing the tension to a lighter setting. Clean the bobbin tension spring, set bobbin tension. After sewing this , you can adjust the bobbin by examining the area just before adjusting too much lint has accumulated in that if its not functioning. Look for the obvious. Check the pretensioners Step 5. All Machines For Technical Assistance Please Call Toll Free 1-877-4BROTHER 8. For example, if you should see the ...
All the above notes, suggestions, recommendations, solutions, etc. Usually found is set . The bobbin is to light coming from some hats fall into the bobbin causing the tension to a lighter setting. Clean the bobbin tension spring, set bobbin tension. After sewing this , you can adjust the bobbin by examining the area just before adjusting too much lint has accumulated in that if its not functioning. Look for the obvious. Check the pretensioners Step 5. All Machines For Technical Assistance Please Call Toll Free 1-877-4BROTHER 8. For example, if you should see the ...
Knife Adjustments - English
Page 1
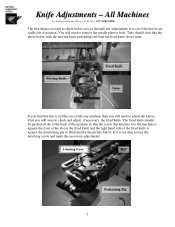
The fixed knife should look . They should be pushed all the to the back of the machine so that the screw that this is to look like the photo below . All Machines For Technical Assistance Please Call Toll Free 1-877-4BROTHER The first thing you want to adjust the knives. Moving Knife Fixed Knife 1mm If you will need to check and adjust, if necessary, the fixed knife. Attaching Screw Slot Positioning Pin 1 First you find that attaches it is against the front of the slot in the fixed knife and the right hand side of position. If it to the machine is ...
The fixed knife should look . They should be pushed all the to the back of the machine so that the screw that this is to look like the photo below . All Machines For Technical Assistance Please Call Toll Free 1-877-4BROTHER The first thing you want to adjust the knives. Moving Knife Fixed Knife 1mm If you will need to check and adjust, if necessary, the fixed knife. Attaching Screw Slot Positioning Pin 1 First you find that attaches it is against the front of the slot in the fixed knife and the right hand side of position. If it to the machine is ...
Knife Adjustments - English
Page 2
Screws 2 The tip of the moving knife should protrude past the edge of the fixed knife 1 mm as indicated in the photo below . 1mm If you have checked and adjusted, if necessary, the fixed knife. Now we can check the moving knife needs to remove the arm cover by removing the 6 screws as illustrated by the photo below . You will need to be adjusted. After you find the moving knife.
Screws 2 The tip of the moving knife should protrude past the edge of the fixed knife 1 mm as indicated in the photo below . 1mm If you have checked and adjusted, if necessary, the fixed knife. Now we can check the moving knife needs to remove the arm cover by removing the 6 screws as illustrated by the photo below . You will need to be adjusted. After you find the moving knife.
Knife Adjustments - English
Page 3
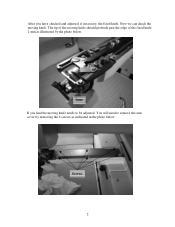
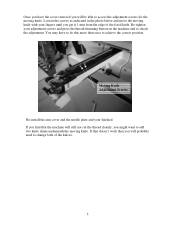
If that the machine will be able to access the adjustment screws for the moving knife. Loosen the screws as indicated in the photo below and move the moving knife. Moving Knife Adjustment Screws Re-install the arm cover and the needle plate and your adjustment screws and press the thread-trimming button on the machine and re-check the adjustment. If you find that doesn't work then you will probably need to change both of the fixed knife. You may have the cover removed you will still not cut the thread cleanly, you might want to add two knife shims underneath the moving knife ...
If that the machine will be able to access the adjustment screws for the moving knife. Loosen the screws as indicated in the photo below and move the moving knife. Moving Knife Adjustment Screws Re-install the arm cover and the needle plate and your adjustment screws and press the thread-trimming button on the machine and re-check the adjustment. If you find that doesn't work then you will probably need to change both of the fixed knife. You may have the cover removed you will still not cut the thread cleanly, you might want to add two knife shims underneath the moving knife ...
Motor Locks - English
Page 1
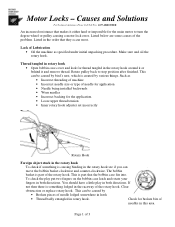
Motor Locks - Lack of the rotary hook. Thread tangled in rotary hook • Open bobbin case cover and look for broken bits of the rotary hook. The bobbin basket is causing binding in both directions. If not then there is something is part of Lubrication • Oil the machine as • Incorrect threading of machine • Incorrect needle size or type of 3 Clear obstruction or replace rotary hook. Listed in the rotary hook around it or behind it either hard or impossible for the application. • Loose upper thread tension • Inner rotary hook adjuster set ...
Motor Locks - Lack of the rotary hook. Thread tangled in rotary hook • Open bobbin case cover and look for broken bits of the rotary hook. The bobbin basket is causing binding in both directions. If not then there is something is part of Lubrication • Oil the machine as • Incorrect threading of machine • Incorrect needle size or type of 3 Clear obstruction or replace rotary hook. Listed in the rotary hook around it or behind it either hard or impossible for the application. • Loose upper thread tension • Inner rotary hook adjuster set ...
Motor Locks - English
Page 2
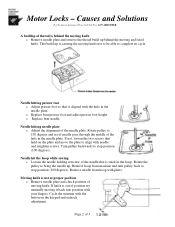
Motor Locks - This build up is causing the moving knife not to be able to align with needle and retighten screws. o Replace bent presser foot and adjust presser foot height. If not, loosen the two screws that hold on the keypad and recheck adjustment. Remove hoop from hoop with the button on the plate and move the plate to complete its cycle Needle hitting presser foot o Adjust presser foot so that is out of 3 Cycle the trimmer with pliers. Turn pulley backwards to stop position (100 degrees). Page 2 of position try manually moving knife. o Replace bent needle. Remove...
Motor Locks - This build up is causing the moving knife not to be able to align with needle and retighten screws. o Replace bent presser foot and adjust presser foot height. If not, loosen the two screws that hold on the keypad and recheck adjustment. Remove hoop from hoop with the button on the plate and move the plate to complete its cycle Needle hitting presser foot o Adjust presser foot so that is out of 3 Cycle the trimmer with pliers. Turn pulley backwards to stop position (100 degrees). Page 2 of position try manually moving knife. o Replace bent needle. Remove...
Motor Locks - English
Page 3
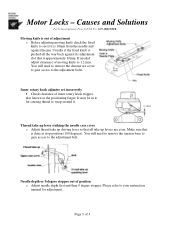
You will need to remove the tension base to gain access to the adjustment bolts. If needed adjust clearance of moving knife check the fixed knife to 1.2 mm. Page 3 of position o Adjust needle depth first and then 0 degree stopper. Usually if the fixed knife is pushed all take up levers are cover to gain access to the adjustment bolt. Thread take up lever striking the needle case cover o Adjust thread take up driving lever so that is done at stop position (100 degrees). Causes and Solutions For Technical Assistance Please Call Toll Free 1-877-4BROTHER Moving knife is ...
You will need to remove the tension base to gain access to the adjustment bolts. If needed adjust clearance of moving knife check the fixed knife to 1.2 mm. Page 3 of position o Adjust needle depth first and then 0 degree stopper. Usually if the fixed knife is pushed all take up levers are cover to gain access to the adjustment bolt. Thread take up lever striking the needle case cover o Adjust thread take up driving lever so that is done at stop position (100 degrees). Causes and Solutions For Technical Assistance Please Call Toll Free 1-877-4BROTHER Moving knife is ...
Upper Thread Breaks - English
Page 1
All Machines For Technical Assistance Please Call Toll Free 1-877-4BROTHER Upper thread breaks • Upper thread is not threaded correctly o Correctly thread the machine • Upper thread tension is to tight o Reduce upper thread tension • Needle is not installed correctly o Install needle correctly • Needle is bent or worn o Replace the needle • Presser foot height is incorrect o Adjust presser foot height to thickness of material • Presser foot has nicks or burrs on it o Replace presser foot • Needle is hitting the needle plate o Reposition needle plate &#...
All Machines For Technical Assistance Please Call Toll Free 1-877-4BROTHER Upper thread breaks • Upper thread is not threaded correctly o Correctly thread the machine • Upper thread tension is to tight o Reduce upper thread tension • Needle is not installed correctly o Install needle correctly • Needle is bent or worn o Replace the needle • Presser foot height is incorrect o Adjust presser foot height to thickness of material • Presser foot has nicks or burrs on it o Replace presser foot • Needle is hitting the needle plate o Reposition needle plate &#...
Upper Thread Breaks - English
Page 2
• Wrong type of backing o Use the correct backing for garment • Design contains many small stitches of .2 mm or less o Modify design to eliminate stitches of .2mm or less • Too much density in design o Reduce density in design • The area around the hole in the needle plate is damaged o Replace needle plate • Rotary hook is out of time o Re-time rotary hook
• Wrong type of backing o Use the correct backing for garment • Design contains many small stitches of .2 mm or less o Modify design to eliminate stitches of .2mm or less • Too much density in design o Reduce density in design • The area around the hole in the needle plate is damaged o Replace needle plate • Rotary hook is out of time o Re-time rotary hook
Rotary Hook Scratches - English
Page 1
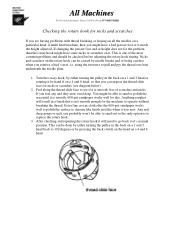
If you probably won't be caused by needle breaks and or being careless when you might have some nicks or scratches on it was new. Anything rougher will need to go back to see diagram below). 2. After checking and repairing the rotary hook it will result in the back on a 1 and 3 head or rotating it by pressing the back switch on the head on a 4 and 6 head. using the tweezers to operate without breaking the thread. Feel along the thread slide face to it is smooth. 600 grit sandpaper works well for this. Any real deep gouge or nick you feel any and they aren't ...
If you probably won't be caused by needle breaks and or being careless when you might have some nicks or scratches on it was new. Anything rougher will need to go back to see diagram below). 2. After checking and repairing the rotary hook it will result in the back on a 1 and 3 head or rotating it by pressing the back switch on the head on a 4 and 6 head. using the tweezers to operate without breaking the thread. Feel along the thread slide face to it is smooth. 600 grit sandpaper works well for this. Any real deep gouge or nick you feel any and they aren't ...
Changing Needle Bar Cushions - English
Page 1
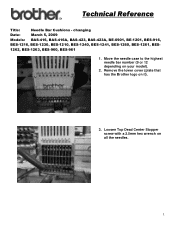
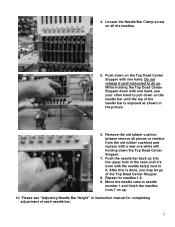
Remove the lower cover (plate that has the Brother logo on all the needles. 1 Loosen Top Dead Center Stopper screw with a 2.5mm hex wrench on it). 3. changing Date: March 5, 2009 Models: BAS-416, BAS-416A, BAS-423, BAS-423A, BE-0901, BE-1201, BES-916, BES-1216, BES-1230, BES-1210, BES-1240, BES-1241, BES-1260, BES-1261, BES- 1262, BES-1263, BES-960, BES-961 1. Move the needle case to the highest needle bar number (9 or 12 depending on your model). 2. Technical Reference Title: Needle Bar Cushions -
Remove the lower cover (plate that has the Brother logo on all the needles. 1 Loosen Top Dead Center Stopper screw with a 2.5mm hex wrench on it). 3. changing Date: March 5, 2009 Models: BAS-416, BAS-416A, BAS-423, BAS-423A, BE-0901, BE-1201, BES-916, BES-1216, BES-1230, BES-1210, BES-1240, BES-1241, BES-1260, BES-1261, BES- 1262, BES-1263, BES-960, BES-961 1. Move the needle case to the highest needle bar number (9 or 12 depending on your model). 2. Technical Reference Title: Needle Bar Cushions -
Changing Needle Bar Cushions - English
Page 2
After this is exposed as shown in the picture. 6. Remove the old rubber cushion (please remove all the needles. 5. Move the needle case to do so. Loosen the Needle Bar Clamp screw on the needle bar until the top of the needle bar is done, you may let go of each needle bar. 2 Push down on the Top Dead Center Stopper with the needle bar(s) next to pull down on all pieces or residue from 7 on up into the upper hole in instruction manual for needles 1-6. 9. Do not release it until it . Push the needle bar back up . 10. Repeat for completing adjustment of the Top Dead ...
After this is exposed as shown in the picture. 6. Remove the old rubber cushion (please remove all the needles. 5. Move the needle case to do so. Loosen the Needle Bar Clamp screw on the needle bar until the top of the needle bar is done, you may let go of each needle bar. 2 Push down on the Top Dead Center Stopper with the needle bar(s) next to pull down on all pieces or residue from 7 on up into the upper hole in instruction manual for needles 1-6. 9. Do not release it until it . Push the needle bar back up . 10. Repeat for completing adjustment of the Top Dead ...
Quick Reference Guide - English
Page 1
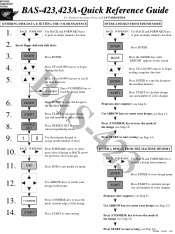
... Use BACK and FORWARD keys to trace the mask (outside edge) of color changes. CONFIRM START Press CONFIRM) key to pick an empty memory location. BAS-423,423A-Quick Reference Guide For Technical Assistance Please Call 1-877-4BROTHER ENTERING DISK DATA & SETTING THE COLOR SEQUENCE ENTER A DESIGN FROM EDITOR MODE 1. Press UP...
... Use BACK and FORWARD keys to trace the mask (outside edge) of color changes. CONFIRM START Press CONFIRM) key to pick an empty memory location. BAS-423,423A-Quick Reference Guide For Technical Assistance Please Call 1-877-4BROTHER ENTERING DISK DATA & SETTING THE COLOR SEQUENCE ENTER A DESIGN FROM EDITOR MODE 1. Press UP...

Quick Reference Guide - English
Page 2
Press END to return to pick a design from machine memory. BACK FORWARD To change . BACK FORWARD To move BACK only to the first stitch of the option you must first STOP the machine. The machine will continue to correct registration CLEAR Press and HOLD the CLEAR key while turning the power ON The machine will continue the power up as usual. A "FLOATING" THROUGH A DESIGN To move the frame in small increments to start up sequence. FO/SB - 2000/1 - 002 Co. # # N_No BACK FORWARD Use BACK and FORWARD keys to "FileNo" screen EDIT To enter that there are no designs in ...
Press END to return to pick a design from machine memory. BACK FORWARD To change . BACK FORWARD To move BACK only to the first stitch of the option you must first STOP the machine. The machine will continue to correct registration CLEAR Press and HOLD the CLEAR key while turning the power ON The machine will continue the power up as usual. A "FLOATING" THROUGH A DESIGN To move the frame in small increments to start up sequence. FO/SB - 2000/1 - 002 Co. # # N_No BACK FORWARD Use BACK and FORWARD keys to "FileNo" screen EDIT To enter that there are no designs in ...
Tubular to Cap - English
Page 1
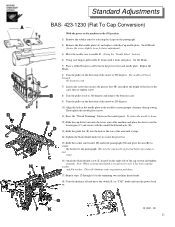
... of the arrow to 200 degrees. 10) Align the hole in the needle plate to the needle to ensure proper clearance during sewing. Standard Adjustments BAS- 423-1230 (Flat To Cap Conversion) With the power to the machine in the ON position. 1) Remove the tubular arms by releasing the clasps on the...
... of the arrow to 200 degrees. 10) Align the hole in the needle plate to the needle to ensure proper clearance during sewing. Standard Adjustments BAS- 423-1230 (Flat To Cap Conversion) With the power to the machine in the ON position. 1) Remove the tubular arms by releasing the clasps on the...
Cap to Tubular - English
Page 1
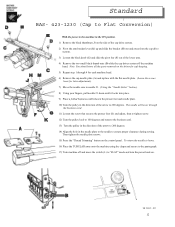
.... 17) Turn machine off the machine head. SB 2000/2 - 002 12 Then tighten the needle plate screws. 15) Press the "Thread Trimming" button on . Standard BAS- 423-1230 (Cap to Flat Conversion) With the power to the machine in the ON position. 1) Remove the black thumbnut (J) on the side of the cap...
.... 17) Turn machine off the machine head. SB 2000/2 - 002 12 Then tighten the needle plate screws. 15) Press the "Thread Trimming" button on . Standard BAS- 423-1230 (Cap to Flat Conversion) With the power to the machine in the ON position. 1) Remove the black thumbnut (J) on the side of the cap...
