
Cap to Tubular - English
Page 1
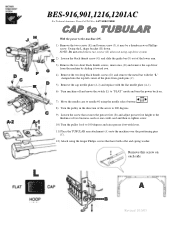
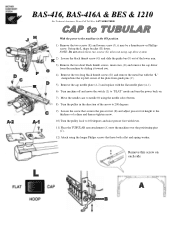
...remove the cap driver from the machine by sliding it may be a thumbscrew or Phillips screw. Remove this screw on . 7) Move the needle case to needle #1 using the needle select buttons . 8) Turn the pulley in the direction of the arrow to 200 degrees. 9) Loosen the screw that secures the presser foot (B)... the metal bar with the "L" stamped into the top left corner of the plate from guide pins (C). 5) Remove the cap needle plate (A-2) and replace with the flat needle plate (A-1). 6) Turn machine off and move the switch (L) to "FLAT" mode and turn the power back on each side Revised...
...remove the cap driver from the machine by sliding it may be a thumbscrew or Phillips screw. Remove this screw on . 7) Move the needle case to needle #1 using the needle select buttons . 8) Turn the pulley in the direction of the arrow to 200 degrees. 9) Loosen the screw that secures the presser foot (B)... the metal bar with the "L" stamped into the top left corner of the plate from guide pins (C). 5) Remove the cap needle plate (A-2) and replace with the flat needle plate (A-1). 6) Turn machine off and move the switch (L) to "FLAT" mode and turn the power back on each side Revised...

Color Change Potentiometer Replacement - English
Page 2
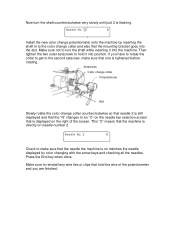
... the machine. Turn the shaft of the color change potentiometer so that needles 1 and 2 are flashing on power to the machine. Turn on the needle bar selection screen. Turn the color change collar to move the needle bar case to display the needle bar selection screen. Remove the mounting bracket from the old color change potentiometer...
... the machine. Turn the shaft of the color change potentiometer so that needles 1 and 2 are flashing on power to the machine. Turn on the needle bar selection screen. Turn the color change collar to move the needle bar case to display the needle bar selection screen. Remove the mounting bracket from the old color change potentiometer...
Color Change Potentiometer Replacement - English
Page 3
.... Press the End key when done. Make sure to an "O" on the needle bar selection screen that is displayed on matches the needle displayed by inserting the shaft in to the second setscrew, make sure that the needle the machine is still displayed and that the "N" changes to reinstall any wire ...clips that the mounting bracket goes into the slot. Setscrews Color change collar Potentiometer Slot Slowly rotate the color change collar counterclockwise so that needle 2 is on the right of the potentiometer and you have to rotate the collar to get to the color change potentiometer onto the ...
.... Press the End key when done. Make sure to an "O" on the needle bar selection screen that is displayed on matches the needle displayed by inserting the shaft in to the second setscrew, make sure that the needle the machine is still displayed and that the "N" changes to reinstall any wire ...clips that the mounting bracket goes into the slot. Setscrews Color change collar Potentiometer Slot Slowly rotate the color change collar counterclockwise so that needle 2 is on the right of the potentiometer and you have to rotate the collar to get to the color change potentiometer onto the ...

Quick Reference Guide - English
Page 1
Press UP or DOWN arrow to select next color of design or BACK arrow for previous color ...10. 11. Press UP or DOWN arrows to pick an empty memory location. 2. Press START to pick an empty memory location. BAS-416,416A-Quick Reference Guide For Technical Assistance Please Call 1-877-4BROTHER ENTERING DISK DATA & SETTING THE COLOR SEQUENCE ENTER A DESIGN FROM EDITOR...your design in the frame. 13. # 14. Press UP or DOWN arrows to enter color programming mode. Press NEEDLE SET to scroll the disk directory. Program color sequence (see Step 8) Use ARROW keys to center your design (...
Press UP or DOWN arrow to select next color of design or BACK arrow for previous color ...10. 11. Press UP or DOWN arrows to pick an empty memory location. 2. Press START to pick an empty memory location. BAS-416,416A-Quick Reference Guide For Technical Assistance Please Call 1-877-4BROTHER ENTERING DISK DATA & SETTING THE COLOR SEQUENCE ENTER A DESIGN FROM EDITOR...your design in the frame. 13. # 14. Press UP or DOWN arrows to enter color programming mode. Press NEEDLE SET to scroll the disk directory. Program color sequence (see Step 8) Use ARROW keys to center your design (...
Quick Reference Guide - English
Page 2
...CLEAR When asked "Do you must first STOP the machine. To move by 100 stitches either FORWARD or BACK in design END To EXIT the NEEDLE SELECT mode Press "#" again to display a "T" in effect. SETTING THE ROTATE, MIRROR, REPEAT After loading your design and at the display below, ... ENTER to store the new HOOP FEED position Press HOOP FEED to toggle between sewing position and hoop feed position MOVING THE NEEDLE CASE NEEDLE SELECT To enter the NEEDLE SELECT mode To move through a design after you have started sewing you want to correct registration ERASE ALL DESIGNS / HARD RESET...
...CLEAR When asked "Do you must first STOP the machine. To move by 100 stitches either FORWARD or BACK in design END To EXIT the NEEDLE SELECT mode Press "#" again to display a "T" in effect. SETTING THE ROTATE, MIRROR, REPEAT After loading your design and at the display below, ... ENTER to store the new HOOP FEED position Press HOOP FEED to toggle between sewing position and hoop feed position MOVING THE NEEDLE CASE NEEDLE SELECT To enter the NEEDLE SELECT mode To move through a design after you have started sewing you want to correct registration ERASE ALL DESIGNS / HARD RESET...
Tubular to Cap - English
Page 1
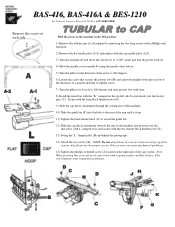
NOTE: Do not attach these two screws when not using the needle select button. 5) Turn the pulley in the ON position. 1) Remove the tubular arm (A) attachment by and attach over the metal bar, with L stamped on the right ... has both a spring washer and flat washer. This will eliminate some registration problems. BAS-416, BAS-416A & BES-1210 For Technical Assistance Please Call Toll Free 1-877-4BROTHER Remove this screw please be sure it , and secure with the cap needle plate (A-2). 3) Turn the machine off and move the switch (L) to "CAP" mode and...
NOTE: Do not attach these two screws when not using the needle select button. 5) Turn the pulley in the ON position. 1) Remove the tubular arm (A) attachment by and attach over the metal bar, with L stamped on the right ... has both a spring washer and flat washer. This will eliminate some registration problems. BAS-416, BAS-416A & BES-1210 For Technical Assistance Please Call Toll Free 1-877-4BROTHER Remove this screw please be sure it , and secure with the cap needle plate (A-2). 3) Turn the machine off and move the switch (L) to "CAP" mode and...
Cap to Tubular - English
Page 1
... 100 degrees and raise presser foot with lever. 11) Place the TUBULAR arm attachment (A) onto the machine over the positioning pins (C). 12) Attach using the needle select button. 8) Turn the pulley in the ON position. 1) Remove the two screws (K) and loosen screw (J), it toward you. 4) Remove the two long... black thumb screws, inner ones, (E) and remove the cap driver from the machine by sliding it may be a thumbscrew or Phillips screw. BAS-416, BAS-416A & BES & 1210 For Technical Assistance Please Call Toll Free 1-877-4BROTHER With the power to the machine in the direction of the arrow ...
... 100 degrees and raise presser foot with lever. 11) Place the TUBULAR arm attachment (A) onto the machine over the positioning pins (C). 12) Attach using the needle select button. 8) Turn the pulley in the ON position. 1) Remove the two screws (K) and loosen screw (J), it toward you. 4) Remove the two long... black thumb screws, inner ones, (E) and remove the cap driver from the machine by sliding it may be a thumbscrew or Phillips screw. BAS-416, BAS-416A & BES & 1210 For Technical Assistance Please Call Toll Free 1-877-4BROTHER With the power to the machine in the direction of the arrow ...

Instruction Manual - English
Page 8
...on main printed circuit board 37 4-2. Default sewing of machine 6 3-1. Embroidering Procedures 28 1. Installing guard bar 2-5. Thread tension 13 Needle thread tension 13 Bobbin thread tension 13 4-5. Flow chart 28 2. Installation 4 2-1. Transportation of machines 4 2-3. Installation of machines ...the machine 6 3-2. Inserting floppy disk 29 3. Names 30 3-2. Operation panel display 36 4. Replacing and selecting needle 10 4-3. CONTENTS Chapter 1. Attaching embroidery hoop to holder base 14 Attaching plastic square hoop to holder ...
...on main printed circuit board 37 4-2. Default sewing of machine 6 3-1. Embroidering Procedures 28 1. Installing guard bar 2-5. Thread tension 13 Needle thread tension 13 Bobbin thread tension 13 4-5. Flow chart 28 2. Installation 4 2-1. Transportation of machines 4 2-3. Installation of machines ...the machine 6 3-2. Inserting floppy disk 29 3. Names 30 3-2. Operation panel display 36 4. Replacing and selecting needle 10 4-3. CONTENTS Chapter 1. Attaching embroidery hoop to holder base 14 Attaching plastic square hoop to holder ...

Instruction Manual - English
Page 9
...10. Entering Embroidery Date 39 Data available in BAS-416A • BES-1210AC 39 Summary of sewing function 60 2. Setting repeat sewing 58 Chapter 7. Explanation of main menu 40 1. Cleaning 88 2. Selecting needle bar 65 5. Settingbobbin thread counter and thread ...breakage sensor 66 6. Skip function of speed volume table setting 68 7. Chapter 5. Editing Embroidery Data 53 1. Needle bar setting 63 4. Function of 0 mm stitch...
...10. Entering Embroidery Date 39 Data available in BAS-416A • BES-1210AC 39 Summary of sewing function 60 2. Setting repeat sewing 58 Chapter 7. Explanation of main menu 40 1. Cleaning 88 2. Selecting needle bar 65 5. Settingbobbin thread counter and thread ...breakage sensor 66 6. Skip function of speed volume table setting 68 7. Chapter 5. Editing Embroidery Data 53 1. Needle bar setting 63 4. Function of 0 mm stitch...
Instruction Manual - English
Page 20
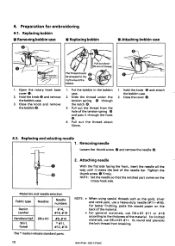
Slide the thread under the tension spring 0 through the hook O. 4. Pull out the thread about SO mm of the needle bar. Replacing and selecting needle 1. Materials and needle selection Fabric type Needles Needle numbers Denim Leather #14, #16, #18 Handkerchief Shirt Towel DB x K5 #9, #10 * #11, #12, #13 The.... Put the bobbin in the bobbin case. 2. Removing needle Loosen the thumb screw 0 and remove the needle 0. 2. BAS-416A BES-1210AC Open the rotary hook base cover 0. 2. Pull out about 50mm. 1. NOTE: Set the needle so that the notched part comes on the back of the...
Slide the thread under the tension spring 0 through the hook O. 4. Pull out the thread about SO mm of the needle bar. Replacing and selecting needle 1. Materials and needle selection Fabric type Needles Needle numbers Denim Leather #14, #16, #18 Handkerchief Shirt Towel DB x K5 #9, #10 * #11, #12, #13 The.... Put the bobbin in the bobbin case. 2. Removing needle Loosen the thumb screw 0 and remove the needle 0. 2. BAS-416A BES-1210AC Open the rotary hook base cover 0. 2. Pull out about 50mm. 1. NOTE: Set the needle so that the notched part comes on the back of the...

Instruction Manual - English
Page 35
Available key ottext NEEDLE SET Function To enter needle bar setting mode 11-40MIR NEEDLE SELECT To enter needle bar selecting mode • t~*fTHREAD SENSOR To enter thread breakage sensor and bobbin thread counter setting mode 3,1O THREAD TRIMMING To trim thread HOOP FEED To feed hoop or enter hoop feed mode BAS-4164 - BES-1210AC 25
Available key ottext NEEDLE SET Function To enter needle bar setting mode 11-40MIR NEEDLE SELECT To enter needle bar selecting mode • t~*fTHREAD SENSOR To enter thread breakage sensor and bobbin thread counter setting mode 3,1O THREAD TRIMMING To trim thread HOOP FEED To feed hoop or enter hoop feed mode BAS-4164 - BES-1210AC 25
Instruction Manual - English
Page 38
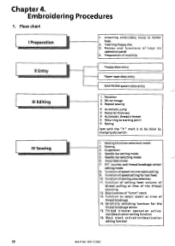
...the "X" mark is to holder base 2. Function of sewing area selection 11. Function of speed volume table setting 9. Function to select alarm at time of thread breakage 14. Mask check activation/deactivation setting function 28 BAS-416A • BES-1210AC Chapter 4. Flowchart I Preparation 1. Names and ...hoop to be done by changing dip switch. 1. Needle bar selecting mode 6. Function of machine II Entry Floppy data entry Paper tape data entry BAS-PC/EM system data entry III Editing IV Sewing 1. Needle bar setting mode 5. Sensitivity switching function for test feed...
...the "X" mark is to holder base 2. Function of sewing area selection 11. Function of speed volume table setting 9. Function to select alarm at time of thread breakage 14. Mask check activation/deactivation setting function 28 BAS-416A • BES-1210AC Chapter 4. Flowchart I Preparation 1. Names and ...hoop to be done by changing dip switch. 1. Needle bar selecting mode 6. Function of machine II Entry Floppy data entry Paper tape data entry BAS-PC/EM system data entry III Editing IV Sewing 1. Needle bar setting mode 5. Sensitivity switching function for test feed...

Instruction Manual - English
Page 40
POWER THREAD THREAD SENSOR TRIMMING HOOP FEED ESE% ItaaiN NEEDLE NEEDLE SET SELECT BL EDIT bRpther BAS-418 9 I).7 CLEAR A7] ENTER sr a la a BACK FORWARD V 30 BAS-416A•BES-1210AC Names EMERGENCY St s •Aktarre - Names and functions of operation panel 3-1. 3.
POWER THREAD THREAD SENSOR TRIMMING HOOP FEED ESE% ItaaiN NEEDLE NEEDLE SET SELECT BL EDIT bRpther BAS-418 9 I).7 CLEAR A7] ENTER sr a la a BACK FORWARD V 30 BAS-416A•BES-1210AC Names EMERGENCY St s •Aktarre - Names and functions of operation panel 3-1. 3.

Instruction Manual - English
Page 43
.... BAS-416A • BES-1210AC 33 Use this key to; 314 • Edit in main menu. • Edit after reading data in each mode (main menu mode, floppy disk data entry mode, paper tape data entry mode, editing system data entry mode) and entering sewing mode. EDIT NEEDLE SET Use this key to select needle...
.... BAS-416A • BES-1210AC 33 Use this key to; 314 • Edit in main menu. • Edit after reading data in each mode (main menu mode, floppy disk data entry mode, paper tape data entry mode, editing system data entry mode) and entering sewing mode. EDIT NEEDLE SET Use this key to select needle...
Instruction Manual - English
Page 44
... direction) are alternately displayed. • Perform trial feeding just after entering sewing mode. • Enter inching mode or jump mode in sewing suspension. • Set needle select number as long as the receive data from editing system is entered. [NOTE] For floppy disk data and paper tape data, this key to; •...
... direction) are alternately displayed. • Perform trial feeding just after entering sewing mode. • Enter inching mode or jump mode in sewing suspension. • Set needle select number as long as the receive data from editing system is entered. [NOTE] For floppy disk data and paper tape data, this key to; •...

Instruction Manual - English
Page 50
... main menu is displayed, pressing the following key will select its mode.) Available key Function A • It isinvalid in selecting registered data number • To move hoop Available key Function Star NEEDLE SELECT To enter needle bar selecting mode omit's.- Summary of machine side in registered number selecting mode • To move hoop in hoop moving mode... MI JG .1 t, START To enter sewing mode dry HOOP FEED To feed hoop (To enter hoop feed mode.) a it To enter editing mode EDIT ttelftlE NEEDLE SET To enter needle bar setting mode 40 BAS-416A • BES-1210AC
... main menu is displayed, pressing the following key will select its mode.) Available key Function A • It isinvalid in selecting registered data number • To move hoop Available key Function Star NEEDLE SELECT To enter needle bar selecting mode omit's.- Summary of machine side in registered number selecting mode • To move hoop in hoop moving mode... MI JG .1 t, START To enter sewing mode dry HOOP FEED To feed hoop (To enter hoop feed mode.) a it To enter editing mode EDIT ttelftlE NEEDLE SET To enter needle bar setting mode 40 BAS-416A • BES-1210AC
Instruction Manual - English
Page 58
...enter editing mode To enter needle bar setting mode To enter needle bar selecting mode To enter thread sensor and bobbin thread counter setting mode To return to main menu THREAD TRIMMING 4E:1 HOOP FEED To trim thread To feed hoop (To enter hoop feed mode) 48 BAS-416A • BES-1 210AC &#...8226; The following keys are available during inputting floppy data: Available key Function A To select paper tape type from (TAJIMA, BARUDAN, ZANGS) V et 12 153 Ai < BACK > FORWARD...
...enter editing mode To enter needle bar setting mode To enter needle bar selecting mode To enter thread sensor and bobbin thread counter setting mode To return to main menu THREAD TRIMMING 4E:1 HOOP FEED To trim thread To feed hoop (To enter hoop feed mode) 48 BAS-416A • BES-1 210AC &#...8226; The following keys are available during inputting floppy data: Available key Function A To select paper tape type from (TAJIMA, BARUDAN, ZANGS) V et 12 153 Ai < BACK > FORWARD...

Instruction Manual - English
Page 62
... clear file data displayed on upper row from BAS-POEM system; Available key Function A V tik il in At < BACK > FORWARD To scroll file names registered in selecting number.) To enter sewing mode if data registered if .1 • • EDIT i i liAlIM NEEDLE .._ SET _, litt01102 NEEDLE SELECT * THREADSENSOR 1.' 3 END 'Pt1)O THREAD ... enter editing mode To enter needle bar setting mode To enter needle bar selecting mode To enter thread sensor and bobbin thread counter setting mode To return to main menu To trim thread To feed hoop (To enter hoop feed mode) 52 BAS-4164 - • The ...
... clear file data displayed on upper row from BAS-POEM system; Available key Function A V tik il in At < BACK > FORWARD To scroll file names registered in selecting number.) To enter sewing mode if data registered if .1 • • EDIT i i liAlIM NEEDLE .._ SET _, litt01102 NEEDLE SELECT * THREADSENSOR 1.' 3 END 'Pt1)O THREAD ... enter editing mode To enter needle bar setting mode To enter needle bar selecting mode To enter thread sensor and bobbin thread counter setting mode To return to main menu To trim thread To feed hoop (To enter hoop feed mode) 52 BAS-4164 - • The ...

Instruction Manual - English
Page 73
... the and keys to select the needle number. • To select needle number (The BAS-416A shows a scrolling display of numbers from 1 to 9.) (The BES-1210AC shows a scrolling display of numbers and letters from 1 to 9 and A to C (for the BAS-416A) or to any number of 99 needle changes can also be set when changing colors. BAS-416A • BES-1210AC...
... the and keys to select the needle number. • To select needle number (The BAS-416A shows a scrolling display of numbers from 1 to 9.) (The BES-1210AC shows a scrolling display of numbers and letters from 1 to 9 and A to C (for the BAS-416A) or to any number of 99 needle changes can also be set when changing colors. BAS-416A • BES-1210AC...
Instruction Manual - English
Page 75
... in proper position [ N Case POS. Cl E N No.IIEDEEDEEE R_ St:EEE1OOOCo:EE) N No.OCIECIElEEJEE NEEDLE SELECT , Needle No. 1 N N END [Set STR P. "O" Indicates that the needle bar selection position is locked and would not move to page 97 "Error messages" for the BAS-416A, the setting will scroll through the numbers 1 to 9 and the letters A to C. • The...
... in proper position [ N Case POS. Cl E N No.IIEDEEDEEE R_ St:EEE1OOOCo:EE) N No.OCIECIElEEJEE NEEDLE SELECT , Needle No. 1 N N END [Set STR P. "O" Indicates that the needle bar selection position is locked and would not move to page 97 "Error messages" for the BAS-416A, the setting will scroll through the numbers 1 to 9 and the letters A to C. • The...


