Lifestyle® VS-2 video enhancer - Owner's guide
Page 5
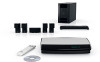
...! Before setting up the VS-2 with a software update disc. English Unpacking Carefully unpack the VS-2 video enhancer. Notify Bose or your LIFESTYLE® system and select the CD/DVD source. 2. Wait for the display window of the media center to be sure your product. Turn on this page. ...You can purchase additional cables from your LIFESTYLE® system. Check to indicate when it . Load the software update disc into the Lifestyle system media center ...
...! Before setting up the VS-2 with a software update disc. English Unpacking Carefully unpack the VS-2 video enhancer. Notify Bose or your LIFESTYLE® system and select the CD/DVD source. 2. Wait for the display window of the media center to be sure your product. Turn on this page. ...You can purchase additional cables from your LIFESTYLE® system. Check to indicate when it . Load the software update disc into the Lifestyle system media center ...
Lifestyle® VS-2 video enhancer - Owner's guide
Page 6
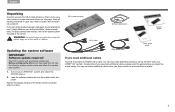
Connecting the VS-2 to Your Media Center English Preparation When setting up a LIFESTYLE® system with your LIFESTYLE® DVD home entertainment system. 6 Then, disconnect the power supply from the wall outlet. Note: Straighten the DC power cord from the media center power supply and ... into the S-Video OUT connector. • Connect the other end of the VS-2 cable to the media center as much as the antenna for your LIFESTYLE system, wait 30 seconds, and unplug the media center power supply from the rear panel of the VS-2: 7 Insert the DC power cable from the...
Connecting the VS-2 to Your Media Center English Preparation When setting up a LIFESTYLE® system with your LIFESTYLE® DVD home entertainment system. 6 Then, disconnect the power supply from the wall outlet. Note: Straighten the DC power cord from the media center power supply and ... into the S-Video OUT connector. • Connect the other end of the VS-2 cable to the media center as much as the antenna for your LIFESTYLE system, wait 30 seconds, and unplug the media center power supply from the rear panel of the VS-2: 7 Insert the DC power cable from the...
Lifestyle® VS-2 video enhancer - Owner's guide
Page 19
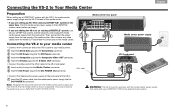
If your TV screen is connected to your LIFESTYLE® system, the remote changes channels on the source selected by the TV Control setting (CBL•SAT, VCR, TV, or AUX) in the System ... selecting the TV source unless you have connected to the TV Audio IN jacks. navigate select Media center display - Just press the remote button (CD/DVD, VCR, CBL•SAT, or AUX) for the source you to continue viewing the video portion of the sources connected to the VS-2, be sure...
If your TV screen is connected to your LIFESTYLE® system, the remote changes channels on the source selected by the TV Control setting (CBL•SAT, VCR, TV, or AUX) in the System ... selecting the TV source unless you have connected to the TV Audio IN jacks. navigate select Media center display - Just press the remote button (CD/DVD, VCR, CBL•SAT, or AUX) for the source you to continue viewing the video portion of the sources connected to the VS-2, be sure...
Lifestyle® VS-2 video enhancer - Owner's guide
Page 21
...the VS-2 to the appropriate VS-2 inputs. • Make sure you have not used a source that outputs a video format that is plugged into the DVD player. English Maintaining Your VS-2 Cleaning • Use only a soft, dry cloth to clean the outside of the VS-2. • Do not use any...sources are connected to the appropriate VS-2 inputs. See "Updating the system software" on TV • If you connected your TV to spill into the DVD player. See "Updating the system software" on page 5. • Make sure the VS-2 cable is correctly connected between the VS-2 and the media ...
...the VS-2 to the appropriate VS-2 inputs. • Make sure you have not used a source that outputs a video format that is plugged into the DVD player. English Maintaining Your VS-2 Cleaning • Use only a soft, dry cloth to clean the outside of the VS-2. • Do not use any...sources are connected to the appropriate VS-2 inputs. See "Updating the system software" on TV • If you connected your TV to spill into the DVD player. See "Updating the system software" on page 5. • Make sure the VS-2 cable is correctly connected between the VS-2 and the media ...
Operating guide
Page 1
LIFESTYLE® DVD HOME ENTERTAINMENT SYSTEMS with the VS-2 Video Enhancer Operating Guide Guía de uso Notice d'utilisation ®
LIFESTYLE® DVD HOME ENTERTAINMENT SYSTEMS with the VS-2 Video Enhancer Operating Guide Guía de uso Notice d'utilisation ®

Operating guide
Page 2
... only). • If applicable, the radio communication device incorporated into any local regulations. Do not incinerate. ©2007 Bose Corporation. Additional safety information See the additional instructions on the apparatus. Unauthorized alterations may compromise safety, regulatory compliance, and system...this guide carefully. The lightning flash with liquids, such as marked on the apparatus. Class 1 laser product This CD/DVD player is classified as the disconnect device, such disconnect device shall remain readily operable. • The product must be ...
... only). • If applicable, the radio communication device incorporated into any local regulations. Do not incinerate. ©2007 Bose Corporation. Additional safety information See the additional instructions on the apparatus. Unauthorized alterations may compromise safety, regulatory compliance, and system...this guide carefully. The lightning flash with liquids, such as marked on the apparatus. Class 1 laser product This CD/DVD player is classified as the disconnect device, such disconnect device shall remain readily operable. • The product must be ...

Operating guide
Page 3
...241;ol Français CONTENTS INTRODUCTION 5 SYSTEM CONTROLS 8 SYSTEM OPERATION 14 CONTROLLING EXTERNAL SOURCES 21 USING SYSTEM MENUS 27 CHANGING SOURCE SETTINGS 35 REFERENCE 41 INTRODUCTION 5 Welcome 5 Introducing the VS-2 video enhancer 5 Types of discs you can use with this system 5 Glossary of ...sources 15 Playing a DVD 15 Using DVD parental controls 16 Playing a CD 16 Using the radio 18 Setting, removing, or reassigning radio station presets 18 Using the headphone jack 19 Using the sleep timer 19 CONTROLLING EXTERNAL SOURCES 21 Using your LIFESTYLE® remote with...
...241;ol Français CONTENTS INTRODUCTION 5 SYSTEM CONTROLS 8 SYSTEM OPERATION 14 CONTROLLING EXTERNAL SOURCES 21 USING SYSTEM MENUS 27 CHANGING SOURCE SETTINGS 35 REFERENCE 41 INTRODUCTION 5 Welcome 5 Introducing the VS-2 video enhancer 5 Types of discs you can use with this system 5 Glossary of ...sources 15 Playing a DVD 15 Using DVD parental controls 16 Playing a CD 16 Using the radio 18 Setting, removing, or reassigning radio station presets 18 Using the headphone jack 19 Using the sleep timer 19 CONTROLLING EXTERNAL SOURCES 21 Using your LIFESTYLE® remote with...

Operating guide
Page 4
Français Español English CHANGING SOURCE SETTINGS 35 Quick adjustments as you watch or listen 35 Where to find the list of options 35 How to change the settings 36 CD settings options 37 DVD settings options 37 Tuner settings options (FM or AM radio 39 TV ... control switch settings 41 Protecting and caring for your system 42 Setting up a second room with sound 43 Bose® link-compatible products make it easy 43 Bose® link remote switch settings 44 Troubleshooting 45 Contacting Customer Service 47 Limited warranty 47 Accessories 48 Technical information...
Français Español English CHANGING SOURCE SETTINGS 35 Quick adjustments as you watch or listen 35 Where to find the list of options 35 How to change the settings 36 CD settings options 37 DVD settings options 37 Tuner settings options (FM or AM radio 39 TV ... control switch settings 41 Protecting and caring for your system 42 Setting up a second room with sound 43 Bose® link-compatible products make it easy 43 Bose® link remote switch settings 44 Troubleshooting 45 Contacting Customer Service 47 Limited warranty 47 Accessories 48 Technical information...
Operating guide
Page 5
... you can use with HDTV and progressive scan TV formats. All tracks burned in playing compatible CDs or DVDs may contain specific restrictions on use system delivers superior performance for purchasing a Bose® LIFESTYLE® DVD home entertainment system with : - Please respect the rights of ISO9660 disc format - Use of the artists and other...
... you can use with HDTV and progressive scan TV formats. All tracks burned in playing compatible CDs or DVDs may contain specific restrictions on use system delivers superior performance for purchasing a Bose® LIFESTYLE® DVD home entertainment system with : - Please respect the rights of ISO9660 disc format - Use of the artists and other...

Operating guide
Page 6
..., check to the height and seen when as an international standard. This more complex signal also requires the use in a DVD title. DVD-R, DVD+R, DVD-RW, DVD+RW - An abbreviation for your system. Glossary of the media center. A main division of your system on MPEG video, Dolby...a Compact Disc (CD), which are 4:3 and 16:9. D Dolby Digital - An abbreviation for Read Only Memory (ROM) on certain CDs and many DVDs. - DVD-ROM - CD-ROM - These numbers are sold. Component video - Dolby Digital is split into three parts: luminance and two color signals for High ...
..., check to the height and seen when as an international standard. This more complex signal also requires the use in a DVD title. DVD-R, DVD+R, DVD-RW, DVD+RW - An abbreviation for your system. Glossary of the media center. A main division of your system on MPEG video, Dolby...a Compact Disc (CD), which are 4:3 and 16:9. D Dolby Digital - An abbreviation for Read Only Memory (ROM) on certain CDs and many DVDs. - DVD-ROM - CD-ROM - These numbers are sold. Component video - Dolby Digital is split into three parts: luminance and two color signals for High ...

Operating guide
Page 9
..."Video options" on page 29. 9 Exits on-screen menus for the current source. Confirms the selection of a menu item. Enters the main menu of your LIFESTYLE® remote is currently loaded. Moves up to control your TV. Enters or exits the System menu. Tunes the FM/AM radio up or down... FastText buttons on the remote. Exits the Settings and System menus and the Library and Info screens. Enters or exits the menu of the DVD disc that is set up to control such components). SYSTEM CONTROLS English Español Français SYSTEM CONTROLS Depending on the remote you...
..."Video options" on page 29. 9 Exits on-screen menus for the current source. Confirms the selection of a menu item. Enters the main menu of your LIFESTYLE® remote is currently loaded. Moves up to control your TV. Enters or exits the System menu. Tunes the FM/AM radio up or down... FastText buttons on the remote. Exits the Settings and System menus and the Library and Info screens. Enters or exits the menu of the DVD disc that is set up to control such components). SYSTEM CONTROLS English Español Français SYSTEM CONTROLS Depending on the remote you...

Operating guide
Page 10
... the numbers pressed. Moves back a few seconds in your DVR (or other digital video recorder) if the LIFESTYLE® remote is set up to the next TV, cable, or satellite channel, CD track, or DVD chapter. Moves ahead a few seconds in some cable and satellite on the media center display. Displays or... the channel last selected on the TV screen, if the remote is set up ) page in your DVR (or other digital video recorder) if the LIFESTYLE® remote is set up for this style of play. During MP3 play . Stops music (except FM/AM) or video play , removes or restores ...
... the numbers pressed. Moves back a few seconds in your DVR (or other digital video recorder) if the LIFESTYLE® remote is set up to the next TV, cable, or satellite channel, CD track, or DVD chapter. Moves ahead a few seconds in some cable and satellite on the media center display. Displays or... the channel last selected on the TV screen, if the remote is set up ) page in your DVR (or other digital video recorder) if the LIFESTYLE® remote is set up for this style of play. During MP3 play . Stops music (except FM/AM) or video play , removes or restores ...

Operating guide
Page 12
...Disc tray Controls Display window Headphone jack IR emitter Controls Four of the media center control panel buttons provide similar control to malfunction. Initiates DVD play when that Enter appear on the system. Volume Raises the volume of the system and unmutes the speakers (if they are located ...under the disc tray, enables you to control other components using the LIFESTYLE® remote. An IR (infrared) signal emitter, located under the front panel door of the media center. To the right of the ...
...Disc tray Controls Display window Headphone jack IR emitter Controls Four of the media center control panel buttons provide similar control to malfunction. Initiates DVD play when that Enter appear on the system. Volume Raises the volume of the system and unmutes the speakers (if they are located ...under the disc tray, enables you to control other components using the LIFESTYLE® remote. An IR (infrared) signal emitter, located under the front panel door of the media center. To the right of the ...

Operating guide
Page 14
...remote control. To watch or listen" on the system. • Press the remote control button for audio, video, media center, remote control, or DVD lock), use your LIFESTYLE® remote to "Quick adjustments as your system. After setting up your system • Press the On/Off button on the system and selects... particular source playing (like the number of speakers engaged or the turn on your remote: • Turn on page 35. 14 For details on -screen Settings menus. OR • Press the CD/DVD, FM/AM, TV, CBL/SAT, or AUX remote button. Note: For information on how to set the remote...
...remote control. To watch or listen" on the system. • Press the remote control button for audio, video, media center, remote control, or DVD lock), use your LIFESTYLE® remote to "Quick adjustments as your system. After setting up your system • Press the On/Off button on the system and selects... particular source playing (like the number of speakers engaged or the turn on your remote: • Turn on page 35. 14 For details on -screen Settings menus. OR • Press the CD/DVD, FM/AM, TV, CBL/SAT, or AUX remote button. Note: For information on how to set the remote...

Operating guide
Page 15
...it on the LIFESTYLE® remote control unless otherwise specified. Press Play to begin DVD play ... Resume play . to restart at the beginning of several on page 42. 5. Repeat a chapter... Press again to retract the disc tray. 6. Be sure the DVD is just one of the DVD. while the ...çais SYSTEM OPERATION Using system sources For instructions on selecting and playing system sources, refer to buttons on . 3. Turn on the DVD... Insert a DVD into the tray (label side up . Your remote control options When you want , and press Enter to view the menu shown at...
...it on the LIFESTYLE® remote control unless otherwise specified. Press Play to begin DVD play ... Resume play . to restart at the beginning of several on page 42. 5. Repeat a chapter... Press again to retract the disc tray. 6. Be sure the DVD is just one of the DVD. while the ...çais SYSTEM OPERATION Using system sources For instructions on selecting and playing system sources, refer to buttons on . 3. Turn on the DVD... Insert a DVD into the tray (label side up . Your remote control options When you want , and press Enter to view the menu shown at...
Operating guide
Page 16
... in "Where to "DVD Lock options" on page 35. To load a disc: 1. Press Enter to restrict access by locking any DVD movies that you find the list of options" on page 33. Using DVD parental controls The parental control feature of your action. 4. Playing a CD Press CD/DVD to A, confirming your LIFESTYLE® system allows you...
... in "Where to "DVD Lock options" on page 35. To load a disc: 1. Press Enter to restrict access by locking any DVD movies that you find the list of options" on page 33. Using DVD parental controls The parental control feature of your action. 4. Playing a CD Press CD/DVD to A, confirming your LIFESTYLE® system allows you...

Operating guide
Page 23
... Identify the device: • From the Remote Control options in the alphabetical list to locate your brand. • Press Enter to your LIFESTYLE system. navigate select 8. CONTROLLING EXTERNAL SOURCES English Español Français Figure 7 Changing the TV Power Video TV Power: TV ...Power Status: TV Aspect Ratio: Widescreen DVDs: Video Connector: Video Black Level: Automatic TV Detected - - Notice the TV Power Status: • TV Detected means the installed TV sensor is...
... Identify the device: • From the Remote Control options in the alphabetical list to locate your brand. • Press Enter to your LIFESTYLE system. navigate select 8. CONTROLLING EXTERNAL SOURCES English Español Français Figure 7 Changing the TV Power Video TV Power: TV ...Power Status: TV Aspect Ratio: Widescreen DVDs: Video Connector: Video Black Level: Automatic TV Detected - - Notice the TV Power Status: • TV Detected means the installed TV sensor is...

Operating guide
Page 24
.... • When you have chosen the right code, press Enter. • Press System or Exit to operate it as well. For VCR (or other LIFESTYLE® remote buttons to leave the System menu. When you complete these settings, you have chosen the right code. Choose the device code: • In...you can set up or down to locate your brand of VCR brands and codes include selections for DVRs (or PVRs) and DVD recorders, as the source. Then, using the LIFESTYLE® remote control, press the VCR source button and follow the steps below , you have chosen the right code, press Enter...
.... • When you have chosen the right code, press Enter. • Press System or Exit to operate it as well. For VCR (or other LIFESTYLE® remote buttons to leave the System menu. When you complete these settings, you have chosen the right code. Choose the device code: • In...you can set up or down to locate your brand of VCR brands and codes include selections for DVRs (or PVRs) and DVD recorders, as the source. Then, using the LIFESTYLE® remote control, press the VCR source button and follow the steps below , you have chosen the right code, press Enter...

Operating guide
Page 27
...• Make sure to select the TV Video Input that you want, there is the adjustments made so the remote control works with any DVD or VCD that are typically those property features. Inactive display navigate select Navigation cue - USING SYSTEM MENUS English Français Español... English USING SYSTEM MENUS Properties that connects to the VS-2. • Press System on the LIFESTYLE® remote control. Figure 9 System menu and preview of the RemoteControl options How to make such adjustments. What it shows you reach the...
...• Make sure to select the TV Video Input that you want, there is the adjustments made so the remote control works with any DVD or VCD that are typically those property features. Inactive display navigate select Navigation cue - USING SYSTEM MENUS English Français Español... English USING SYSTEM MENUS Properties that connects to the VS-2. • Press System on the LIFESTYLE® remote control. Figure 9 System menu and preview of the RemoteControl options How to make such adjustments. What it shows you reach the...

Operating guide
Page 29
... the ADAPTiQ system adjustments* when this advanced feature, the LIFESTYLE® system self-adjusts its audio processing to compensate for each external component to move into the active list of this selection is HDMITM.) Bose 5.1 [default] TV Stereo Allows you to adjust these ...right to see a preview of your Installation Guide. Restoring these system options: TV Power TV Power Status Widescreen TV Widescreen DVDs Video Connector Video Black Level TV Video Format Progressive Scan Video Resolution Persistent Video Settings on the media center control panel. ...
... the ADAPTiQ system adjustments* when this advanced feature, the LIFESTYLE® system self-adjusts its audio processing to compensate for each external component to move into the active list of this selection is HDMITM.) Bose 5.1 [default] TV Stereo Allows you to adjust these ...right to see a preview of your Installation Guide. Restoring these system options: TV Power TV Power Status Widescreen TV Widescreen DVDs Video Connector Video Black Level TV Video Format Progressive Scan Video Resolution Persistent Video Settings on the media center control panel. ...


