Owner's guide
Page 2
...Bose.com/static/compliance/index.html. Liquids can be of sufficient magnitude to the presence of Conformity can cause a failure and/or a fire hazard. It may compromise safety, regulatory compliance, and system performance. Replace only with the Acoustimass® module in the shipping carton. CineMate series II... carefully. Dispose of explosion if battery is located on the Important Safety Instructions sheet (North America only) enclosed in the CineMate® system. WARNING: Danger of used batteries properly, following any local regulations. Do not incinerate. WARNING: Do not ...
...Bose.com/static/compliance/index.html. Liquids can be of sufficient magnitude to the presence of Conformity can cause a failure and/or a fire hazard. It may compromise safety, regulatory compliance, and system performance. Replace only with the Acoustimass® module in the shipping carton. CineMate series II... carefully. Dispose of explosion if battery is located on the Important Safety Instructions sheet (North America only) enclosed in the CineMate® system. WARNING: Danger of used batteries properly, following any local regulations. Do not incinerate. WARNING: Do not ...

Owner's guide
Page 3
...INDICATORS 15 Acoustimass® module bass control 15 CineMate® series II remote control 16 Using the remote to control the CineMate system 16 CONTENTS CineMate® GS series II remote control . . . . . 17 Using the remote to control the CineMate® system 18 Setting the remote for your... control from one device to another 20 Using the CineMate® GS series II remote control 21 CARE AND MAINTENANCE 25 Replacing the CineMate® series II remote battery 25 Replacing the CineMate® GS series II remote batteries 26 Cleaning your speaker system 26 Troubleshooting ...
...INDICATORS 15 Acoustimass® module bass control 15 CineMate® series II remote control 16 Using the remote to control the CineMate system 16 CONTENTS CineMate® GS series II remote control . . . . . 17 Using the remote to control the CineMate® system 18 Setting the remote for your... control from one device to another 20 Using the CineMate® GS series II remote control 21 CARE AND MAINTENANCE 25 Replacing the CineMate® series II remote battery 25 Replacing the CineMate® GS series II remote batteries 26 Cleaning your speaker system 26 Troubleshooting ...
Owner's guide
Page 4
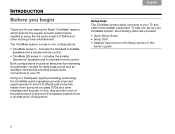
..., the following items are provided: • Quick Setup Guide • Setup DVD • Detailed instructions in two configurations: • CineMate series II - Setup help you for purchasing the Bose® CineMate® system, which delivers the superb acoustic performance needed to enjoy the full audio impact of DVDs and other home theater equipment. includes the...
..., the following items are provided: • Quick Setup Guide • Setup DVD • Detailed instructions in two configurations: • CineMate series II - Setup help you for purchasing the Bose® CineMate® system, which delivers the superb acoustic performance needed to enjoy the full audio impact of DVDs and other home theater equipment. includes the...
Owner's guide
Page 5
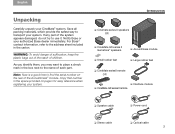
... part. Copy that number in the carton. For Bose® contact information, refer to transport your system. ❏ Cinemate series II speakers OR ❏ CineMate GS series II Gemstone® speakers ❏ Small rubber feet ❏ Acoustimass module ❏ Large rubber feet ❏ CineMate series II remote OR ❏ Interface module ❏ CineMate GS series II remote ❏ Speaker cable ❏ Power cord...
... part. Copy that number in the carton. For Bose® contact information, refer to transport your system. ❏ Cinemate series II speakers OR ❏ CineMate GS series II Gemstone® speakers ❏ Small rubber feet ❏ Acoustimass module ❏ Large rubber feet ❏ CineMate series II remote OR ❏ Interface module ❏ CineMate GS series II remote ❏ Speaker cable ❏ Power cord...
Owner's guide
Page 6
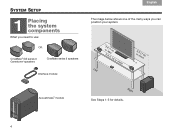
OR CineMate® GS series II Gemstone® speakers CineMate series II speakers Interface module o33rffltet(s(11smm)) or more Left 3 or mft o(1rem) Acoustimass® module Right See Steps 1-5 for details. 4 SYSTEM SETUP 1 Placing the system components What you need to use: Svenska Nederlands FItralniaçnaois DEsepuatsñcohl English The image below shows one of the many ways you can position your system.
OR CineMate® GS series II Gemstone® speakers CineMate series II speakers Interface module o33rffltet(s(11smm)) or more Left 3 or mft o(1rem) Acoustimass® module Right See Steps 1-5 for details. 4 SYSTEM SETUP 1 Placing the system components What you need to use: Svenska Nederlands FItralniaçnaois DEsepuatsñcohl English The image below shows one of the many ways you can position your system.
Owner's guide
Page 7
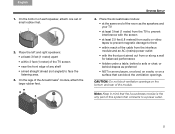
English DEsepuatsñcohl FItralniaçnaois Nederlands Svenska 1. Place the Acoustimass module: • at the same end of the room as the speakers and your TV • at least 3 feet (1 meter) from the TV to prevent interference with the front port aimed out from or along a wall for balanced performance • hidden under a table, behind a sofa or chair, or behind drapes as preferred • NOT in mind that the Acoustimass module is the only part of any shelf • aimed straight ahead (not angled) to face the listening area. 3. CAUTION: Do not block ventilation openings on...
English DEsepuatsñcohl FItralniaçnaois Nederlands Svenska 1. Place the Acoustimass module: • at the same end of the room as the speakers and your TV • at least 3 feet (1 meter) from the TV to prevent interference with the front port aimed out from or along a wall for balanced performance • hidden under a table, behind a sofa or chair, or behind drapes as preferred • NOT in mind that the Acoustimass module is the only part of any shelf • aimed straight ahead (not angled) to face the listening area. 3. CAUTION: Do not block ventilation openings on...
Owner's guide
Page 8
... should have a clear line of the shelf, so the shelf does not block signals from the remote control and provides audio input connections for the CineMate® system. If on a shelf, make sure the front edge of the module extends slightly past the front of sight to turn off the lens...
... should have a clear line of the shelf, so the shelf does not block signals from the remote control and provides audio input connections for the CineMate® system. If on a shelf, make sure the front edge of the module extends slightly past the front of sight to turn off the lens...
Owner's guide
Page 9
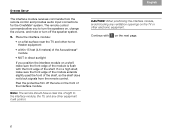
Notice the two plugs at one reaches a speaker. English DEsepuatsñcohl FItralniaçnaois Nederlands Svenska SYSTEM SETUP 2 Connecting the speakers to the Acoustimass® module What you need to use: 1. Separate the two plugs so each one end of the speaker cable. Acoustimass module 7 Speaker cable OR CineMate® GS series II Gemstone® speakers CineMate series II speakers 2.
Notice the two plugs at one reaches a speaker. English DEsepuatsñcohl FItralniaçnaois Nederlands Svenska SYSTEM SETUP 2 Connecting the speakers to the Acoustimass® module What you need to use: 1. Separate the two plugs so each one end of the speaker cable. Acoustimass module 7 Speaker cable OR CineMate® GS series II Gemstone® speakers CineMate series II speakers 2.
Owner's guide
Page 10
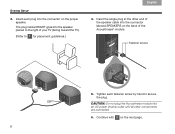
Fastener screws 5. Continue with 3 on the proper speaker. CAUTION: Do not plug the Acoustimass module into an AC power (mains) outlet until all other end of the speaker cable into the connector labeled SPEAKERS on the back of your TV (facing toward the TV). (Refer to secure the plug. The plug marked RIGHT goes into the connector on the next page. 8 Tighten each plug into the speaker placed to the right of the Acoustimass® module. Insert each fastener screw by hand to 1 for placement guidelines.) 4. Insert the single plug at the other components are connected. 6....
Fastener screws 5. Continue with 3 on the proper speaker. CAUTION: Do not plug the Acoustimass module into an AC power (mains) outlet until all other end of the speaker cable into the connector labeled SPEAKERS on the back of your TV (facing toward the TV). (Refer to secure the plug. The plug marked RIGHT goes into the connector on the next page. 8 Tighten each plug into the speaker placed to the right of the Acoustimass® module. Insert each fastener screw by hand to 1 for placement guidelines.) 4. Insert the single plug at the other components are connected. 6....
Owner's guide
Page 11
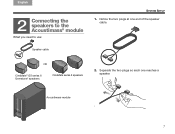
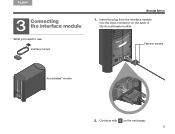
What you need to use: Interface module Fastener screws Acoustimass® module 2. Continue with 4 on the back of the Acoustimass module. English DEsepuatsñcohl FItralniaçnaois Nederlands Svenska SYSTEM SETUP 3 Connecting the interface module 1. Insert the plug from the interface module into the input connector on the next page. 9
What you need to use: Interface module Fastener screws Acoustimass® module 2. Continue with 4 on the back of the Acoustimass module. English DEsepuatsñcohl FItralniaçnaois Nederlands Svenska SYSTEM SETUP 3 Connecting the interface module 1. Insert the plug from the interface module into the input connector on the next page. 9
Owner's guide
Page 12
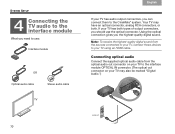
If your TV using an HDMI cable. Using the optical connection gives you can connect them to the CineMate® system. Your TV may have an optical connector, analog RCA connectors, or both types of output connectors, you should use : Interface module OR If ...
If your TV using an HDMI cable. Using the optical connection gives you can connect them to the CineMate® system. Your TV may have an optical connector, analog RCA connectors, or both types of output connectors, you should use : Interface module OR If ...
Owner's guide
Page 13
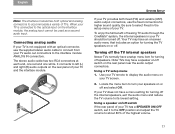
... audio input. Be sure to select Fixed in your TV provides both optical and analog connectors to accommodate a variety of hearing TV audio through the CineMate® system, the internal speakers in the setup menu of your TV screen. 2. Turning off switch If the rear panel of the highest volume. 11...
... audio input. Be sure to select Fixed in your TV provides both optical and analog connectors to accommodate a variety of hearing TV audio through the CineMate® system, the internal speakers in the setup menu of your TV screen. 2. Turning off switch If the rear panel of the highest volume. 11...
Owner's guide
Page 14
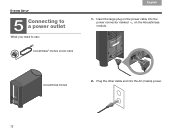
Svenska Nederlands FItralniaçnaois DEsepuatsñcohl English SYSTEM SETUP 5 Connecting to use: Acoustimass® module power cable Acoustimass module 2. What you need to a power outlet 1. Plug the other cable end into the power connector marked on the Acoustimass module. Insert the large plug on the power cable into the AC (mains) power. 12
Svenska Nederlands FItralniaçnaois DEsepuatsñcohl English SYSTEM SETUP 5 Connecting to use: Acoustimass® module power cable Acoustimass module 2. What you need to a power outlet 1. Plug the other cable end into the power connector marked on the Acoustimass module. Insert the large plug on the power cable into the AC (mains) power. 12
Owner's guide
Page 15
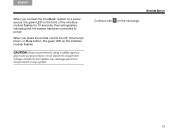
When you connect the CineMate® system to a power source, the green LED on the next page. CAUTION: Bose recommends using a safety agencyapproved surge protector on the interface module flashes. Continue with 6 on the front of the interface module flashes for 10 seconds, then ...
When you connect the CineMate® system to a power source, the green LED on the next page. CAUTION: Bose recommends using a safety agencyapproved surge protector on the interface module flashes. Continue with 6 on the front of the interface module flashes for 10 seconds, then ...
Owner's guide
Page 16
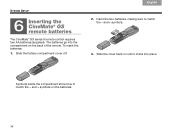
and + symbols. 3. Symbols inside the compartment show how to match the - Insert the two batteries, making sure to match the - and + symbols on the back of the remote. Slide the battery compartment cover off. 2. Svenska Nederlands FItralniaçnaois DEsepuatsñcohl English SYSTEM SETUP 6 Inserting the CineMate® GS remote batteries The CineMate® GS series II remote control requires two AA batteries (supplied). The batteries go into place. Slide the cover back on until it clicks into the compartment on the batteries. 14 To insert the batteries: 1.
and + symbols. 3. Symbols inside the compartment show how to match the - Insert the two batteries, making sure to match the - and + symbols on the back of the remote. Slide the battery compartment cover off. 2. Svenska Nederlands FItralniaçnaois DEsepuatsñcohl English SYSTEM SETUP 6 Inserting the CineMate® GS remote batteries The CineMate® GS series II remote control requires two AA batteries (supplied). The batteries go into place. Slide the cover back on until it clicks into the compartment on the batteries. 14 To insert the batteries: 1.
Owner's guide
Page 17
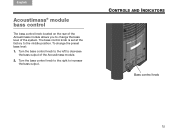
To change the bass level of the Acoustimass module. 2. Turn the bass control knob to the right to the middle position. The bass control knob is set at the factory to increase the bass output. Bass control knob 15 Turn the bass control knob to the left to decrease the bass output of the system. English DeEustpsacñhol ItFarliaannçoais Nederlands Svenska CONTROLS AND INDICATORS Acoustimass® module bass control The bass control knob located on the rear of the Acoustimass module allows you to change the preset bass level: 1.
To change the bass level of the Acoustimass module. 2. Turn the bass control knob to the right to the middle position. The bass control knob is set at the factory to increase the bass output. Bass control knob 15 Turn the bass control knob to the left to decrease the bass output of the system. English DeEustpsacñhol ItFarliaannçoais Nederlands Svenska CONTROLS AND INDICATORS Acoustimass® module bass control The bass control knob located on the rear of the Acoustimass module allows you to change the preset bass level: 1.
Owner's guide
Page 18
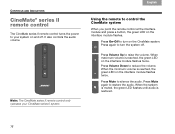
... control at the interface module and press a button, the green LED on the CineMate system. Svenska Nederlands FItralniaçnaois DEsepuatsñcohl English CONTROLS AND INDICATORS CineMate® series II remote control The CineMate series II remote control turns the power to your CineMate series II system. 16 It also controls the audio volume. Press Volume Up to restore...
... control at the interface module and press a button, the green LED on the CineMate system. Svenska Nederlands FItralniaçnaois DEsepuatsñcohl English CONTROLS AND INDICATORS CineMate® series II remote control The CineMate series II remote control turns the power to your CineMate series II system. 16 It also controls the audio volume. Press Volume Up to restore...
Owner's guide
Page 19
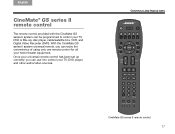
English DEsepuatsñcohl FItralniaçnaois Nederlands Svenska CineMate® GS series II remote control The remote control provided with the CineMate GS series II system can be programmed to control your TV, DVD player, and other audio/video sources. With the CineMate GS series II system universal remote, you can enjoy the convenience of using only one remote... Recorder (DVR). Once your universal remote control has been set up correctly, you can use it to control your home theater equipment. CONTROLS AND INDICATORS CineMate GS series II remote control 17
English DEsepuatsñcohl FItralniaçnaois Nederlands Svenska CineMate® GS series II remote control The remote control provided with the CineMate GS series II system can be programmed to control your TV, DVD player, and other audio/video sources. With the CineMate GS series II system universal remote, you can enjoy the convenience of using only one remote... Recorder (DVR). Once your universal remote control has been set up correctly, you can use it to control your home theater equipment. CONTROLS AND INDICATORS CineMate GS series II remote control 17
Owner's guide
Page 20
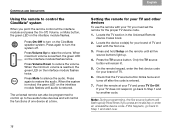
... LED on the interface module flashes twice. Svenska Nederlands FItralniaçnaois DEsepuatsñcohl English CONTROLS AND INDICATORS Using the remote to control the CineMate® system When you point the remote control at the interface module and press the On-Off, Volume, or Mute button, the green LED on...
... LED on the interface module flashes twice. Svenska Nederlands FItralniaçnaois DEsepuatsñcohl English CONTROLS AND INDICATORS Using the remote to control the CineMate® system When you point the remote control at the interface module and press the On-Off, Volume, or Mute button, the green LED on...
Owner's guide
Page 21
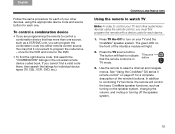
... listings for individual device types (TV, CBL, VCR, DVD, etc.). In addition to controlling TV functions, the remote will control the basic CineMate speaker functions, such as a VCR/DVD unit, you can program the combination code into either remote control source. Using the remote to watch TV... control is in the universal remote device codes book. The green LED on your TV and the CineMate® speaker system. The button will light. 2. See "Using the CineMate® GS series II remote control" on the speaker system, changing the volume, and muting or turning off the speaker system...
... listings for individual device types (TV, CBL, VCR, DVD, etc.). In addition to controlling TV functions, the remote will control the basic CineMate speaker functions, such as a VCR/DVD unit, you can program the combination code into either remote control source. Using the remote to watch TV... control is in the universal remote device codes book. The green LED on your TV and the CineMate® speaker system. The button will light. 2. See "Using the CineMate® GS series II remote control" on the speaker system, changing the volume, and muting or turning off the speaker system...
