
Owner's guide
Page 1
The Bose® Acoustimass® - 6 Home Theater Speaker System Owner's Guide December 20, 2001 AM189815_04_V.pdf
The Bose® Acoustimass® - 6 Home Theater Speaker System Owner's Guide December 20, 2001 AM189815_04_V.pdf
Owner's guide
Page 2
... responsibility, that the product: Kind of the Directive, is located near the connection panel on the Acoustimass module. For your sales slip and warranty card together with realistic sound, without a lot of the Bose® Acoustimass®-6 home theater speaker system. Serial number Dealer name Dealer phone Purchase date We suggest you will...
... responsibility, that the product: Kind of the Directive, is located near the connection panel on the Acoustimass module. For your sales slip and warranty card together with realistic sound, without a lot of the Bose® Acoustimass®-6 home theater speaker system. Serial number Dealer name Dealer phone Purchase date We suggest you will...
Owner's guide
Page 3
... Information Warranty period ...16 Technical information 16 Accessories ...17 Bose® Corporation inside back cover Contents AM189815_04_V.pdf December 20, 2001 3 Setting Up Before you begin ...4 Unpack the carton ...5 Placing your Acoustimass®-6 speakers to achieve realistic home theater sound ...... ... your speakers 7 Left and right front cube speakers 7 Center cube speaker 8 Surround cube speakers 8 Acoustimass module 9 Connect the speakers 10 Connect the Acoustimass module to the center and front cube speakers ...... 10 Connect the module to the surround cube speakers ...
... Information Warranty period ...16 Technical information 16 Accessories ...17 Bose® Corporation inside back cover Contents AM189815_04_V.pdf December 20, 2001 3 Setting Up Before you begin ...4 Unpack the carton ...5 Placing your Acoustimass®-6 speakers to achieve realistic home theater sound ...... ... your speakers 7 Left and right front cube speakers 7 Center cube speaker 8 Surround cube speakers 8 Acoustimass module 9 Connect the speakers 10 Connect the Acoustimass module to the center and front cube speakers ...... 10 Connect the module to the surround cube speakers ...
Owner's guide
Page 4
...is usually sent to particular speakers. Setting Up Before you begin Bose® Virtually Invisible® speaker technology allows you in a surround sound performance, you may hear sound from all channels. Your Acoustimass-6 home theater speakers are also compatible with your receiver as ...tapes and discs, and the word "surround" preceding a TV broadcast. At any of the surround (rear) speakers. Simply adjust your Acoustimass-6 speakers. Your video sound source (stereo VCR, laserdisc or digital video player, or stereo television) sends the encoded program material to...
...is usually sent to particular speakers. Setting Up Before you begin Bose® Virtually Invisible® speaker technology allows you in a surround sound performance, you may hear sound from all channels. Your Acoustimass-6 home theater speakers are also compatible with your receiver as ...tapes and discs, and the word "surround" preceding a TV broadcast. At any of the surround (rear) speakers. Simply adjust your Acoustimass-6 speakers. Your video sound source (stereo VCR, laserdisc or digital video player, or stereo television) sends the encoded program material to...

Owner's guide
Page 5
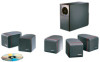
...the plastic bags that wrap these speakers on page 2 of children. Note: Now is a good idea to avoid injury. WARNING: The Acoustimass module weighs 19 pounds (8.6 kg). Use good lifting practice to save all packing materials for possible future use them. Setting Up Unpack the... cables connected to record the serial number of these speakers out of the reach of this guide and on your authorized Bose® dealer immediately. Repack everything in the carton: • Acoustimass module • Module end cover • 5 cube speakers • 20' (6 m) speaker input cable • 20'...
...the plastic bags that wrap these speakers on page 2 of children. Note: Now is a good idea to avoid injury. WARNING: The Acoustimass module weighs 19 pounds (8.6 kg). Use good lifting practice to save all packing materials for possible future use them. Setting Up Unpack the... cables connected to record the serial number of these speakers out of the reach of this guide and on your authorized Bose® dealer immediately. Repack everything in the carton: • Acoustimass module • Module end cover • 5 cube speakers • 20' (6 m) speaker input cable • 20'...
Owner's guide
Page 6
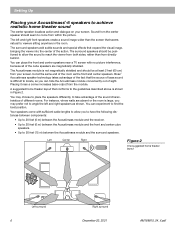
...absent or the room is shown in the room. The surround speakers should be at the same end of the room as shown. Bose® Acoustimass speaker technology takes advantage of the fact that seems natural to viewers sitting anywhere in Figure 2. You can place the front and center...wider than from directly behind. You can experiment to find the best position. Your speakers come from within the picture. Setting Up Placing your Acoustimass®-6 speakers to achieve realistic home theater sound The center speaker localizes action and dialogue on your screen, but at least 2 feet (60 ...
...absent or the room is shown in the room. The surround speakers should be at the same end of the room as shown. Bose® Acoustimass speaker technology takes advantage of the fact that seems natural to viewers sitting anywhere in Figure 2. You can place the front and center...wider than from directly behind. You can experiment to find the best position. Your speakers come from within the picture. Setting Up Placing your Acoustimass®-6 speakers to achieve realistic home theater sound The center speaker localizes action and dialogue on your screen, but at least 2 feet (60 ...
Owner's guide
Page 7
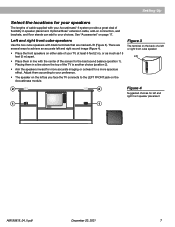
...imaging or outward for the best sound balance (position 1). Setting Up Select the locations for your speakers The lengths of cable supplied with your Acoustimass®-6 system provide a great deal of a left or right front cube speaker L/R L/R 2 2 Figure 4 Suggested choices for left ...and right front speaker placement 1 1 AM189815_04_V.pdf December 20, 2001 7 Optional Bose® extension cable, add-on connectors, wall brackets, and floor stands can add to your preference. • The speaker on page 17. Placing...
...imaging or outward for the best sound balance (position 1). Setting Up Select the locations for your speakers The lengths of cable supplied with your Acoustimass®-6 system provide a great deal of a left or right front cube speaker L/R L/R 2 2 Figure 4 Suggested choices for left ...and right front speaker placement 1 1 AM189815_04_V.pdf December 20, 2001 7 Optional Bose® extension cable, add-on connectors, wall brackets, and floor stands can add to your preference. • The speaker on page 17. Placing...
Owner's guide
Page 8
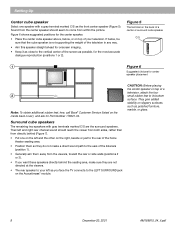
... channel sound should seem to the vertical center of a television, attach the four small rubber feet to the LEFT SURROUND jack on the Acoustimass® module. CAUTION: Before placing the center speaker on the inside back cover), and ask for onscreen imaging. • Keep it...a center or surround cube speaker C/S C/S 1 Figure 6 Suggested choices for center speaker placement 2 Note: To obtain additional rubber feet, free, call Bose® Customer Service (listed on top of the screen as you want these speakers directly behind (Figure 7). • Put one speaker with gray terminals...
... channel sound should seem to the vertical center of a television, attach the four small rubber feet to the LEFT SURROUND jack on the Acoustimass® module. CAUTION: Before placing the center speaker on the inside back cover), and ask for onscreen imaging. • Keep it...a center or surround cube speaker C/S C/S 1 Figure 6 Suggested choices for center speaker placement 2 Note: To obtain additional rubber feet, free, call Bose® Customer Service (listed on top of the screen as you want these speakers directly behind (Figure 7). • Put one speaker with gray terminals...
Owner's guide
Page 9
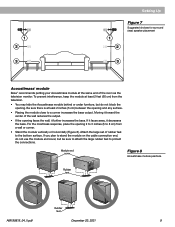
... the output. • If the opening 2 to 3 inches (5 to 8 cm) from the television. • You may hide the Acoustimass module behind or under furniture, but be sure to attach the large rubber feet to protect the connections. Attach the large set of the room... AM189815_04_V.pdf December 20, 2001 9 1 2 3 Setting Up 1 2 Figure 7 Suggested choices for surround (rear) speaker placement 3 Acoustimass® module Bose® recommends putting your Acoustimass module at the same end of rubber feet to the bottom surface. To prevent interference, keep the module at least 2 feet (60 cm...
... the output. • If the opening 2 to 3 inches (5 to 8 cm) from the television. • You may hide the Acoustimass module behind or under furniture, but be sure to attach the large rubber feet to protect the connections. Attach the large set of the room... AM189815_04_V.pdf December 20, 2001 9 1 2 3 Setting Up 1 2 Figure 7 Suggested choices for surround (rear) speaker placement 3 Acoustimass® module Bose® recommends putting your Acoustimass module at the same end of rubber feet to the bottom surface. To prevent interference, keep the module at least 2 feet (60 cm...
Owner's guide
Page 10
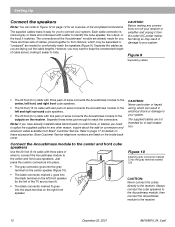
... splice the supplied cables for you are already made for any connections turn off your system. Separate these accessories. The connections at the Acoustimass® module are laying out the cable lengths. Setting Up Connect the speakers Note: You can result in -wall installation. Each cable... to page 17 for details on these wires just enough to Figure 12 on the receiver. Bose Customer Service telephone numbers are not intended for an overview of wires connects the Acoustimass module to L/R the center and front cube speakers. The supplied cables are listed on the ...
... splice the supplied cables for you are already made for any connections turn off your system. Separate these accessories. The connections at the Acoustimass® module are laying out the cable lengths. Setting Up Connect the speakers Note: You can result in -wall installation. Each cable... to page 17 for details on these wires just enough to Figure 12 on the receiver. Bose Customer Service telephone numbers are not intended for an overview of wires connects the Acoustimass module to L/R the center and front cube speakers. The supplied cables are listed on the ...
Owner's guide
Page 15
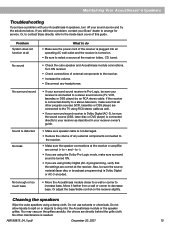
...Cleaning the speakers Wipe the cube speakers using Dolby Digital (AC-3) programming, verify that all other maintenance is plugged into the Acoustimass module or the speaker grilles. AM189815_04_V.pdf December 20, 2001 15 Turn ON receiver. • Check connections of external components ... Troubleshooting If you still have a problem with your Acoustimass-6 speakers, turn off your sound source and try the solutions below. If you have a problem, contact your Bose® dealer to decrease bass. Or, to contact Bose directly, refer to select a source at the receiver...
...Cleaning the speakers Wipe the cube speakers using Dolby Digital (AC-3) programming, verify that all other maintenance is plugged into the Acoustimass module or the speaker grilles. AM189815_04_V.pdf December 20, 2001 15 Turn ON receiver. • Check connections of external components ... Troubleshooting If you still have a problem with your Acoustimass-6 speakers, turn off your sound source and try the solutions below. If you have a problem, contact your Bose® dealer to decrease bass. Or, to contact Bose directly, refer to select a source at the receiver...
Owner's guide
Page 16
...on page 2 of this guide. you may choose to Bose in the pre-addressed envelope. rated from 10 to 100 watts per channel; Bose will try to 8 ohms Finish Cube speakers: Black or Arctic white finish Acoustimass module: Scratch-resistant black or Arctic white textured finish Size...-voice coil 51⁄4" (13.3 cm) woofers for front and surround channels Connectivity Compatible with your speakers. Product Information Warranty period Bose® Acoustimass®-6 speakers are explained on the warranty card packed with A/V receivers rated from 4 to remedy any problem within the terms of ...
...on page 2 of this guide. you may choose to Bose in the pre-addressed envelope. rated from 10 to 100 watts per channel; Bose will try to 8 ohms Finish Cube speakers: Black or Arctic white finish Acoustimass module: Scratch-resistant black or Arctic white textured finish Size...-voice coil 51⁄4" (13.3 cm) woofers for front and surround channels Connectivity Compatible with your speakers. Product Information Warranty period Bose® Acoustimass®-6 speakers are explained on the warranty card packed with A/V receivers rated from 4 to remedy any problem within the terms of ...
Owner's guide
Page 17
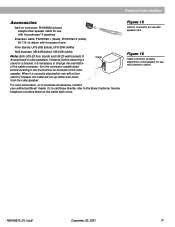
... with a floor stand or bracket, the cable will run up rather than down before attaching a stand or a bracket, it is correctly attached for use with Acoustimass®-6 speakers Extension cable: PN187092-1 (black), PN187092-2 (white) 50' (15 m) ribbon with five pairs of wire Floor stands: UFS-20B (black), UFS...down from the cube speaker. Figure 15 Add-on connector for use with speaker wire Figure 16 Cable connector properly attached to the Bose Customer Service telephone numbers listed on the back of the cable connector. Cable For more information, or to change the orientation of the...
... with a floor stand or bracket, the cable will run up rather than down before attaching a stand or a bracket, it is correctly attached for use with Acoustimass®-6 speakers Extension cable: PN187092-1 (black), PN187092-2 (white) 50' (15 m) ribbon with five pairs of wire Floor stands: UFS-20B (black), UFS...down from the cube speaker. Figure 15 Add-on connector for use with speaker wire Figure 16 Cable connector properly attached to the Bose Customer Service telephone numbers listed on the back of the cable connector. Cable For more information, or to change the orientation of the...


