Owner's guide
Page 2
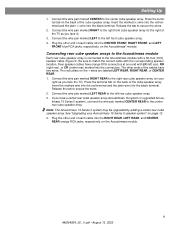
...a risk of this owner's guide. ©2002 Bose Corporation. Confidential Unpublished Works. ©1992-1997 Dolby Laboratories. All rights reserved. 2 AM264924_00 _V.pdf • August 13, 2002 These CAUTION marks may be located on the Acoustimass module: The lightning flash with arrowhead symbol, within... warranty card together with your system properly, and enjoy all of fire or electric shock, do not expose the powered Acoustimass® module to follow this owner's guide Please take the time to rain or moisture. No part of electric shock. REFER SERVICING TO ...
...a risk of this owner's guide. ©2002 Bose Corporation. Confidential Unpublished Works. ©1992-1997 Dolby Laboratories. All rights reserved. 2 AM264924_00 _V.pdf • August 13, 2002 These CAUTION marks may be located on the Acoustimass module: The lightning flash with arrowhead symbol, within... warranty card together with your system properly, and enjoy all of fire or electric shock, do not expose the powered Acoustimass® module to follow this owner's guide Please take the time to rain or moisture. No part of electric shock. REFER SERVICING TO ...
Owner's guide
Page 3
... Acoustimass module to power 12 Upgrading your Acoustimass 15 Series II speaker system 12 Using your system 13 For realistic home theater sound 13 Adjusting the LFE level 13 Adjusting the bass/room compensation level 13 Setting your analog surround sound receiver 14 Reference 15 Troubleshooting 15 Customer service 15 Cleaning the speakers 16...
... Acoustimass module to power 12 Upgrading your Acoustimass 15 Series II speaker system 12 Using your system 13 For realistic home theater sound 13 Adjusting the LFE level 13 Adjusting the bass/room compensation level 13 Setting your analog surround sound receiver 14 Reference 15 Troubleshooting 15 Customer service 15 Cleaning the speakers 16...
Owner's guide
Page 4
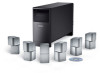
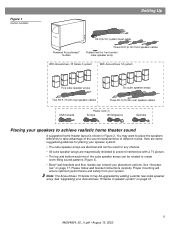
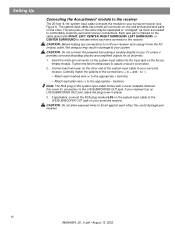
...visual soundstage is not surround-encoded. WARNING: To avoid danger of your authorized Bose dealer immediately. Note: This product is a good time to avoid injury. Slowly pull the Acoustimass module from multi-channel digital programming. Or, to the powered Acoustimass module. Your stereo VCR, stereo television, or DVD player sends the encoded program... of speakers. Carefully unpack the carton contents (Figure 1): 1. Gently roll the carton over onto its side. 3. Please save all of the Bose® Acoustimass® 15 series II or Acoustimass 16 home entertainment speaker system.
...visual soundstage is not surround-encoded. WARNING: To avoid danger of your authorized Bose dealer immediately. Note: This product is a good time to avoid injury. Slowly pull the Acoustimass module from multi-channel digital programming. Or, to the powered Acoustimass module. Your stereo VCR, stereo television, or DVD player sends the encoded program... of speakers. Carefully unpack the carton contents (Figure 1): 1. Gently roll the carton over onto its side. 3. Please save all of the Bose® Acoustimass® 15 series II or Acoustimass 16 home entertainment speaker system.
Owner's guide
Page 5
... Acoustimass® module Three 20-ft (6.1m) front speaker cables Rubber feet for any channel. • All cube speaker arrays are identical and can be used for front center cube speaker array With Acoustimass 15 Series II system With Acoustimass 16 ...system Five cube speaker arrays Six cube speaker arrays Two 50-ft (15.2m) rear speaker cables Three 50-ft (15.2m) rear speaker cables USA/Canada Power cord (1) Europe UK/Singapore Australia Placing your speakers to create room-filling sound patterns (Figure 3). • Bose...
... Acoustimass® module Three 20-ft (6.1m) front speaker cables Rubber feet for any channel. • All cube speaker arrays are identical and can be used for front center cube speaker array With Acoustimass 15 Series II system With Acoustimass 16 ...system Five cube speaker arrays Six cube speaker arrays Two 50-ft (15.2m) rear speaker cables Three 50-ft (15.2m) rear speaker cables USA/Canada Power cord (1) Europe UK/Singapore Australia Placing your speakers to create room-filling sound patterns (Figure 3). • Bose...
Owner's guide
Page 6
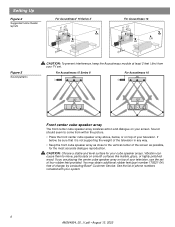
...to move, particularly on smooth surfaces like marble, glass, or highly polished wood. For Acoustimass 15 Series II For Acoustimass 16 Front center cube speaker array The front center cube speaker array localizes action and dialogue on ...Suggested home theater layouts For Acoustimass® 15 Series II (26'--51m5)' CR RR L LR (0.26'm+ +) For Acoustimass 16 (62'--51m5)' CR L LR RR CR (0.26'm+ +) Figure 3 Sound patterns CAUTION: To prevent interference, keep the Acoustimass module at least 2 feet (....cube speaker array on top of charge, by contacting Bose® Customer Service.
...to move, particularly on smooth surfaces like marble, glass, or highly polished wood. For Acoustimass 15 Series II For Acoustimass 16 Front center cube speaker array The front center cube speaker array localizes action and dialogue on ...Suggested home theater layouts For Acoustimass® 15 Series II (26'--51m5)' CR RR L LR (0.26'm+ +) For Acoustimass 16 (62'--51m5)' CR L LR RR CR (0.26'm+ +) Figure 3 Sound patterns CAUTION: To prevent interference, keep the Acoustimass module at least 2 feet (....cube speaker array on top of charge, by contacting Bose® Customer Service.
Owner's guide
Page 7
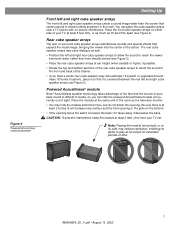
... it increases the bass; You can hide the powered Acoustimass module conveniently out of the action. Powered Acoustimass® module Bose® Acoustimass speaker technology takes advantage of the fact that expand the... visual image, bringing the viewer into the center of sight. Place the front cube speaker arrays on its side, may reduce ventilation, inhibiting its ability to locate, so you have a center rear cube speaker array (Acoustimass 16 system or upgraded Acoustimass...
... it increases the bass; You can hide the powered Acoustimass module conveniently out of the action. Powered Acoustimass® module Bose® Acoustimass speaker technology takes advantage of the fact that expand the... visual image, bringing the viewer into the center of sight. Place the front cube speaker arrays on its side, may reduce ventilation, inhibiting its ability to locate, so you have a center rear cube speaker array (Acoustimass 16 system or upgraded Acoustimass...
Owner's guide
Page 8
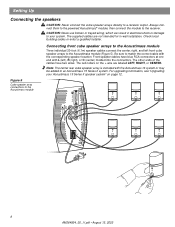
... speaker cables have two wires. For upgrading information, see "Upgrading your system. Always connect them to the powered Acoustimass® module, then connect the module to your Acoustimass 15 Series II speaker system" on the + wire are not intended for in electrical shock or damage to the.... Note: The center rear cube speaker array is included with the Acoustimass 16 system or may be added to the Acoustimass module 8 AM264924_00 _V.pdf • August 13, 2002 Figure 5 Cube speaker array connections to an Acoustimass 15 Series II system. The supplied cables are labeled LEFT, RIGHT...
... speaker cables have two wires. For upgrading information, see "Upgrading your system. Always connect them to the powered Acoustimass® module, then connect the module to your Acoustimass 15 Series II speaker system" on the + wire are not intended for in electrical shock or damage to the.... Note: The center rear cube speaker array is included with the Acoustimass 16 system or may be added to the Acoustimass module 8 AM264924_00 _V.pdf • August 13, 2002 Figure 5 Cube speaker array connections to an Acoustimass 15 Series II system. The supplied cables are labeled LEFT, RIGHT...
Owner's guide
Page 9
...the red terminal and the plain (-) wire into the connectors. Plug the other end of the cables have a center rear cube speaker array (Acoustimass 16 system or upgraded Acoustimass 15 Series II system), connect the wire pair marked CENTER REAR to the right rear cube speaker array (on your... LEFT REAR, and CENTER REAR orange RCA jacks, respectively, on the back of the cube speaker array. Connecting rear cube speaker arrays to the Acoustimass module Each rear cube speaker array is connected to the left front cube speaker array. 4. Release the tab to secure the wires. 2. Setting Up ...
...the red terminal and the plain (-) wire into the connectors. Plug the other end of the cables have a center rear cube speaker array (Acoustimass 16 system or upgraded Acoustimass 15 Series II system), connect the wire pair marked CENTER REAR to the right rear cube speaker array (on your... LEFT REAR, and CENTER REAR orange RCA jacks, respectively, on the back of the cube speaker array. Connecting rear cube speaker arrays to the Acoustimass module Each rear cube speaker array is connected to the left front cube speaker array. 4. Release the tab to secure the wires. 2. Setting Up ...
Owner's guide
Page 10
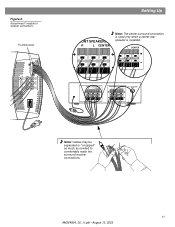
... so may be separated or "unzipped" as much as needed to comfortably reach the surround receiver connections. CAUTION: Do not connect the powered Acoustimass module directly to your receiver. 10 AM264924_00 _V.pdf • August 13, 2002 Remove this could damage your TV unless it from the AC ... (see Figure 6). If applicable, connect the RCA plug marked LFE on the system input cable to indicate where each wire pair on the Acoustimass module. The wire pairs of the system input cable comes with RIGHT, LEFT, CENTER, RIGHT SURROUND, LEFT SURROUND, or CENTER SURROUND to the ...
... so may be separated or "unzipped" as much as needed to comfortably reach the surround receiver connections. CAUTION: Do not connect the powered Acoustimass module directly to your receiver. 10 AM264924_00 _V.pdf • August 13, 2002 Remove this could damage your TV unless it from the AC ... (see Figure 6). If applicable, connect the RCA plug marked LFE on the system input cable to indicate where each wire pair on the Acoustimass module. The wire pairs of the system input cable comes with RIGHT, LEFT, CENTER, RIGHT SURROUND, LEFT SURROUND, or CENTER SURROUND to the ...
Owner's guide
Page 11
R L CENTER FRONT SPEAKERS A R L CENTER SURROUND SPEAKERS R L CENTER LFE/SUBWOOFER OUT Note: Cables may be separated or "unzipped" as much as needed to receiver connections Thumbscrews Setting Up FRONT SPEAKERS A R L CENTER Note: The center surround connection is used only when a center rear speaker is installed. Audio Output Left Center Right Rear Rear Rear Audio Input Left Center Right Front Front Front Figure 6 Acoustimass® module to comfortably reach the surround receiver connections. 11 AM264924_00 _V.pdf • August 13, 2002
R L CENTER FRONT SPEAKERS A R L CENTER SURROUND SPEAKERS R L CENTER LFE/SUBWOOFER OUT Note: Cables may be separated or "unzipped" as much as needed to receiver connections Thumbscrews Setting Up FRONT SPEAKERS A R L CENTER Note: The center surround connection is used only when a center rear speaker is installed. Audio Output Left Center Right Rear Rear Rear Audio Input Left Center Right Front Front Front Figure 6 Acoustimass® module to comfortably reach the surround receiver connections. 11 AM264924_00 _V.pdf • August 13, 2002
Owner's guide
Page 12
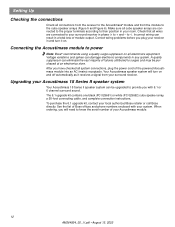
... connection instructions. Incorrect wiring can eliminate the vast majority of module output. A quality suppressor can result in any system. Your Acoustimass speaker system will need to know the serial number of the powered Acoustimass module into an AC (mains) receptacle. Connecting the Acoustimass module to power Note: Bose® recommends using a quality surge suppressor on . To purchase...
... connection instructions. Incorrect wiring can eliminate the vast majority of module output. A quality suppressor can result in any system. Your Acoustimass speaker system will need to know the serial number of the powered Acoustimass module into an AC (mains) receptacle. Connecting the Acoustimass module to power Note: Bose® recommends using a quality surge suppressor on . To purchase...
Owner's guide
Page 13
...after you to Acoustimass 16 systems or upgraded Acoustimass 15 Series II systems. For upgrade information, see "Upgrading your Acoustimass 15 Series II speaker system" on your selected location. Adjusting the bass/room compensation level This feature will allow you have placed the Acoustimass module in a ... • August 13, 2002 Sustained listening at high volume levels to LARGE in your digital surround sound receiver Your Acoustimass 16 or Acoustimass 15 Series II speakers are fully compatible with the output from electrical stress or overload. The cube speaker arrays should ...
...after you to Acoustimass 16 systems or upgraded Acoustimass 15 Series II systems. For upgrade information, see "Upgrading your Acoustimass 15 Series II speaker system" on your selected location. Adjusting the bass/room compensation level This feature will allow you have placed the Acoustimass module in a ... • August 13, 2002 Sustained listening at high volume levels to LARGE in your digital surround sound receiver Your Acoustimass 16 or Acoustimass 15 Series II speakers are fully compatible with the output from electrical stress or overload. The cube speaker arrays should ...
Owner's guide
Page 15
.... Reference Troubleshooting If you have a problem, contact your Bose® dealer to arrange for DVD sound. • Disconnect any headphones. • Increase the volume. Not enough or too much bass • Move the powered Acoustimass module closer to a wall or corner to -). Customer service ...For additional help in and the receiver is turned on your receiver. • Be sure the audio source selected is plugged in solving problems, contact Bose customer service.
.... Reference Troubleshooting If you have a problem, contact your Bose® dealer to arrange for DVD sound. • Disconnect any headphones. • Increase the volume. Not enough or too much bass • Move the powered Acoustimass module closer to a wall or corner to -). Customer service ...For additional help in and the receiver is turned on your receiver. • Be sure the audio source selected is plugged in solving problems, contact Bose customer service.
Owner's guide
Page 16
... protection circuitry Syncom® computer quality control Finish Cube arrays: Black or Arctic White finish Powered Acoustimass module: Scratch-resistant Black or Arctic White textured finish Speaker driver complement Cube speaker arrays: two 2.50-inch (6....x 4.0"D (15.7 cm x 7.8 cm x 10.2 cm) / 2.4 lb (1.1 kg) Acoustimass module: 16.3"H x 8.1"W x 29.1"D (41.4 cm x 20.6 cm x 73.9 cm) / 45 lb (20.3 kg) Acoustimass module power rating Connectivity Packed system weight Acoustimass 15 Series II Acoustimass 16 USA/Canada: USA/Canada: 100-127V 50/60 Hz 400 W 100-127V 50/60 Hz...
... protection circuitry Syncom® computer quality control Finish Cube arrays: Black or Arctic White finish Powered Acoustimass module: Scratch-resistant Black or Arctic White textured finish Speaker driver complement Cube speaker arrays: two 2.50-inch (6....x 4.0"D (15.7 cm x 7.8 cm x 10.2 cm) / 2.4 lb (1.1 kg) Acoustimass module: 16.3"H x 8.1"W x 29.1"D (41.4 cm x 20.6 cm x 73.9 cm) / 45 lb (20.3 kg) Acoustimass module power rating Connectivity Packed system weight Acoustimass 15 Series II Acoustimass 16 USA/Canada: USA/Canada: 100-127V 50/60 Hz 400 W 100-127V 50/60 Hz...
Owner's guide
Page 17
... are provided on the card and mail it to -cube speaker array cable adapter for use with your system. Reference Warranty period Your Bose® Acoustimass® speaker system is covered by a limited transferable warranty. Accessories • Table stands: UTS-20B (black), UTS-20W (white)...20W (white) • Wall brackets: UB-20B (black), UB-20W (white) • Module input cable adapter for use with existing wiring: PN267138-001 (black) PN267138-002 (white) • Module-to Bose. Please fill out the information section on the warranty card that came with existing wiring...
... are provided on the card and mail it to -cube speaker array cable adapter for use with your system. Reference Warranty period Your Bose® Acoustimass® speaker system is covered by a limited transferable warranty. Accessories • Table stands: UTS-20B (black), UTS-20W (white)...20W (white) • Wall brackets: UB-20B (black), UB-20W (white) • Module input cable adapter for use with existing wiring: PN267138-001 (black) PN267138-002 (white) • Module-to Bose. Please fill out the information section on the warranty card that came with existing wiring...