Owner's guide
Page 8
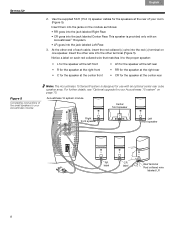
...• CR for the speaker at the center rear Figure 5 Completing connections of the small speakers to your Acoustimass module Note: The Acoustimass 15 Series III system is provided only with an optional center rear cube speaker array. Insert them into the jack labeled ... upgrade for use with an Acoustimass® 16 system. • LR goes into the other terminal (Figure 5). Acoustimass 16 system module Center front speaker Right front speaker Left front speaker RR label CR label Red terminal Red collared wire labeled LR 8 At the other wire into the jack labeled Left ...
...• CR for the speaker at the center rear Figure 5 Completing connections of the small speakers to your Acoustimass module Note: The Acoustimass 15 Series III system is provided only with an optional center rear cube speaker array. Insert them into the jack labeled ... upgrade for use with an Acoustimass® 16 system. • LR goes into the other terminal (Figure 5). Acoustimass 16 system module Center front speaker Right front speaker Left front speaker RR label CR label Red terminal Red collared wire labeled LR 8 At the other wire into the jack labeled Left ...
Owner's guide
Page 9
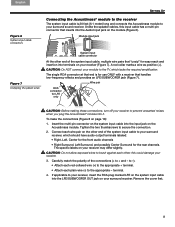
... the rear channels. ! The single RCA connector at that handles ! Wire pair RCA connector for use ONLY with a receiver that end is 20 feet (6.1 meter) long and connects the Acoustimass module to the TV, which should have audio output terminals labeled: &#...8226; Attach each red-collared wire (+) to the appropriate + terminal. • Attach each wire pair on your receiver. 3. terminal. 4. Remove the cover first. 9 A red collar marks a wire as positive (+). Acoustimass module. Module input jack Figure 7 Unzipping the paired wires System input cable connector At ...
... the rear channels. ! The single RCA connector at that handles ! Wire pair RCA connector for use ONLY with a receiver that end is 20 feet (6.1 meter) long and connects the Acoustimass module to the TV, which should have audio output terminals labeled: &#...8226; Attach each red-collared wire (+) to the appropriate + terminal. • Attach each wire pair on your receiver. 3. terminal. 4. Remove the cover first. 9 A red collar marks a wire as positive (+). Acoustimass module. Module input jack Figure 7 Unzipping the paired wires System input cable connector At ...
Owner's guide
Page 10
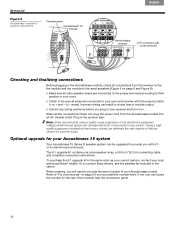
wires). Note: Bose recommends using a quality surge suppressor on page 2 if you recorded the number there. Voltage variations and spikes can damage electronic components in any wiring problems before you can result in your receiver and turn it on the rear of your Acoustimass 15 system Your Acoustimass 15 Series...50-foot (15.2 m) connecting cable, and complete connection instructions. SETTING UP Figure 8 Acoustimass® module to receiver connections Thumbscrews Acoustimass® 16 module Français Español English Home theater receiver LFE connector with cover removed...
wires). Note: Bose recommends using a quality surge suppressor on page 2 if you recorded the number there. Voltage variations and spikes can damage electronic components in any wiring problems before you can result in your receiver and turn it on the rear of your Acoustimass 15 system Your Acoustimass 15 Series...50-foot (15.2 m) connecting cable, and complete connection instructions. SETTING UP Figure 8 Acoustimass® module to receiver connections Thumbscrews Acoustimass® 16 module Français Español English Home theater receiver LFE connector with cover removed...
Owner's guide
Page 13
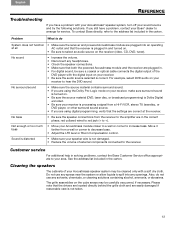
... any sprays near the system or allow liquids to arrange for service. Please note that the receiver is plugged in solving problems, contact the Bose Customer Service office appropriate to the receiver. No sound • Increase the volume. • Disconnect any headphones. • Check the speaker.... Cleaning the speakers The cabinets of the DVD player with your Acoustimass® speaker system, turn off your Acoustimass module closer to a wall or corner to the address list included in the correct phase, red collared wired to red jack (+ to decrease bass. • Adjust the ...
... any sprays near the system or allow liquids to arrange for service. Please note that the receiver is plugged in solving problems, contact the Bose Customer Service office appropriate to the receiver. No sound • Increase the volume. • Disconnect any headphones. • Check the speaker.... Cleaning the speakers The cabinets of the DVD player with your Acoustimass® speaker system, turn off your Acoustimass module closer to a wall or corner to the address list included in the correct phase, red collared wired to red jack (+ to decrease bass. • Adjust the ...
Owner's guide
Page 14
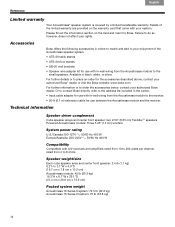
... not affect your authorized Bose dealer. Available in -wall wiring from the Acoustimass module to 8 ohms Speaker weight/size Each cube speaker array and center front speaker: 2.4 lb (1.1 kg)! 6.2"H x 3.1"W x 4.0"D ! (15.7 cm x 7.8 cm x 10.2 cm) Acoustimass module: 45 lb (20.3 kg)! 16.3"H x 8.1"W x 29.1"D ! (41.4 cm x 20.6 cm x 73.9 cm) Packed system weight Acoustimass 16 Series II system: 72.5 lb (32...
... not affect your authorized Bose dealer. Available in -wall wiring from the Acoustimass module to 8 ohms Speaker weight/size Each cube speaker array and center front speaker: 2.4 lb (1.1 kg)! 6.2"H x 3.1"W x 4.0"D ! (15.7 cm x 7.8 cm x 10.2 cm) Acoustimass module: 45 lb (20.3 kg)! 16.3"H x 8.1"W x 29.1"D ! (41.4 cm x 20.6 cm x 73.9 cm) Packed system weight Acoustimass 16 Series II system: 72.5 lb (32...


