Owner's guide
Page 2
...features. For your speaker system. No part of this work may be of sufficient magnitude to constitute a risk of electric shock.! Confidential Unpublished Works. ©1992-1997 Dolby Laboratories. WARNING: No naked flame sources, such as marked on the rear of the Acoustimass module. Additional ...of the line cord plug to follow this owner's guide. ©2006 Bose Corporation. All rights reserved. 2 The exclamation point within the system enclosure that may be placed on the rear of the Acoustimass module: The lightning flash with this owner's guide carefully. Français...
...features. For your speaker system. No part of this work may be of sufficient magnitude to constitute a risk of electric shock.! Confidential Unpublished Works. ©1992-1997 Dolby Laboratories. WARNING: No naked flame sources, such as marked on the rear of the Acoustimass module. Additional ...of the line cord plug to follow this owner's guide. ©2006 Bose Corporation. All rights reserved. 2 The exclamation point within the system enclosure that may be placed on the rear of the Acoustimass module: The lightning flash with this owner's guide carefully. Français...
Owner's guide
Page 3
...çais CONTENTS SETTING UP 4 Unpacking the carton 4 Choosing locations for your speakers 5 Placing the center front speaker 6 Placing your left and right front speakers 6 Placing your rear speakers 6 Placing your Acoustimass® module 7 Making the connections 7 Connecting speakers to the Acoustimass module 7 Connecting the Acoustimass® module to the receiver 9 Checking and finalizing connections 10 Optional upgrade...
...çais CONTENTS SETTING UP 4 Unpacking the carton 4 Choosing locations for your speakers 5 Placing the center front speaker 6 Placing your left and right front speakers 6 Placing your rear speakers 6 Placing your Acoustimass® module 7 Making the connections 7 Connecting speakers to the Acoustimass module 7 Connecting the Acoustimass® module to the receiver 9 Checking and finalizing connections 10 Optional upgrade...
Owner's guide
Page 4
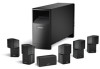
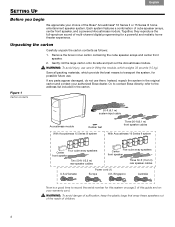
... front speaker, and a powered Acoustimass module. Instead, repack the system in lifting the module, which provide the best means to transport the system, for a powerful and realistic home theater experience. Or, to contact Bose directly, refer to record the serial number for this system on page 2 of the Bose® Acoustimass® 16 Series II or 15 Series III...
... front speaker, and a powered Acoustimass module. Instead, repack the system in lifting the module, which provide the best means to transport the system, for a powerful and realistic home theater experience. Or, to contact Bose directly, refer to record the serial number for this system on page 2 of the Bose® Acoustimass® 16 Series II or 15 Series III...
Owner's guide
Page 5
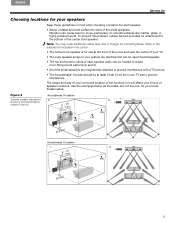
.... • The top and bottom cubes of the small speakers. ! d. 5 Note: You may order additional rubber feet, free of the small speakers are magnetically shielded to prevent ! room-filling sound patterns (b and d). • All of charge, by contacting Bose. The shape and size of your room and location of ...glass, or highly polished wood. theater setup. To prevent this problem, rubber feet are identical and can cause them to the bottom of speaker locations. Figure 2 Acoustimass 16 system Sample speaker placement a. interference. b. (a and c) and performance results (b and...
.... • The top and bottom cubes of the small speakers. ! d. 5 Note: You may order additional rubber feet, free of the small speakers are magnetically shielded to prevent ! room-filling sound patterns (b and d). • All of charge, by contacting Bose. The shape and size of your room and location of ...glass, or highly polished wood. theater setup. To prevent this problem, rubber feet are identical and can cause them to the bottom of speaker locations. Figure 2 Acoustimass 16 system Sample speaker placement a. interference. b. (a and c) and performance results (b and...

Owner's guide
Page 6
...Acoustimass® 15 Series III system is designed for the most realistic performance of on-screen action and dialogue. • Place the center front speaker above, on page 5). • Place these speakers at the same height as the ears of a seated viewer or higher. • Rotate the top and bottom cubes of each speaker...! They help bring the viewer into the center of your Acoustimass 15 system" on page 5). CAUTION: Before placing the center front speaker on page 14. SETTING UP Français Español English Bose® wall brackets and floor or table stands expand the options...
...Acoustimass® 15 Series III system is designed for the most realistic performance of on-screen action and dialogue. • Place the center front speaker above, on page 5). • Place these speakers at the same height as the ears of a seated viewer or higher. • Rotate the top and bottom cubes of each speaker...! They help bring the viewer into the center of your Acoustimass 15 system" on page 5). CAUTION: Before placing the center front speaker on page 14. SETTING UP Français Español English Bose® wall brackets and floor or table stands expand the options...
Owner's guide
Page 7
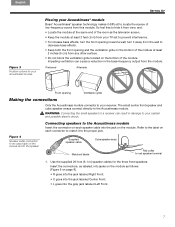
.... • Keep the module at least 2 feet (.6 m) from the module. turn the front opening Ventilation grille Making the connections Only the Acoustimass module connects to your Acoustimass® module Bose® Acoustimass® speaker technology makes it difficult to locate the source of the room as follows! (Figure 5 on page 8). • R goes into the jack...
.... • Keep the module at least 2 feet (.6 m) from the module. turn the front opening Ventilation grille Making the connections Only the Acoustimass module connects to your Acoustimass® module Bose® Acoustimass® speaker technology makes it difficult to locate the source of the room as follows! (Figure 5 on page 8). • R goes into the jack...
Owner's guide
Page 8
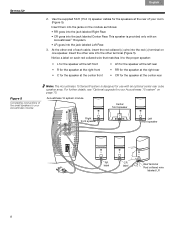
...10. For further details, see "Optional upgrade for the speaker at the rear of the small speakers to your Acoustimass module Note: The Acoustimass 15 Series III system is provided only with an optional center rear cube speaker array. At the other end of each red collared wire... CR for your room (Figure 5). Acoustimass 16 system module Center front speaker Right front speaker Left front speaker RR label CR label Red terminal Red collared wire labeled LR 8 Use the supplied 50-ft (15.2 m) speaker cables for use with an Acoustimass® 16 system. • LR goes into the...
...10. For further details, see "Optional upgrade for the speaker at the rear of the small speakers to your Acoustimass module Note: The Acoustimass 15 Series III system is provided only with an optional center rear cube speaker array. At the other end of each red collared wire... CR for your room (Figure 5). Acoustimass 16 system module Center front speaker Right front speaker Left front speaker RR label CR label Red terminal Red collared wire labeled LR 8 Use the supplied 50-ft (15.2 m) speaker cables for use with an Acoustimass® 16 system. • LR goes into the...
Owner's guide
Page 9
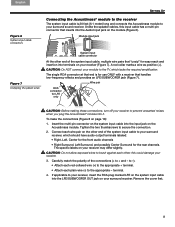
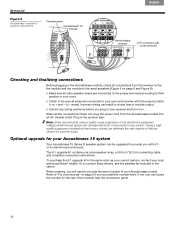
... Wire pair RCA connector for LFE only CAUTION: Before making these connections, turn off your receiver to prevent unwanted noises when you plug the Acoustimass® module into terminals on your receiver (Figure 7). this input cable has a multi-pin ! Module input jack Figure 7 Unzipping the paired...Connecting the Acoustimass® module to the receiver The system input cable is for use ONLY with a receiver that handles ! To make the connections (Figure 8 on the ! The specific labels on the other end of the connections (+ to secure the connection. 2. Unlike the speaker cables, ...
... Wire pair RCA connector for LFE only CAUTION: Before making these connections, turn off your receiver to prevent unwanted noises when you plug the Acoustimass® module into terminals on your receiver (Figure 7). this input cable has a multi-pin ! Module input jack Figure 7 Unzipping the paired...Connecting the Acoustimass® module to the receiver The system input cable is for use ONLY with a receiver that handles ! To make the connections (Figure 8 on the ! The specific labels on the other end of the connections (+ to secure the connection. 2. Unlike the speaker cables, ...
Owner's guide
Page 10
...you will need to contact Bose directly, see the address list included in the ! Voltage variations and spikes can eliminate the vast majority of the module near the connection panel. 10 Optional upgrade for your Acoustimass 15 system Your Acoustimass 15 Series III speaker system can result in a... in your room. • Check to be upgraded to + and - wires). SETTING UP Figure 8 Acoustimass® module to receiver connections Thumbscrews Acoustimass® 16 module Français Español English Home theater receiver LFE connector with cover removed Checking and finalizing ...
...you will need to contact Bose directly, see the address list included in the ! Voltage variations and spikes can eliminate the vast majority of the module near the connection panel. 10 Optional upgrade for your Acoustimass 15 system Your Acoustimass 15 Series III speaker system can result in a... in your room. • Check to be upgraded to + and - wires). SETTING UP Figure 8 Acoustimass® module to receiver connections Thumbscrews Acoustimass® 16 module Français Español English Home theater receiver LFE connector with cover removed Checking and finalizing ...
Owner's guide
Page 11
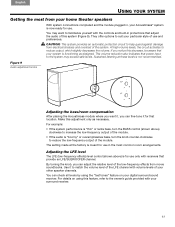
... the system performance is now ready for that provide an LFE/SUBWOOFER channel. to help guard against damage from your home theater speakers With system connections completed and the module plugged in, your system is not recommended. The setting made at these levels is functioning...They offer options to familiarize yourself with receivers that ! Figure 9 Audio adjustment knobs Adjusting the bass/room compensation After placing the Acoustimass module where you want to suit your digital surround sound receiver. English Español Français USING YOUR SYSTEM Getting ...
... the system performance is now ready for that provide an LFE/SUBWOOFER channel. to help guard against damage from your home theater speakers With system connections completed and the module plugged in, your system is not recommended. The setting made at these levels is functioning...They offer options to familiarize yourself with receivers that ! Figure 9 Audio adjustment knobs Adjusting the bass/room compensation After placing the Acoustimass module where you want to suit your digital surround sound receiver. English Español Français USING YOUR SYSTEM Getting ...
Owner's guide
Page 12
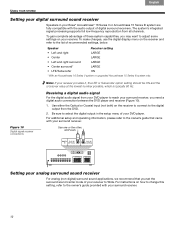
... YOUR SYSTEM Setting your digital surround sound receiver Speakers in the setup menu of these system capabilities, you set the ! Receiving a digital audio signal For the digital audio signal from your DVD player to select the digital output in your Bose® Acoustimass® 16 Series II or Acoustimass 15 Series III system are fully compatible with your...
... YOUR SYSTEM Setting your digital surround sound receiver Speakers in the setup menu of these system capabilities, you set the ! Receiving a digital audio signal For the digital audio signal from your DVD player to select the digital output in your Bose® Acoustimass® 16 Series II or Acoustimass 15 Series III system are fully compatible with your...
Owner's guide
Page 13
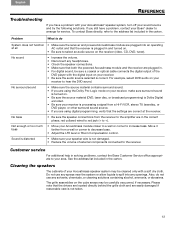
... If you have a problem, contact your speaker wire is not damaged. • Reduce the volume of external components connected to the receiver. To contact Bose directly, refer to the address list included in solving problems, contact the Bose Customer Service office appropriate to your area. ... list included in . • For digital sound, be carefully vacuumed, if necessary. Cleaning the speakers The cabinets of the DVD player with the digital input on your Acoustimass speaker system may be sure a coaxial or optical cable connects the digital output of your receiver to spill...
... If you have a problem, contact your speaker wire is not damaged. • Reduce the volume of external components connected to the receiver. To contact Bose directly, refer to the address list included in solving problems, contact the Bose Customer Service office appropriate to your area. ... list included in . • For digital sound, be carefully vacuumed, if necessary. Cleaning the speakers The cabinets of the DVD player with the digital input on your Acoustimass speaker system may be sure a coaxial or optical cable connects the digital output of your receiver to spill...
Owner's guide
Page 14
... speaker array and center front speaker: 2.4 lb (1.1 kg)! 6.2"H x 3.1"W x 4.0"D ! (15.7 cm x 7.8 cm x 10.2 cm) Acoustimass module: 45 lb (20.3 kg)! 16.3"H x 8.1"W x 29.1"D ! (41.4 cm x 20.6 cm x 73.9 cm) Packed system weight Acoustimass 16 Series II system: 72.5 lb (32.6 kg)! For further details or to order the accessories below, contact your authorized Bose® dealer or visit the Bose website: www.bose...
... speaker array and center front speaker: 2.4 lb (1.1 kg)! 6.2"H x 3.1"W x 4.0"D ! (15.7 cm x 7.8 cm x 10.2 cm) Acoustimass module: 45 lb (20.3 kg)! 16.3"H x 8.1"W x 29.1"D ! (41.4 cm x 20.6 cm x 73.9 cm) Packed system weight Acoustimass 16 Series II system: 72.5 lb (32.6 kg)! For further details or to order the accessories below, contact your authorized Bose® dealer or visit the Bose website: www.bose...
Quick setup guide
Page 1
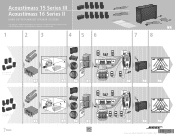
Acoustimass® 15 Series III Acoustimass 16 Series II HOME ENTERTAINMENT SPEAKER SYSTEMS Quick setup guide • Hurtig opstillingsvejledning • Kurzanleitung • Guía rápida de instalación • Noticede montage Guida di installazione rapida • Snelle opstellingsgids • Vägledning för snabb montering 1 2 3 4 5 6 �� � � � �� Acoustimass 15 Series III system � 4 � �...
Acoustimass® 15 Series III Acoustimass 16 Series II HOME ENTERTAINMENT SPEAKER SYSTEMS Quick setup guide • Hurtig opstillingsvejledning • Kurzanleitung • Guía rápida de instalación • Noticede montage Guida di installazione rapida • Snelle opstellingsgids • Vägledning för snabb montering 1 2 3 4 5 6 �� � � � �� Acoustimass 15 Series III system � 4 � �...

