Owner's guide
Page 2
...a risk of electric shock.! Serial number Dealer name Dealer phone Purchase date Please keep your speaker system. No part of this work may be of sufficient magnitude to the presence of important...owner's guide. ! "Dolby" and the double-D symbol are located on the rear of the Acoustimass module: The lightning flash with this owner's guide carefully. CAUTION: To prevent electric shock, ... the system, is intended to alert the user to follow this owner's guide. ©2006 Bose Corporation. Insert fully. All rights reserved. 2 Français Español English SAFETY INFORMATION...
...a risk of electric shock.! Serial number Dealer name Dealer phone Purchase date Please keep your speaker system. No part of this work may be of sufficient magnitude to the presence of important...owner's guide. ! "Dolby" and the double-D symbol are located on the rear of the Acoustimass module: The lightning flash with this owner's guide carefully. CAUTION: To prevent electric shock, ... the system, is intended to alert the user to follow this owner's guide. ©2006 Bose Corporation. Insert fully. All rights reserved. 2 Français Español English SAFETY INFORMATION...
Owner's guide
Page 3
...çais CONTENTS SETTING UP 4 Unpacking the carton 4 Choosing locations for your speakers 5 Placing the center front speaker 6 Placing your left and right front speakers 6 Placing your rear speakers 6 Placing your Acoustimass® module 7 Making the connections 7 Connecting speakers to the Acoustimass module 7 Connecting the Acoustimass® module to the receiver 9 Checking and finalizing connections 10 Optional upgrade...
...çais CONTENTS SETTING UP 4 Unpacking the carton 4 Choosing locations for your speakers 5 Placing the center front speaker 6 Placing your left and right front speakers 6 Placing your rear speakers 6 Placing your Acoustimass® module 7 Making the connections 7 Connecting speakers to the Acoustimass module 7 Connecting the Acoustimass® module to the receiver 9 Checking and finalizing connections 10 Optional upgrade...
Owner's guide
Page 4
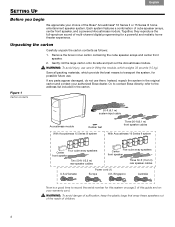
... authorized Bose dealer. WARNING: To avoid injury, use care in the original ! Figure 1 Carton contents 20-ft (6.1 m) system input cable Acoustimass module Rubber feet With Acoustimass 15 Series IIl system Three 20-ft (6.1 m) front speaker cables With Acoustimass 16 Series II system Four cube array speakers Center front speaker Two 50-ft (15.2 m) rear speaker cables Five cube array speakers Center front speaker Three...
... authorized Bose dealer. WARNING: To avoid injury, use care in the original ! Figure 1 Carton contents 20-ft (6.1 m) system input cable Acoustimass module Rubber feet With Acoustimass 15 Series IIl system Three 20-ft (6.1 m) front speaker cables With Acoustimass 16 Series II system Four cube array speakers Center front speaker Two 50-ft (15.2 m) rear speaker cables Five cube array speakers Center front speaker Three...
Owner's guide
Page 5
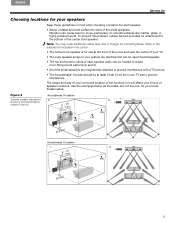
...carton. • The center front speaker is for your system are provided for each of charge, by contacting Bose. Use the examples below as the basis, but not the rule, for use at least 2 feet (.6 m) from your choice of speaker locations. Vibration can be at ... front speaker. To prevent this problem, rubber feet are identical and can be used interchangeably. • The top and bottom cubes of each speaker array can cause them to move, particularly on smooth surfaces like marble, glass, or highly polished wood. Figure 2 Acoustimass 16 system Sample speaker placement ...
...carton. • The center front speaker is for your system are provided for each of charge, by contacting Bose. Use the examples below as the basis, but not the rule, for use at least 2 feet (.6 m) from your choice of speaker locations. Vibration can be at ... front speaker. To prevent this problem, rubber feet are identical and can be used interchangeably. • The top and bottom cubes of each speaker array can cause them to move, particularly on smooth surfaces like marble, glass, or highly polished wood. Figure 2 Acoustimass 16 system Sample speaker placement ...

Owner's guide
Page 6
...5). SETTING UP Français Español English Bose® wall brackets and floor or table stands expand the options for placement of your Acoustimass 15 system" on page 10. For further information, see "Optional upgrade for these speakers at the same height as shown in Figure 2 on... directly behind (as shown in Figure 2 on both the front ! Note: The Acoustimass® 15 Series III system is wider than from 6 feet (2 m) to the bottom of your rear speakers While the rear (surround) speakers may deliver some dialogue, they can deliver sound on page 5). • Place these...
...5). SETTING UP Français Español English Bose® wall brackets and floor or table stands expand the options for placement of your Acoustimass 15 system" on page 10. For further information, see "Optional upgrade for these speakers at the same height as shown in Figure 2 on... directly behind (as shown in Figure 2 on both the front ! Note: The Acoustimass® 15 Series III system is wider than from 6 feet (2 m) to the bottom of your rear speakers While the rear (surround) speakers may deliver some dialogue, they can deliver sound on page 5). • Place these...
Owner's guide
Page 7
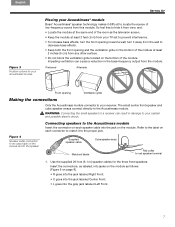
... jack. Use the supplied 20-foot (6.1 m) speaker cables for your Acoustimass module Placing your Acoustimass® module Bose® Acoustimass® speaker technology makes it difficult to your system and possible electric shock. Figure 4 Speaker cable connection to an output jack on the module and to the speaker Supplied speaker cable Cube speaker array Matched labels Red collar to the...
... jack. Use the supplied 20-foot (6.1 m) speaker cables for your Acoustimass module Placing your Acoustimass® module Bose® Acoustimass® speaker technology makes it difficult to your system and possible electric shock. Figure 4 Speaker cable connection to an output jack on the module and to the speaker Supplied speaker cable Cube speaker array Matched labels Red collar to the...
Owner's guide
Page 8
... right rear • CR for use with an Acoustimass® 16 system. • LR goes into the jack labeled Center Rear. Insert the other wire into the jacks on page 10. Use the supplied 50-ft (15.2 m) speaker cables for your Acoustimass module Note: The Acoustimass 15 Series III system is provided only with an optional...
... right rear • CR for use with an Acoustimass® 16 system. • LR goes into the jack labeled Center Rear. Insert the other wire into the jacks on page 10. Use the supplied 50-ft (15.2 m) speaker cables for your Acoustimass module Note: The Acoustimass 15 Series III system is provided only with an optional...
Owner's guide
Page 9
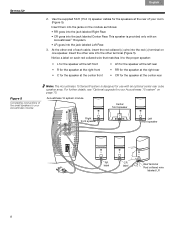
...20 feet (6.1 meter) long and connects the Acoustimass module to your receiver. 3. this input cable ..., which lacks the required amplification. To make the connections (Figure 8 on the ! Acoustimass module. terminal. 4. Remove the cover first. 9 connector that handles ! Wire pair ... input cable to your receiver to prevent unwanted noises when you plug the Acoustimass® module into it. CAUTION: Do not allow exposed wires to brush... SETTING UP Figure 6 System input cable connectors Connecting the Acoustimass® module to the receiver The system input cable is for easy...
...20 feet (6.1 meter) long and connects the Acoustimass module to your receiver. 3. this input cable ..., which lacks the required amplification. To make the connections (Figure 8 on the ! Acoustimass module. terminal. 4. Remove the cover first. 9 connector that handles ! Wire pair ... input cable to your receiver to prevent unwanted noises when you plug the Acoustimass® module into it. CAUTION: Do not allow exposed wires to brush... SETTING UP Figure 6 System input cable connectors Connecting the Acoustimass® module to the receiver The system input cable is for easy...
Owner's guide
Page 10
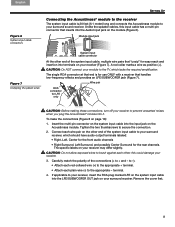
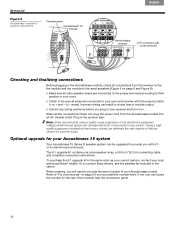
...module to receiver connections Thumbscrews Acoustimass® 16 module Français Español English Home theater receiver LFE connector with cover removed Checking and finalizing connections Before plugging in the Acoustimass module, check all connections from the Acoustimass module into an AC (...• Check to be upgraded to + and - to contact Bose directly, see the address list included in the same color as your current system, contact your Acoustimass 15 system Your Acoustimass 15 Series III speaker system can result in the receiver also. The 6.1 upgrade kit ...
...module to receiver connections Thumbscrews Acoustimass® 16 module Français Español English Home theater receiver LFE connector with cover removed Checking and finalizing connections Before plugging in the Acoustimass module, check all connections from the Acoustimass module into an AC (...• Check to be upgraded to + and - to contact Bose directly, see the address list included in the same color as your current system, contact your Acoustimass 15 system Your Acoustimass 15 Series III speaker system can result in the receiver also. The 6.1 upgrade kit ...
Owner's guide
Page 11
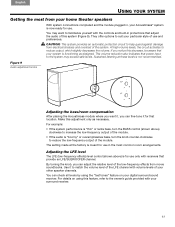
...check all levels by using this adjustment only as designed. Figure 9 Audio adjustment knobs Adjusting the bass/room compensation After placing the Acoustimass module where you want to familiarize yourself with receivers that power input to the system may want it to reduce output, which slightly... decreases the volume. For details on using the "test tones" feature on your other speaker channels. Sustained listening at the factory is functioning as necessary. the audio of the module. This volume reduction also indicates that provide...
...check all levels by using this adjustment only as designed. Figure 9 Audio adjustment knobs Adjusting the bass/room compensation After placing the Acoustimass module where you want to familiarize yourself with receivers that power input to the system may want it to reduce output, which slightly... decreases the volume. For details on using the "test tones" feature on your other speaker channels. Sustained listening at the factory is functioning as necessary. the audio of the module. This volume reduction also indicates that provide...
Owner's guide
Page 12
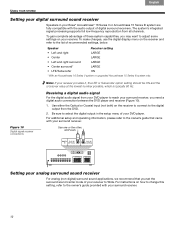
...in your surround receiver. Speaker Receiver setting • Left and right LARGE • Center LARGE • Left and right surround LARGE • Center surround* LARGE • LFE/Subwoofer ON * With an Acoustimass 16 Series II system or upgraded Acoustimass 15 Series IlI system only. ...analog surround sound receiver For analog (non-digital) surround sound applications, we recommend that came with your Bose® Acoustimass® 16 Series II or Acoustimass 15 Series III system are fully compatible with your DVD player. Use either the Optical or Coaxial input (not ...
...in your surround receiver. Speaker Receiver setting • Left and right LARGE • Center LARGE • Left and right surround LARGE • Center surround* LARGE • LFE/Subwoofer ON * With an Acoustimass 16 Series II system or upgraded Acoustimass 15 Series IlI system only. ...analog surround sound receiver For analog (non-digital) surround sound applications, we recommend that came with your Bose® Acoustimass® 16 Series II or Acoustimass 15 Series III system are fully compatible with your DVD player. Use either the Optical or Coaxial input (not ...
Owner's guide
Page 13
.... The grille assemblies on your receiver. • Be sure the audio source selected is correct. If you still have a problem with your Acoustimass® speaker system, turn off your sound source and try the following solutions. Do not use any openings. reasonable care is not damaged. • Reduce... is not taken. 13 Cleaning the speakers The cabinets of the DVD player with a soft dry cloth. English Español Français REFERENCE Troubleshooting If you have a problem, contact your Bose® dealer to arrange for service. Problem What to do not use any sprays ...
.... The grille assemblies on your receiver. • Be sure the audio source selected is correct. If you still have a problem with your Acoustimass® speaker system, turn off your sound source and try the following solutions. Do not use any openings. reasonable care is not damaged. • Reduce... is not taken. 13 Cleaning the speakers The cabinets of the DVD player with a soft dry cloth. English Español Français REFERENCE Troubleshooting If you have a problem, contact your Bose® dealer to arrange for service. Problem What to do not use any sprays ...
Owner's guide
Page 14
... -wall wiring from the Acoustimass module to Bose. Failure to 8 ohms Speaker weight/size Each cube speaker array and center front speaker: 2.4 lb (1.1 kg)! 6.2"H x 3.1"W x 4.0"D ! (15.7 cm x 7.8 cm x 10.2 cm) Acoustimass module: 45 lb (20.3 kg)! 16.3"H x 8.1"W x 29.1"D ! (41.4 cm x 20.6 cm x 73.9 cm) Packed system weight Acoustimass 16 Series II system: 72.5 lb (32.6 kg)! Accessories Bose offers the following accessories in...
... -wall wiring from the Acoustimass module to Bose. Failure to 8 ohms Speaker weight/size Each cube speaker array and center front speaker: 2.4 lb (1.1 kg)! 6.2"H x 3.1"W x 4.0"D ! (15.7 cm x 7.8 cm x 10.2 cm) Acoustimass module: 45 lb (20.3 kg)! 16.3"H x 8.1"W x 29.1"D ! (41.4 cm x 20.6 cm x 73.9 cm) Packed system weight Acoustimass 16 Series II system: 72.5 lb (32.6 kg)! Accessories Bose offers the following accessories in...
Quick setup guide
Page 1
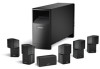
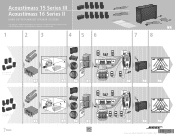
Acoustimass® 15 Series III Acoustimass 16 Series II HOME ENTERTAINMENT SPEAKER SYSTEMS Quick setup guide • Hurtig opstillingsvejledning • Kurzanleitung • Guía rápida de instalación • Noticede montage Guida di installazione rapida • Snelle opstellingsgids • Vägledning för snabb montering 1 2 3 4 5 6 �� � � � �� Acoustimass 15 Series III system � 4 � �...
Acoustimass® 15 Series III Acoustimass 16 Series II HOME ENTERTAINMENT SPEAKER SYSTEMS Quick setup guide • Hurtig opstillingsvejledning • Kurzanleitung • Guía rápida de instalación • Noticede montage Guida di installazione rapida • Snelle opstellingsgids • Vägledning för snabb montering 1 2 3 4 5 6 �� � � � �� Acoustimass 15 Series III system � 4 � �...

