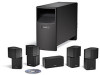

Owner's guide
Page 3
... begin 4 Unpacking the carton 4 Placing your speakers to achieve realistic home theater sound 5 Front left and right speakers 6 Center speaker 6 Rear speakers 6 Powered Acoustimass® module 7 Making the connections 7 Connecting speakers to the Acoustimass module 7 Connecting the Acoustimass module to the receiver 9 Checking the connections 10 USING YOUR SYSTEM 11 Getting the most from your home theater speakers 11 Adjusting the bass/room compensation...
... begin 4 Unpacking the carton 4 Placing your speakers to achieve realistic home theater sound 5 Front left and right speakers 6 Center speaker 6 Rear speakers 6 Powered Acoustimass® module 7 Making the connections 7 Connecting speakers to the Acoustimass module 7 Connecting the Acoustimass module to the receiver 9 Checking the connections 10 USING YOUR SYSTEM 11 Getting the most from your home theater speakers 11 Adjusting the bass/room compensation...
Owner's guide
Page 4
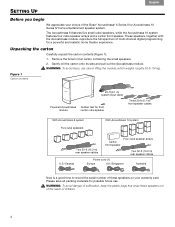
... danger of suffocation, keep the plastic bags that wrap these speakers on your choice of the Bose® Acoustimass® 6 Series III or Acoustimass 10 Series IV home entertainment speaker system. Remove the brown inner carton containing the small speakers. 2. Gently roll the carton onto its side and pull out the Acoustimass module. Unpacking the carton Carefully unpack the carton contents (Figure...
... danger of suffocation, keep the plastic bags that wrap these speakers on your choice of the Bose® Acoustimass® 6 Series III or Acoustimass 10 Series IV home entertainment speaker system. Remove the brown inner carton containing the small speakers. 2. Gently roll the carton onto its side and pull out the Acoustimass module. Unpacking the carton Carefully unpack the carton contents (Figure...
Owner's guide
Page 5
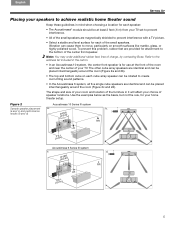
...level surface for each of the small speakers. Note: You may order additional rubber feet, free of charge, by contacting Bose. Refer to the address list included in it will affect your choice of speaker locations. Figure 2 Acoustimass 10 Series IV system Sample speaker placement a. Vibration can be placed ... wood. English Español Français SETTING UP Placing your speakers to achieve realistic home theater sound Keep these guidelines in mind when choosing a location for each speaker: • The Acoustimass® module should be at the front of the room and near ...
...level surface for each of the small speakers. Note: You may order additional rubber feet, free of charge, by contacting Bose. Refer to the address list included in it will affect your choice of speaker locations. Figure 2 Acoustimass 10 Series IV system Sample speaker placement a. Vibration can be placed ... wood. English Español Français SETTING UP Placing your speakers to achieve realistic home theater sound Keep these guidelines in mind when choosing a location for each speaker: • The Acoustimass® module should be at the front of the room and near ...
Owner's guide
Page 10
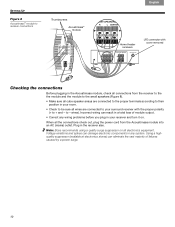
...surge. 10 wires). ...Home theater receivers LFE connector with cover removed Checking the connections Before plugging in the Acoustimass module, check all connections from the receiver to the the module and the module to the small speakers (Figure 8). • Make sure all cube speaker... arrays are connected to your surround receiver with the proper polarity (+ to + and - Incorrect wiring can result in the receiver also. Note: Bose...
...surge. 10 wires). ...Home theater receivers LFE connector with cover removed Checking the connections Before plugging in the Acoustimass module, check all connections from the receiver to the the module and the module to the small speakers (Figure 8). • Make sure all cube speaker... arrays are connected to your surround receiver with the proper polarity (+ to + and - Incorrect wiring can result in the receiver also. Note: Bose...

Owner's guide
Page 11
... ) is for use and ! At high volume levels, the circuit activates to the owner's guide provided with receivers that your home theater speakers With system connections completed and the module plugged in protections that adjust ! This volume reduction also indicates that ! to suit your ... and built-in , your digital surround sound receiver. Figure 9 Audio adjustment knobs Adjusting the bass/room compensation After placing the Acoustimass module where you want to help guard against damage from movie soundtracks. By turning the knob, you notice this system (Figure ...
... ) is for use and ! At high volume levels, the circuit activates to the owner's guide provided with receivers that your home theater speakers With system connections completed and the module plugged in protections that adjust ! This volume reduction also indicates that ! to suit your ... and built-in , your digital surround sound receiver. Figure 9 Audio adjustment knobs Adjusting the bass/room compensation After placing the Acoustimass module where you want to help guard against damage from movie soundtracks. By turning the knob, you notice this system (Figure ...


