Quick setup guide
Page 1
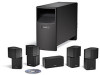
Acoustimass® 6 Series III Acoustimass 10 Series IV HOME ENTERTAINMENT SPEAKER SYSTEMS Quick setup guide • Hurtig opstillingsvejledning • Kurzanleitung • Guía rápida de instalación • Noticede montage • Guida di installazione rapida • Snelle opstellingsgids • Vägledning för snabb montering 1 2 3 4 5 6 �� � � � �� Acoustimass 6 Series III system � �� � �...
Acoustimass® 6 Series III Acoustimass 10 Series IV HOME ENTERTAINMENT SPEAKER SYSTEMS Quick setup guide • Hurtig opstillingsvejledning • Kurzanleitung • Guía rápida de instalación • Noticede montage • Guida di installazione rapida • Snelle opstellingsgids • Vägledning för snabb montering 1 2 3 4 5 6 �� � � � �� Acoustimass 6 Series III system � �� � �...
Owner's guide
Page 3
... 4 Unpacking the carton 4 Placing your speakers to achieve realistic home theater sound 5 Front left and right speakers 6 Center speaker 6 Rear speakers 6 Powered Acoustimass® module 7 Making the connections 7 Connecting speakers to the Acoustimass module 7 Connecting the Acoustimass module to the receiver 9 Checking the connections 10 USING YOUR SYSTEM 11 Getting the most from your home theater speakers 11 Adjusting the bass/room...
... 4 Unpacking the carton 4 Placing your speakers to achieve realistic home theater sound 5 Front left and right speakers 6 Center speaker 6 Rear speakers 6 Powered Acoustimass® module 7 Making the connections 7 Connecting speakers to the Acoustimass module 7 Connecting the Acoustimass module to the receiver 9 Checking the connections 10 USING YOUR SYSTEM 11 Getting the most from your home theater speakers 11 Adjusting the bass/room...
Owner's guide
Page 4
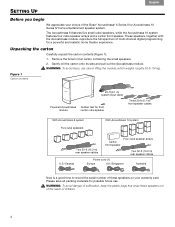
... choice of the Bose® Acoustimass® 6 Series III or Acoustimass 10 Series IV home entertainment speaker system. Figure 1 Carton contents 20-ft (6.1 m) system input cable Powered Acoustimass Rubber feet for front module center cube speaker Three 20-ft (6.1 m) front speaker cables With Acoustimass 6 system Five cube speakers With Acoustimass 10 system Two 50-ft (15.2 m) rear speaker cables Four cube speaker arrays Center front speaker Two 50-ft...
... choice of the Bose® Acoustimass® 6 Series III or Acoustimass 10 Series IV home entertainment speaker system. Figure 1 Carton contents 20-ft (6.1 m) system input cable Powered Acoustimass Rubber feet for front module center cube speaker Three 20-ft (6.1 m) front speaker cables With Acoustimass 6 system Five cube speakers With Acoustimass 10 system Two 50-ft (15.2 m) rear speaker cables Four cube speaker arrays Center front speaker Two 50-ft...
Owner's guide
Page 5
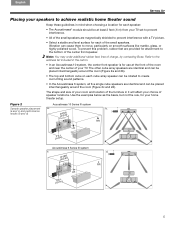
... to create room-filling sound patterns. • In the Acoustimass 6 system, all five single cube speakers are identical and can cause them to move, particularly on each of the small speakers. d. 5 Figure 2 Acoustimass 10 Series IV system Sample speaker placement a. To prevent this problem, rubber feet are provided...). English Español Français SETTING UP Placing your speakers to achieve realistic home theater sound Keep these guidelines in mind when choosing a location for each speaker: • The Acoustimass® module should be at the front of the room and near...
... to create room-filling sound patterns. • In the Acoustimass 6 system, all five single cube speakers are identical and can cause them to move, particularly on each of the small speakers. d. 5 Figure 2 Acoustimass 10 Series IV system Sample speaker placement a. To prevent this problem, rubber feet are provided...). English Español Français SETTING UP Placing your speakers to achieve realistic home theater sound Keep these guidelines in mind when choosing a location for each speaker: • The Acoustimass® module should be at the front of the room and near...
Owner's guide
Page 10
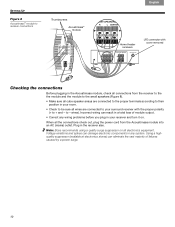
... the the module and the module to the small speakers (Figure 8). • Make sure all cube speaker arrays are connected to the proper terminals according to...Acoustimass module, check all connections from the Acoustimass module into an AC (mains) outlet. Incorrect wiring can eliminate the vast majority of module output. • Correct any system. Note: Bose.... 10 When all electronics equipment. Plug in the receiver also. SETTING UP Figure 8 Acoustimass® module to receiver connections Thumbscrews Acoustimass® module Français Español English Home theater...
... the the module and the module to the small speakers (Figure 8). • Make sure all cube speaker arrays are connected to the proper terminals according to...Acoustimass module, check all connections from the Acoustimass module into an AC (mains) outlet. Incorrect wiring can eliminate the vast majority of module output. • Correct any system. Note: Bose.... 10 When all electronics equipment. Plug in the receiver also. SETTING UP Figure 8 Acoustimass® module to receiver connections Thumbscrews Acoustimass® module Français Español English Home theater...

Owner's guide
Page 11
.... For details on using the "test tones" feature on your ! At high volume levels, the circuit activates to suit your other speaker channels. Use it to the owner's guide provided with volume levels of your particular style of the low-frequency effects from electrical stresses...9 Audio adjustment knobs Adjusting the bass/room compensation After placing the Acoustimass module where you can adjust the relative level of use only with the controls and built-in the most from your home theater speakers With system connections completed and the module plugged in, your system is...
.... For details on using the "test tones" feature on your ! At high volume levels, the circuit activates to suit your other speaker channels. Use it to the owner's guide provided with volume levels of your particular style of the low-frequency effects from electrical stresses...9 Audio adjustment knobs Adjusting the bass/room compensation After placing the Acoustimass module where you can adjust the relative level of use only with the controls and built-in the most from your home theater speakers With system connections completed and the module plugged in, your system is...


