Owner's guide
Page 1
The Bose® Acoustimass® 10 Series II Home Theater Speaker System Owner's Guide October 22, 2001 AM194646_02 _V.pdf
The Bose® Acoustimass® 10 Series II Home Theater Speaker System Owner's Guide October 22, 2001 AM194646_02 _V.pdf
Owner's guide
Page 2
... Edam, The Netherlands Anton Schalkamp General Manager, Bose Europe Manufacturer's authorized EU representative 2 October 22, 2001 AM19464_02_V.pdf Your system features new third generation Acoustimass cube speaker arrays, a product of the Directive, is significantly different from other speakers. It will help you set -up and operate your Acoustimass 10 Series II speaker system is in compliance with EMC Directive...
... Edam, The Netherlands Anton Schalkamp General Manager, Bose Europe Manufacturer's authorized EU representative 2 October 22, 2001 AM19464_02_V.pdf Your system features new third generation Acoustimass cube speaker arrays, a product of the Directive, is significantly different from other speakers. It will help you set -up and operate your Acoustimass 10 Series II speaker system is in compliance with EMC Directive...
Owner's guide
Page 5
... realistic home theater sound 5 Selecting the locations for your speakers 6 Connecting the speakers 9 Using Your Acoustimass 10 Series II speaker system For realistic home theater sound 13 Maintaining Your Acoustimass 10 Series II speaker system Troubleshooting ...14 Customer service ...14 Cleaning the speakers 15 Warranty period ...15 Accessories ...15 Product Information Technical information 16 Bose® Corporation inside back cover For your sales slip...
... realistic home theater sound 5 Selecting the locations for your speakers 6 Connecting the speakers 9 Using Your Acoustimass 10 Series II speaker system For realistic home theater sound 13 Maintaining Your Acoustimass 10 Series II speaker system Troubleshooting ...14 Customer service ...14 Cleaning the speakers 15 Warranty period ...15 Accessories ...15 Product Information Technical information 16 Bose® Corporation inside back cover For your sales slip...
Owner's guide
Page 6
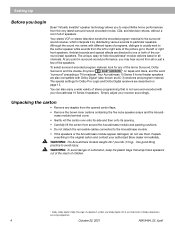
... just a few of the speakers. Simply adjust your Acoustimass 10 Series II speakers. English Setting Up Before you begin Bose® Virtually Invisible® speaker technology allows you may hear sound from around the Acoustimass module and packing cushions. • Do not detach the removable cables connected to the Acoustimass module. • If the speakers or the Acoustimass module appear damaged, do...
... just a few of the speakers. Simply adjust your Acoustimass 10 Series II speakers. English Setting Up Before you begin Bose® Virtually Invisible® speaker technology allows you may hear sound from around the Acoustimass module and packing cushions. • Do not detach the removable cables connected to the Acoustimass module. • If the speakers or the Acoustimass module appear damaged, do...
Owner's guide
Page 7
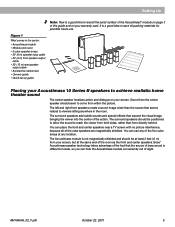
... sitting anywhere in the carton: • Acoustimass module • Module end cover • 5 cube speaker arrays • 20' (6 m) speaker input cable • 20' (6 m) front speaker output cable • 50' (15 m) rear speaker output cable • 8 protective rubber feet • Owner's guide • Quick set up guide Placing your Acoustimass 10 Series II speakers to achieve realistic home theater sound The...
... sitting anywhere in the carton: • Acoustimass module • Module end cover • 5 cube speaker arrays • 20' (6 m) speaker input cable • 20' (6 m) front speaker output cable • 50' (15 m) rear speaker output cable • 8 protective rubber feet • Owner's guide • Quick set up guide Placing your Acoustimass 10 Series II speakers to achieve realistic home theater sound The...
Owner's guide
Page 8
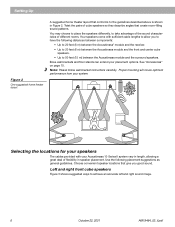
...; Up to 20 feet (6 m) between the Acoustimass module and the front and center cube speakers. • Up to 50 feet (15 m) between the Acoustimass module and the surround speakers. See "Accessories" on page 15. Bose wall brackets and floor stands can extend your system. Selecting the locations for your Acoustimass 10 Series II system vary in length, allowing a great...
...; Up to 20 feet (6 m) between the Acoustimass module and the front and center cube speakers. • Up to 50 feet (15 m) between the Acoustimass module and the surround speakers. See "Accessories" on page 15. Bose wall brackets and floor stands can extend your system. Selecting the locations for your Acoustimass 10 Series II system vary in length, allowing a great...

Owner's guide
Page 9
...: If you face the TV is connected to the LEFT FRONT output jack on the Acoustimass® module. 3 23 1 1 2 Figure 4 Suggested choices for center speaker placement Center cube speaker Sound from within the picture. English Setting Up Figure 3 Suggested choices for left as you... are available, free, by calling the Bose® customer service numbers inside the back cover of your TV, at...
...: If you face the TV is connected to the LEFT FRONT output jack on the Acoustimass® module. 3 23 1 1 2 Figure 4 Suggested choices for center speaker placement Center cube speaker Sound from within the picture. English Setting Up Figure 3 Suggested choices for left as you... are available, free, by calling the Bose® customer service numbers inside the back cover of your TV, at...
Owner's guide
Page 10
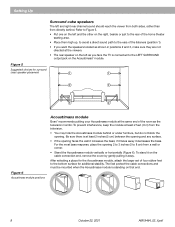
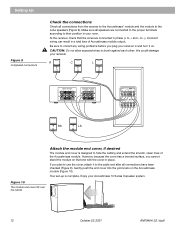
...direct sound path to the bottom surface for surround (rear) speaker placement 1 1 2 2 3 3 Figure 6 Acoustimass module positions Acoustimass module Bose® recommends putting your Acoustimass module at least 2 feet (.6 m) from a wall or corner. • Stand the Acoustimass module vertically or horizontally (Figure 6). The feet protect the ... cover by gently pulling it decreases the bass. English Setting Up Surround cube speakers The left as the television monitor. After selecting a place for the Acoustimass module, attach the larger set of four rubber feet to the ears of ...
...direct sound path to the bottom surface for surround (rear) speaker placement 1 1 2 2 3 3 Figure 6 Acoustimass module positions Acoustimass module Bose® recommends putting your Acoustimass module at least 2 feet (.6 m) from a wall or corner. • Stand the Acoustimass module vertically or horizontally (Figure 6). The feet protect the ... cover by gently pulling it decreases the bass. English Setting Up Surround cube speakers The left as the television monitor. After selecting a place for the Acoustimass module, attach the larger set of four rubber feet to the ears of ...
Owner's guide
Page 11
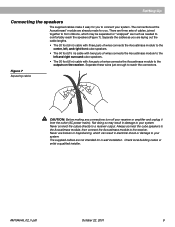
... cable with three pairs of wires connects the Acoustimass module to the center, left, and right front cube speakers. • The 50 foot (15 m) cable with two pairs of wires connects the Acoustimass module to the left and right surround cube speakers. • The 20 foot (6 m) cable...or frayed wiring, which may result in damage to comfortably reach the speakers (Figure 7). Check local building codes or enlist a qualified installer. Always connect the cube speakers to the Acoustimass module, then connect the Acoustimass module to your system. Separate the cables as needed to your ...
... cable with three pairs of wires connects the Acoustimass module to the center, left, and right front cube speakers. • The 50 foot (15 m) cable with two pairs of wires connects the Acoustimass module to the left and right surround cube speakers. • The 20 foot (6 m) cable...or frayed wiring, which may result in damage to comfortably reach the speakers (Figure 7). Check local building codes or enlist a qualified installer. Always connect the cube speakers to the Acoustimass module, then connect the Acoustimass module to your system. Separate the cables as needed to your ...

Owner's guide
Page 12
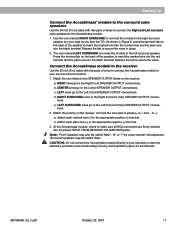
... need to secure the wires in any cube array in place. Connect the Acoustimass® module to the center and front cube speakers Use the 20 foot (6 m) cable with three pairs of wires to connect the Acoustimass module to red terminal 10 October 22, 2001 AM19464_02_V.pdf Connect the wire pair marked CENTER to... (to the right of the TV as you face it ) in the same way. 3. See Figure 8. 2. Release the tab to lengthen the supplied cables, call Bose® customer service. Connect the wire pair marked LEFT to the cube array you have placed in the left of the TV as you face...
... need to secure the wires in any cube array in place. Connect the Acoustimass® module to the center and front cube speakers Use the 20 foot (6 m) cable with three pairs of wires to connect the Acoustimass module to red terminal 10 October 22, 2001 AM19464_02_V.pdf Connect the wire pair marked CENTER to... (to the right of the TV as you face it ) in the same way. 3. See Figure 8. 2. Release the tab to lengthen the supplied cables, call Bose® customer service. Connect the wire pair marked LEFT to the cube array you have placed in the left of the TV as you face...
Owner's guide
Page 13
...20 foot (6 m) cable with two pairs of wires to connect the Right and Left surround cube speakers to the Acoustimass module. 1. Match the wire labels to the SPEAKER OUTPUT labels on the receiver. tions. Connect the wire pairs in place. 2. Attach each plain wire...receiver. 1. d. LEFT SURROUND wires go to the Center SPEAKER OUTPUT connections. to secure the wires. b. Release the tab to -). CAUTION: Do not connect the Acoustimass module directly to the appropriate positive (+) terminal. b. Note: "Front" speakers may be called "Rear". a. Attach each marked wire ...
...20 foot (6 m) cable with two pairs of wires to connect the Right and Left surround cube speakers to the Acoustimass module. 1. Match the wire labels to the SPEAKER OUTPUT labels on the receiver. tions. Connect the wire pairs in place. 2. Attach each plain wire...receiver. 1. d. LEFT SURROUND wires go to the Center SPEAKER OUTPUT connections. to secure the wires. b. Release the tab to -). CAUTION: Do not connect the Acoustimass module directly to the appropriate positive (+) terminal. b. Note: "Front" speakers may be called "Rear". a. Attach each marked wire ...
Owner's guide
Page 14
English Setting Up Figure 9 Completed connections Check the connections Check all connections have been checked (Figure 9). to the cube speakers (Figure 9). this could damage your Acoustimass 10 Series II speaker system. 12 October 22, 2001 AM19464_02_V.pdf However, because the cover has a beveled surface, you cannot stand the module on that the wires are connected ...
English Setting Up Figure 9 Completed connections Check the connections Check all connections have been checked (Figure 9). to the cube speakers (Figure 9). this could damage your Acoustimass 10 Series II speaker system. 12 October 22, 2001 AM19464_02_V.pdf However, because the cover has a beveled surface, you cannot stand the module on that the wires are connected ...
Owner's guide
Page 15
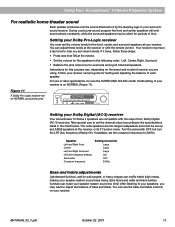
...controls on your surroundsound receiver. After listening to your speakers, you may want to the specifications listed in video applications, be silent for periods of your Dolby Digital (AC-3) receiver Your Acoustimass 10 Series II speakers are compatible with the remote control. Your receiver ...may be sure the SURROUND-SOUND center mode setting of time. Speaker Left and Right Front Center Left and Right Surround LFE (...
...controls on your surroundsound receiver. After listening to your speakers, you may want to the specifications listed in video applications, be silent for periods of your Dolby Digital (AC-3) receiver Your Acoustimass 10 Series II speakers are compatible with the remote control. Your receiver ...may be sure the SURROUND-SOUND center mode setting of time. Speaker Left and Right Front Center Left and Right Surround LFE (...
Owner's guide
Page 16
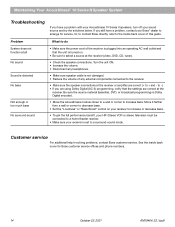
... to a surround-sound mode. If you still have a problem with your Acoustimass 10 Series II speakers, turn off your sound source and try the solutions below. English Maintaining Your Acoustimass® 10 Series II Speaker System Troubleshooting If you have a problem, contact your Bose® dealer to arrange for Bose customer service offices and phone numbers. 14 October 22, 2001 AM19464_02_V.pdf...
... to a surround-sound mode. If you still have a problem with your Acoustimass 10 Series II speakers, turn off your sound source and try the solutions below. English Maintaining Your Acoustimass® 10 Series II Speaker System Troubleshooting If you have a problem, contact your Bose® dealer to arrange for Bose customer service offices and phone numbers. 14 October 22, 2001 AM19464_02_V.pdf...
Owner's guide
Page 17
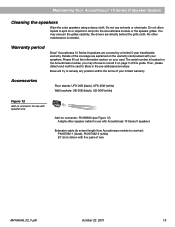
... period Bose® Acoustimass 10 Series II speakers are directly behind the grille cloth. you may vacuum the grilles carefully; Bose will try to Bose in the pre-addressed envelope. Then, please detach and mail the card to remedy any problem within the terms of this guide. English Maintaining Your Acoustimass® 10 Series II Speaker System Cleaning the speakers Wipe the cube speakers using...
... period Bose® Acoustimass 10 Series II speakers are directly behind the grille cloth. you may vacuum the grilles carefully; Bose will try to Bose in the pre-addressed envelope. Then, please detach and mail the card to remedy any problem within the terms of this guide. English Maintaining Your Acoustimass® 10 Series II Speaker System Cleaning the speakers Wipe the cube speakers using...
Owner's guide
Page 18
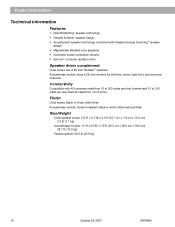
... with A/V receivers rated from 4 to 100 watts per front channel and 10 to 8 ohms Finish Cube arrays: Black or Arctic white finish Acoustimass module: Scratch-resistant black or Arctic white textured finish Size/Weight Cube speaker arrays: 6.2"H x 3.1"W x 4.0"D (15.7 cm x 7.8 cm x 10.2 cm) 2.4 lb (1.1 kg) Acoustimass module: 14"H x 23"W x 7.5"D (35.5 cm x 58.5 cm x 19.0 cm) 28...
... with A/V receivers rated from 4 to 100 watts per front channel and 10 to 8 ohms Finish Cube arrays: Black or Arctic white finish Acoustimass module: Scratch-resistant black or Arctic white textured finish Size/Weight Cube speaker arrays: 6.2"H x 3.1"W x 4.0"D (15.7 cm x 7.8 cm x 10.2 cm) 2.4 lb (1.1 kg) Acoustimass module: 14"H x 23"W x 7.5"D (35.5 cm x 58.5 cm x 19.0 cm) 28...


