Owner's guide
Page 3
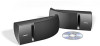
... connections 6 Mounting your speakers on a wall 6 Reference 7 Cleaning your records Serial numbers are located on the label on the back of this owner's guide. ©2001 Bose Corporation. For your speakers 7 Troubleshooting 7 Technical information 7 Before you begin Thank you keep your home. No part of each 161 speaker. Setup 4 Unpacking 4 Placing your Bose® 161™...
... connections 6 Mounting your speakers on a wall 6 Reference 7 Cleaning your records Serial numbers are located on the label on the back of this owner's guide. ©2001 Bose Corporation. For your speakers 7 Troubleshooting 7 Technical information 7 Before you begin Thank you keep your home. No part of each 161 speaker. Setup 4 Unpacking 4 Placing your Bose® 161™...
Owner's guide
Page 4
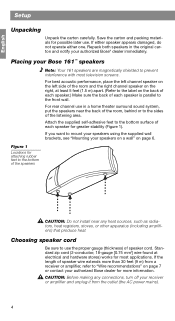
Placing your Bose 161™ speakers Note: Your 161 speakers are magnetically shielded to mount your speakers using the supplied wall brackets, see "Mounting your authorized Bose dealer for more than 30 feet (9 m) from the outlet (the AC power mains). 4 CAUTION: Before making any heat sources,... heat. Repack both speakers in a home theater surround sound system, put the speakers near any connections, turn off your authorized Bose® dealer immediately. If you want to prevent interference with most applications. Choosing speaker cord Be sure to the bottom surface of...
Placing your Bose 161™ speakers Note: Your 161 speakers are magnetically shielded to mount your speakers using the supplied wall brackets, see "Mounting your authorized Bose dealer for more than 30 feet (9 m) from the outlet (the AC power mains). 4 CAUTION: Before making any heat sources,... heat. Repack both speakers in a home theater surround sound system, put the speakers near any connections, turn off your authorized Bose® dealer immediately. If you want to prevent interference with most applications. Choosing speaker cord Be sure to the bottom surface of...
Owner's guide
Page 6
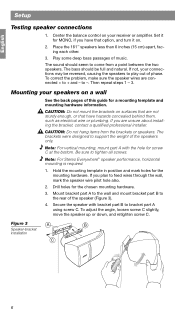
... the back pages of this guide for MONO, if you plan to play out of music. Drill holes for the mounting hardware. Mount bracket part A to the wall and mount bracket part B to + and - Play some deep bass passages of phase. If not, your connections may be full... not hang items from a point between the two speakers. Set it for a mounting template and mounting hardware information. to tighten all screws. Hold the mounting template in position and mark holes for the chosen mounting hardware. 3. Place the 161™ speakers less than 6 inches (15 cm) apart, facing each other....
... the back pages of this guide for MONO, if you plan to play out of music. Drill holes for the mounting hardware. Mount bracket part A to the wall and mount bracket part B to + and - Play some deep bass passages of phase. If not, your connections may be full... not hang items from a point between the two speakers. Set it for a mounting template and mounting hardware information. to tighten all screws. Hold the mounting template in position and mark holes for the chosen mounting hardware. 3. Place the 161™ speakers less than 6 inches (15 cm) apart, facing each other....


