
User Manual
Page 3
... INSTRUCTIONS 5 GROUNDING INSTRUCTIONS 6 INSTALLATION INSTRUCTIONS 7 Introduction 7 Information concerning waste disposal 7 Before installing the dryer 7 Checklist for Installation 8 Installation Location 8 Dryer Dimensions 8 Door Hinge Reversal 9 Installation Types 11 Electrical connection 14 Exhaust air connection 17 Accessories 19 Preparing to transport the dryer ć step by step 19 OPERATING INSTRUCTIONS 20 Panel 20 Additional Safety information 21...
... INSTRUCTIONS 5 GROUNDING INSTRUCTIONS 6 INSTALLATION INSTRUCTIONS 7 Introduction 7 Information concerning waste disposal 7 Before installing the dryer 7 Checklist for Installation 8 Installation Location 8 Dryer Dimensions 8 Door Hinge Reversal 9 Installation Types 11 Electrical connection 14 Exhaust air connection 17 Accessories 19 Preparing to transport the dryer ć step by step 19 OPERATING INSTRUCTIONS 20 Panel 20 Additional Safety information 21...
User Manual
Page 8
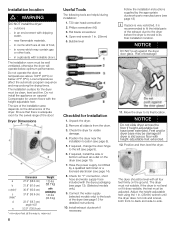
...surface for visible damage. 4. The size of the dryer. Check the dryer for the dryer must be adjusted. If required, install the side or bottom exhaust air outlet on the dimensions of the installation area depends on the dryer (see page 19). 7. Have the power supply...1 in cupboards with dripping water, - outdoors - in rooms which are helpful during installation: 1. Do not operate the dryer at risk of the dryer (see page 13). (Selected models only). 9. Dryer Dimensions a b c (min)* c (max)* d e Dimension 27.0" (68.6 cm) 31.8" (81.0 cm) 36.9" (93.6 cm) 37.8" (95.9 cm) 22.0" ...
...surface for visible damage. 4. The size of the dryer. Check the dryer for the dryer must be adjusted. If required, install the side or bottom exhaust air outlet on the dimensions of the installation area depends on the dryer (see page 19). 7. Have the power supply...1 in cupboards with dripping water, - outdoors - in rooms which are helpful during installation: 1. Do not operate the dryer at risk of the dryer (see page 13). (Selected models only). 9. Dryer Dimensions a b c (min)* c (max)* d e Dimension 27.0" (68.6 cm) 31.8" (81.0 cm) 36.9" (93.6 cm) 37.8" (95.9 cm) 22.0" ...
User Manual
Page 11
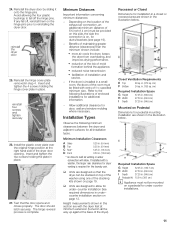
...Insert and tighten the two screws holding the hinge cover plate in the illustration below . If the dryer is on Pedestal Dimensions for pedestal mounting installation are shown in place. Refer to wall as close to the following minimum clearances between ...maintaining greater distance (clearances) than the minimum shown include: S more air cools the dryer, keeps the dryer from overheating, and improves drying performance. Allow additional clearance for under -counter installation See required dimensions in place. 27. Closet Ventilation Requirements E Top 48 sq. cm) F Bottom ...
...Insert and tighten the two screws holding the hinge cover plate in the illustration below . If the dryer is on Pedestal Dimensions for pedestal mounting installation are shown in place. Refer to wall as close to the following minimum clearances between ...maintaining greater distance (clearances) than the minimum shown include: S more air cools the dryer, keeps the dryer from overheating, and improves drying performance. Allow additional clearance for under -counter installation See required dimensions in place. 27. Closet Ventilation Requirements E Top 48 sq. cm) F Bottom ...
User Manual
Page 12
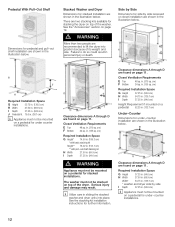
... under -counter installation are found on a pedestal 52.25 in the illustration below . in personal injury or death. Stacked Washer and Dryer Dimensions for stacked installation are two stacking kits available for side by side I Depth 37.25 in. (94.6 cm) Height Requirement if ...mounted on page 11. See the stacking kit installation instructions for under counter installations. Side by Side Dimensions for stacking the dryer on top of the washer. See the Accessories" section on a pedestal for further information. The washer must not be...
... under -counter installation are found on a pedestal 52.25 in the illustration below . in personal injury or death. Stacked Washer and Dryer Dimensions for stacked installation are two stacking kits available for side by side I Depth 37.25 in. (94.6 cm) Height Requirement if ...mounted on page 11. See the stacking kit installation instructions for under counter installations. Side by Side Dimensions for stacking the dryer on top of the washer. See the Accessories" section on a pedestal for further information. The washer must not be...
User Manual
Page 19
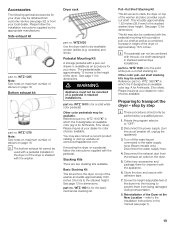
...to the Installation Instructions in which the X designates an available color (eg: A for Anthracite, S for dimensions. part no . WTZ 1610 is for dimensions. See page 12 for a solid white color pedestal. This kit adds approximately 1.52 inches (38.6 mm...dryer is available as a combined increase in which the X designates an available color (eg: A for Anthracite, S for color choices available. You may also consult a current product catalog or visit our website at your local dealer. Rotate the program selector to provide a pull-out shelf as well as an accessory for dimensions...
...to the Installation Instructions in which the X designates an available color (eg: A for Anthracite, S for dimensions. part no . WTZ 1610 is for dimensions. See page 12 for a solid white color pedestal. This kit adds approximately 1.52 inches (38.6 mm...dryer is available as a combined increase in which the X designates an available color (eg: A for Anthracite, S for color choices available. You may also consult a current product catalog or visit our website at your local dealer. Rotate the program selector to provide a pull-out shelf as well as an accessory for dimensions...