
User Manual
Page 3
... INSTRUCTIONS 5 GROUNDING INSTRUCTIONS 6 INSTALLATION INSTRUCTIONS 7 Introduction 7 Information concerning waste disposal 7 Before installing the dryer 7 Checklist for Installation 8 Installation Location 8 Dryer Dimensions 8 Door Hinge Reversal 9 Installation Types 11 Electrical connection 14 Exhaust air connection 17 Accessories 19 Preparing to transport the dryer ć step by step 19 OPERATING INSTRUCTIONS 20 Panel 20 Additional Safety information 21...
... INSTRUCTIONS 5 GROUNDING INSTRUCTIONS 6 INSTALLATION INSTRUCTIONS 7 Introduction 7 Information concerning waste disposal 7 Before installing the dryer 7 Checklist for Installation 8 Installation Location 8 Dryer Dimensions 8 Door Hinge Reversal 9 Installation Types 11 Electrical connection 14 Exhaust air connection 17 Accessories 19 Preparing to transport the dryer ć step by step 19 OPERATING INSTRUCTIONS 20 Panel 20 Additional Safety information 21...
User Manual
Page 5
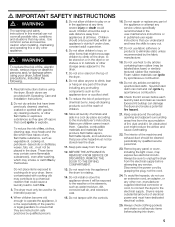
... have the skills to dry articles containing foam rubber (may arise. Children should be sure to the electrical supply. Bosch dryers are instructed in your dryer, follow basic precautions, including the following. 1. Do not dry articles that might reduce the airflow and cause overheating..., combustible materials and materials that produce flammable vapors, flammable liquids, and substances that may be stored near the dryer. 11. Spunbonded olefin can melt and can damage the dryer and create a potential fire hazard. 21. To avoid fire hazards, do not use an extension cord, an...
... have the skills to dry articles containing foam rubber (may arise. Children should be sure to the electrical supply. Bosch dryers are instructed in your dryer, follow basic precautions, including the following. 1. Do not dry articles that might reduce the airflow and cause overheating..., combustible materials and materials that produce flammable vapors, flammable liquids, and substances that may be stored near the dryer. 11. Spunbonded olefin can melt and can damage the dryer and create a potential fire hazard. 21. To avoid fire hazards, do not use an extension cord, an...
User Manual
Page 8
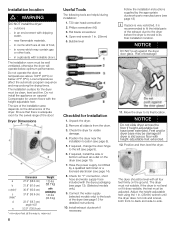
...be damaged if dryer is moved to...dryer. The dryer should be well ventilated, otherwise the dryer will operate below 41°F (5°C). If the dryer...back and sideĆto its final location. Dryer Dimensions a b c (min)* c (max)*...min=dryer feet all the way in . (25mm) wrench until the dryer does ...feet. Unpack the dryer. 2. Feet and/or dryer base may be ...then level the dryer. outdoors -...dryer packaging (see page 9). 6. The installation room must not wobble. Position the dryer...dryer (see page 8). 5. Move the dryer to its final installation location. NOTICE Do not slide dryer...
...be damaged if dryer is moved to...dryer. The dryer should be well ventilated, otherwise the dryer will operate below 41°F (5°C). If the dryer...back and sideĆto its final location. Dryer Dimensions a b c (min)* c (max)*...min=dryer feet all the way in . (25mm) wrench until the dryer does ...feet. Unpack the dryer. 2. Feet and/or dryer base may be ...then level the dryer. outdoors -...dryer packaging (see page 9). 6. The installation room must not wobble. Position the dryer...dryer (see page 8). 5. Move the dryer to its final installation location. NOTICE Do not slide dryer...
User Manual
Page 10
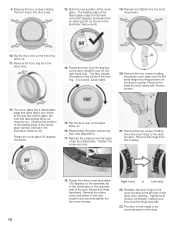
... marked in the illustration below as (A). 19. Rotate the front ring 180 degrees so the door handle is located on the dryer housing. Remove the plate and set it aside with the two screws. 12. Reassemble the parts, preserving their new alignments. ...about two-thirds of the door (where the hinge had been). Remove the two screws holding the front ring to the dryer housing at the left hand hinge mounting position on the inside of the cover glass. Reinsert and tighten the four front...starting point as shown in the illustration below as (A). Be sure this raised edge faces up . 11.
... marked in the illustration below as (A). 19. Rotate the front ring 180 degrees so the door handle is located on the dryer housing. Remove the plate and set it aside with the two screws. 12. Reassemble the parts, preserving their new alignments. ...about two-thirds of the door (where the hinge had been). Remove the two screws holding the front ring to the dryer housing at the left hand hinge mounting position on the inside of the cover glass. Reinsert and tighten the four front...starting point as shown in the illustration below as (A). Be sure this raised edge faces up . 11.
User Manual
Page 11
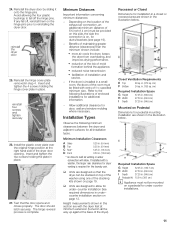
...installation See required dimensions in undercounter installation section on , for installation in . (94.6 cm) Mounted on page 19. Refer to reinstalling the dryer door. Recessed or Closet Dimensions for ducts/brackets (see page 19). - in . (310 sq. Minimum Distances Important information concerning minimum distances:... must not be provided on this section are shown in . (12.8 mm) * as venting or water connection will allow for under counter installations. 11 in . (155 sq. cm) Required Installation Space G Height 37.25 in. (94.6 cm) H Width 27.50 in. (69.9 cm)...
...installation See required dimensions in undercounter installation section on , for installation in . (94.6 cm) Mounted on page 19. Refer to reinstalling the dryer door. Recessed or Closet Dimensions for ducts/brackets (see page 19). - in . (310 sq. Minimum Distances Important information concerning minimum distances:... must not be provided on this section are shown in . (12.8 mm) * as venting or water connection will allow for under counter installations. 11 in . (155 sq. cm) Required Installation Space G Height 37.25 in. (94.6 cm) H Width 27.50 in. (69.9 cm)...
User Manual
Page 12
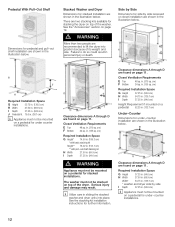
...50 in. (69.9 cm) Width* 54.75 in. (139.1 cm) * washer and dryer side by side recessed or closet installation are shown in the illustration below. See the Accessories" section on page 11. The washer must not be stacked on a pedestal for under -counter installations. 12 Clearance ...dimensions A through D are two stacking kits available for stacking the dryer on page 11. cm) F Bottom 24 sq. There are found on top of the dryer. Serious injury and damage may result. in . (155 sq. Pedestal With Pull-Out Shelf Dimensions ...
...50 in. (69.9 cm) Width* 54.75 in. (139.1 cm) * washer and dryer side by side recessed or closet installation are shown in the illustration below. See the Accessories" section on page 11. The washer must not be stacked on a pedestal for under -counter installations. 12 Clearance ...dimensions A through D are two stacking kits available for stacking the dryer on page 11. cm) F Bottom 24 sq. There are found on top of the dryer. Serious injury and damage may result. in . (155 sq. Pedestal With Pull-Out Shelf Dimensions ...
User Manual
Page 14
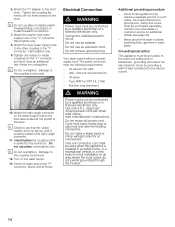
... the washer cold water supply hose to -metal couplings on the connector. i Do not overtighten. UL listed in the right-angle connector. 11. Hand tighten the coupling until it is firmly seated on the water faucet. 13. Do not use pliers to see page 32). - Use... malfunction or breakdown, grounding will reduce the risk of electric shock by a qualified technician or a licensed electrician only. Turn on the hose. Some local regulations may require a separate ground. Do not use an extension cord. Your dryer comes without a power supply cord. approved 30 amp...
... the washer cold water supply hose to -metal couplings on the connector. i Do not overtighten. UL listed in the right-angle connector. 11. Hand tighten the coupling until it is firmly seated on the water faucet. 13. Do not use pliers to see page 32). - Use... malfunction or breakdown, grounding will reduce the risk of electric shock by a qualified technician or a licensed electrician only. Turn on the hose. Some local regulations may require a separate ground. Do not use an extension cord. Your dryer comes without a power supply cord. approved 30 amp...
User Manual
Page 17
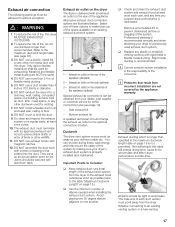
... serve as an accumulation point for exhausting. q Replace any time you suspect dryer performance is not permitted. The male end of a building, furnace cold air duct, attic, crawl space, or any other wildlife. 11. Whether connecting to without exception. To reduce the risk of birds or other... nonĆmetal duct with this dryer. Metal foil and flexible metal ducting are illustrated below. The exhaust duct must point...
... serve as an accumulation point for exhausting. q Replace any time you suspect dryer performance is not permitted. The male end of a building, furnace cold air duct, attic, crawl space, or any other wildlife. 11. Whether connecting to without exception. To reduce the risk of birds or other... nonĆmetal duct with this dryer. Metal foil and flexible metal ducting are illustrated below. The exhaust duct must point...
User Manual
Page 19
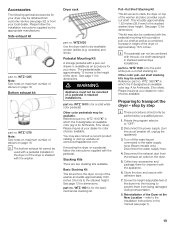
... The following optional accessories for dimensions. sweaters) and shoes. See page 11 for silver). Stacking Kits There are two stacking kits available. Basic Stacking Kit This kit anchors the dryer on a pedestal in height of the dryer of the dryer into the housing to the Installation Instructions in which the X designates an available color...
... The following optional accessories for dimensions. sweaters) and shoes. See page 11 for silver). Stacking Kits There are two stacking kits available. Basic Stacking Kit This kit anchors the dryer on a pedestal in height of the dryer of the dryer into the housing to the Installation Instructions in which the X designates an available color...

User Manual
Page 27
The dryer light goes out. 11. Do not rinse or wash the screen to cool. 2. Switch off the dryer by stroking your hand over the filter. 5. Insert the filter. 6. Close the door. This buildup can moisten your fingers. i If lint falls off with warm ... build up during a drying program, clean the filter immediately and check the exhaust duct. The filter should be cleaned before being inserted back into the dryer. Be careful not to remove residue buildup. A filter with hot water. 3. Lightly scrub the lint screen with hot water. 6. Cleaning the filter reduces the ...
The dryer light goes out. 11. Do not rinse or wash the screen to cool. 2. Switch off the dryer by stroking your hand over the filter. 5. Insert the filter. 6. Close the door. This buildup can moisten your fingers. i If lint falls off with warm ... build up during a drying program, clean the filter immediately and check the exhaust duct. The filter should be cleaned before being inserted back into the dryer. Be careful not to remove residue buildup. A filter with hot water. 3. Lightly scrub the lint screen with hot water. 6. Cleaning the filter reduces the ...

User Manual
Page 31
...action below. Water tap(s) not turned on water tap. As suspension system rollers warm up thumping will stop within 2 to 3 minutes of the dryer Unusual noise: Rhythmic vibration Water is not sprayed into the unit during wool program (laundry not on control Fault condition panel when Cycle Selector is... on rack) Drum suspension rollers need time to warm up causing load to soak for 30 min, switch on dryer rack. Place laundry on again. Remove the nozzle using a 7/16 inch (11 mm) socket wrench. Lint filter LED is used only as a reminder. Restart program. Allow the nozzle to ...
...action below. Water tap(s) not turned on water tap. As suspension system rollers warm up thumping will stop within 2 to 3 minutes of the dryer Unusual noise: Rhythmic vibration Water is not sprayed into the unit during wool program (laundry not on control Fault condition panel when Cycle Selector is... on rack) Drum suspension rollers need time to warm up causing load to soak for 30 min, switch on dryer rack. Place laundry on again. Remove the nozzle using a 7/16 inch (11 mm) socket wrench. Lint filter LED is used only as a reminder. Restart program. Allow the nozzle to ...

