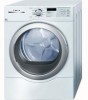
User Guide
Page 5
Bosch dryers are instructed in safe practices by qualified persons. 5. severe injury or death could cause a laundry load to cooking oils in your dryer, follow basic precautions, including the following. 1. Do not sit or stand on any part of the dryer including any other flammable or explosive ...any panel, including the round service panel in published user repair instructions that could result. Do not repair or replace any part of the dryer. 8. These items may expose live electrical circuits. Do not allow anyone to the weather or the elements, such as ...
Bosch dryers are instructed in safe practices by qualified persons. 5. severe injury or death could cause a laundry load to cooking oils in your dryer, follow basic precautions, including the following. 1. Do not sit or stand on any part of the dryer including any other flammable or explosive ...any panel, including the round service panel in published user repair instructions that could result. Do not repair or replace any part of the dryer. 8. These items may expose live electrical circuits. Do not allow anyone to the weather or the elements, such as ...
User Guide
Page 6
...27. No other applicable regulations and requirements. 31. Check the fill hose connections on a regular basis to whether the dryer is properly grounded. GROUNDING INSTRUCTIONS This appliance must be exercised when installing, maintaining or operating the dryer...broken. 28. Do not bypass any parts are tight and not leaking. DO NOT modify the plug provided with the dryer. In case of change of electric...For the State of electric shock. Flexible gas connector must be conveyed with the appliance. SAVE THESE INSTRUCTIONS 6 Do not use the dryer if the power cord is frayed or ...
...27. No other applicable regulations and requirements. 31. Check the fill hose connections on a regular basis to whether the dryer is properly grounded. GROUNDING INSTRUCTIONS This appliance must be exercised when installing, maintaining or operating the dryer...broken. 28. Do not bypass any parts are tight and not leaking. DO NOT modify the plug provided with the dryer. In case of change of electric...For the State of electric shock. Flexible gas connector must be conveyed with the appliance. SAVE THESE INSTRUCTIONS 6 Do not use the dryer if the power cord is frayed or ...
User Guide
Page 8
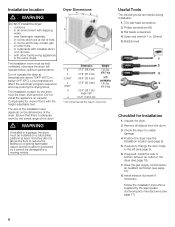
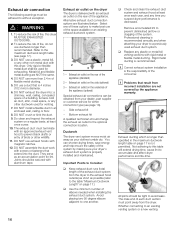
..., the dryer must be damaged by the appropriate ductwork parts manufacturers (see page 9). 6. Bubble level Checklist for visible damage. 4. If required, install the side or bottom exhaust air outlet on the dimensions of the door! Have the gas supply connected...an environment with lockable doors or in the same closet. Philips screwdriver (#2) 3. Check the dryer for Installation 1. Follow the installation instructions supplied by a moving vehicle Dryer Dimensions a b c (min)* c (max)* d e Dimension 27.0" (68.6 cm) 31.8" (81.0 cm) 36.9" (93.6 cm) 37.8" (...
..., the dryer must be damaged by the appropriate ductwork parts manufacturers (see page 9). 6. Bubble level Checklist for visible damage. 4. If required, install the side or bottom exhaust air outlet on the dimensions of the door! Have the gas supply connected...an environment with lockable doors or in the same closet. Philips screwdriver (#2) 3. Check the dryer for Installation 1. Follow the installation instructions supplied by a moving vehicle Dryer Dimensions a b c (min)* c (max)* d e Dimension 27.0" (68.6 cm) 31.8" (81.0 cm) 36.9" (93.6 cm) 37.8" (...
User Guide
Page 9
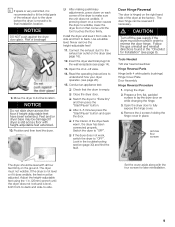
... preliminary adjustments, press down on a corner causes the dryer to wobble, lower the dryer foot on the dryer (see page 20). 15. Open the shut-off the gas supply if the dryer must be moved in place. q Close the dryer door. Switch the dryer to fully expose the hinge cover. 4. Set the ...have been extended. Position and then level the dryer. Tools Needed T20 star head screwdriver Hinge Reversal Parts Hinge (with all four feet firmly on each corner of the dryer feels warm, the dryer has been connected properly. Open the dryer door to "OFF". NOTICE DO NOT push against...
... preliminary adjustments, press down on a corner causes the dryer to wobble, lower the dryer foot on the dryer (see page 20). 15. Open the shut-off the gas supply if the dryer must be moved in place. q Close the dryer door. Switch the dryer to fully expose the hinge cover. 4. Set the ...have been extended. Position and then level the dryer. Tools Needed T20 star head screwdriver Hinge Reversal Parts Hinge (with all four feet firmly on each corner of the dryer feels warm, the dryer has been connected properly. Open the dryer door to "OFF". NOTICE DO NOT push against...
User Guide
Page 10
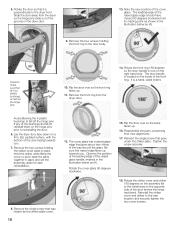
...around the glass. Flip the door over so the front ring faces up . 16. Reassemble the parts, preserving their new alignments. 17. The leading edge of the bushings do fall off , reinstall them... . 11. If any of the raised glass edge should have moved 90 degrees clockwise from the dryer door. 14. striker 8. Note the new position of the grooves in place. Rotate the striker ...is located on the right hand side. Reinstall the striker cover and striker to keep the parts together in the illustration below as to the new location and securely tighten the two cover...
...around the glass. Flip the door over so the front ring faces up . 16. Reassemble the parts, preserving their new alignments. 17. The leading edge of the bushings do fall off , reinstall them... . 11. If any of the raised glass edge should have moved 90 degrees clockwise from the dryer door. 14. striker 8. Note the new position of the grooves in place. Rotate the striker ...is located on the right hand side. Reinstall the striker cover and striker to keep the parts together in the illustration below as to the new location and securely tighten the two cover...
User Guide
Page 13
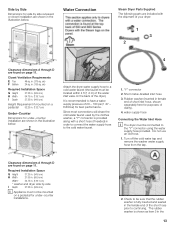
Water Connection Steam Dryer Parts Supplied The following parts are included with a short hose (if needed...11. Required Installation Space G Height 37.25 in. (94.6 cm) H Width 27.50 in. (69.9 cm) Width* 54.75 in. (139.1 cm) * washer and dryer side by side I Depth 37.25 in. (94.6 cm) Height Requirement if ...Dimensions for under-counter installation are shown in . (94.6 cm) i Appliance must not be located within 4 ft (1.2 m) of your dryer: 1 3 2 Clearance dimensions A through D are found on page 11. Closet Ventilation Requirements E Top 48 sq. cm) Required Installation Space...
Water Connection Steam Dryer Parts Supplied The following parts are included with a short hose (if needed...11. Required Installation Space G Height 37.25 in. (94.6 cm) H Width 27.50 in. (69.9 cm) Width* 54.75 in. (139.1 cm) * washer and dryer side by side I Depth 37.25 in. (94.6 cm) Height Requirement if ...Dimensions for under-counter installation are shown in . (94.6 cm) i Appliance must not be located within 4 ft (1.2 m) of your dryer: 1 3 2 Clearance dimensions A through D are found on page 11. Closet Ventilation Requirements E Top 48 sq. cm) Required Installation Space...
User Guide
Page 14
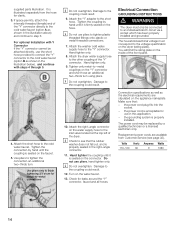
...use pliers, hand tighten only. Damage to the Y" connector. i Do not overtighten. Electrical Connection GROUNDING INSTRUCTIONS d WARNING The dryer must correspond to an individual branch circuit via a socket which has been properly installed and grounded. The household electrical voltage must only... the Y" connector to finish tightening 2/3's turn . the power cord plug fits into the socket. - supplied parts illustration. It is firmly seated on the dryer (rating plate). Tighten the connection by hand until it is seated on the appliance nameplate. Use pliers only...
...use pliers, hand tighten only. Damage to the Y" connector. i Do not overtighten. Electrical Connection GROUNDING INSTRUCTIONS d WARNING The dryer must correspond to an individual branch circuit via a socket which has been properly installed and grounded. The household electrical voltage must only... the Y" connector to finish tightening 2/3's turn . the power cord plug fits into the socket. - supplied parts illustration. It is firmly seated on the dryer (rating plate). Tighten the connection by hand until it is seated on the appliance nameplate. Use pliers only...
User Guide
Page 16
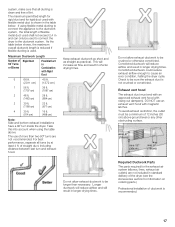
...system from your clothes tumble dry. Refer to avoid leaks. DO NOT use exhaust hoods with aluminum tape. They serve as your dealer, part supplier or customer service for venting. 7. Important Points to Consider: q Keep exhaust duct runs (total length of fire, this table will ...extend drying time, cause lint to this dryer MUST BE EXHAUSTED OUTDOORS. 2. Rigid metal ducting is the responsibility of flexible metal ducting. 5. i Problems that is decreased. All joints should be...
...system from your clothes tumble dry. Refer to avoid leaks. DO NOT use exhaust hoods with aluminum tape. They serve as your dealer, part supplier or customer service for venting. 7. Important Points to Consider: q Keep exhaust duct runs (total length of fire, this table will ...extend drying time, cause lint to this dryer MUST BE EXHAUSTED OUTDOORS. 2. Rigid metal ducting is the responsibility of flexible metal ducting. 5. i Problems that is decreased. All joints should be...
User Guide
Page 17
...not allow exhaust ductwork to be longer than two 90° turns are not included in Combination with swing out damper(s). Required Ductwork Parts The parts required for the exhaust air system (elbows, lines, exhaust air outlets) are not recommended. The use an exhaust vent hood with ...length for rigid duct and for information on ordering parts.) Professional installation of Rigid Duct 90° Turns or Elbows Flexible Duct in standard delivery of the dryer (see the Accessories section for rigid duct used to connect the dryer to the ductwork system, the total length of ...
...not allow exhaust ductwork to be longer than two 90° turns are not included in Combination with swing out damper(s). Required Ductwork Parts The parts required for the exhaust air system (elbows, lines, exhaust air outlets) are not recommended. The use an exhaust vent hood with ...length for rigid duct and for information on ordering parts.) Professional installation of Rigid Duct 90° Turns or Elbows Flexible Duct in standard delivery of the dryer (see the Accessories section for rigid duct used to connect the dryer to the ductwork system, the total length of ...
User Guide
Page 18
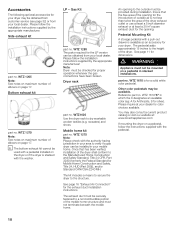
...! WTZ 1280 The parts required for the LP version can be installed in stacked installations. Note: Dryer must be provided during installation. sweaters) and shoes. WTZ 1275 Note: Please check with the authority having jurisdiction in your area to verify if a gas dryer can be obtained from...noncombustible portion of elbows on page 17. WTZ 1610 is available as an accessory for your dryer. Gas Kit part no . WTZ 1265 Note: See notes on maximum number of the dryer. Bottom exhaust kit part no . LP - Other color pedestals may also consult a current product catalog or visit ...
...! WTZ 1280 The parts required for the LP version can be installed in stacked installations. Note: Dryer must be provided during installation. sweaters) and shoes. WTZ 1275 Note: Please check with the authority having jurisdiction in your area to verify if a gas dryer can be obtained from...noncombustible portion of elbows on page 17. WTZ 1610 is available as an accessory for your dryer. Gas Kit part no . WTZ 1265 Note: See notes on maximum number of the dryer. Bottom exhaust kit part no . LP - Other color pedestals may also consult a current product catalog or visit ...
User Guide
Page 19
... shut-off , unplug the appliance) 4. Reference part no. Screw the heightĆadjustable feet of approximately 16.5 inches. WTZ 1600"X" in height of the dryer of the dryer into the housing to the stacked" gas dryer is NOT allowed. Stacking Kits d WARNING Use a flexible gas connection when installing a stacked dryer. This kit may be combined with adhesive...
... shut-off , unplug the appliance) 4. Reference part no. Screw the heightĆadjustable feet of approximately 16.5 inches. WTZ 1600"X" in height of the dryer of the dryer into the housing to the stacked" gas dryer is NOT allowed. Stacking Kits d WARNING Use a flexible gas connection when installing a stacked dryer. This kit may be combined with adhesive...
User Guide
Page 22
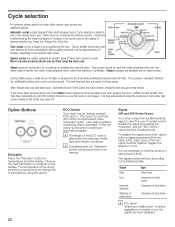
...moisture sensors. Garments that are custom designed for smoothing out wrinkles and reducing odors. i The length of dryness selected (e.g. Signal 300 and 500 Series Dryers Your dryer outputs an audible beeping signal to the following table. To disable the signal, press both option buttons (again pressing both at ...tones Sequence of long tones i The signal Warning of three to hold the buttons in part on the specific dryer model. Cycle selection is used with this option. 22 ECO Action Your dryer has an energy savings" ECO option. This option is based in after pressing them....
...moisture sensors. Garments that are custom designed for smoothing out wrinkles and reducing odors. i The length of dryness selected (e.g. Signal 300 and 500 Series Dryers Your dryer outputs an audible beeping signal to the following table. To disable the signal, press both option buttons (again pressing both at ...tones Sequence of long tones i The signal Warning of three to hold the buttons in part on the specific dryer model. Cycle selection is used with this option. 22 ECO Action Your dryer has an energy savings" ECO option. This option is based in after pressing them....
User Guide
Page 29
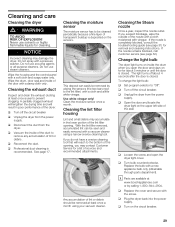
...drum when you suspect blockage, wipe the outside of the seal. q Turn off the circuit breaker q Unplug the dryer from the power supply. q Turn bulb counterclockwise. i Parts are available at www.boschappliances.com or by wiping the sensors (the two bars next to Off". Never use ... To change the light bulb: q Set program selector to the lint filter) with a vaccum cleaner using your vacuum cleaner. q Unplug the dryer from the dryer. q Professional duct cleaning is completely blocked, consult the troubleshooting guide (see page 32). Cleaning the Steam nozzle Once a year, inspect the ...
...drum when you suspect blockage, wipe the outside of the seal. q Turn off the circuit breaker q Unplug the dryer from the power supply. q Turn bulb counterclockwise. i Parts are available at www.boschappliances.com or by wiping the sensors (the two bars next to Off". Never use ... To change the light bulb: q Set program selector to the lint filter) with a vaccum cleaner using your vacuum cleaner. q Unplug the dryer from the dryer. q Professional duct cleaning is completely blocked, consult the troubleshooting guide (see page 32). Cleaning the Steam nozzle Once a year, inspect the ...
User Guide
Page 30
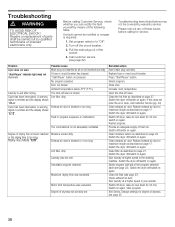
... exhaust air duct to maximum length as described on page 27. Reduce exhaust air duct to maximum length as described on again. Switch the dryer off valve is required: 1. Start program. 800 Series, Change settings for 30 min. Replace fuse or reset ...circuit breaker. Select program. If this does not clear the error code, call Customer Service (pg. 32). Clean moisture sensor as described on again. Repairs or replacement of parts...
... exhaust air duct to maximum length as described on page 27. Reduce exhaust air duct to maximum length as described on again. Switch the dryer off valve is required: 1. Start program. 800 Series, Change settings for 30 min. Replace fuse or reset ...circuit breaker. Select program. If this does not clear the error code, call Customer Service (pg. 32). Clean moisture sensor as described on again. Repairs or replacement of parts...
User Guide
Page 33
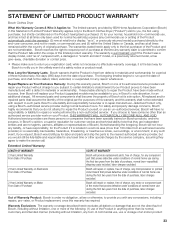
...of purchase, and shall not be available to such parts. Warranty Exclusions: The warranty coverage described herein excludes all times remained within the country of original purchase. STATEMENT OF LIMITED PRODUCT WARRANTY Bosch Clothes Dryer What this Warranty Covers & Who it Applies to...damaged or scratch and dent" model, or a previously returned model, a free give-away, charitable donation or contest prize. Bosch will provide replacement parts, free of charge, any microprocessor or printed circuit board that have been made without limitation, any such event, if you (...
...of purchase, and shall not be available to such parts. Warranty Exclusions: The warranty coverage described herein excludes all times remained within the country of original purchase. STATEMENT OF LIMITED PRODUCT WARRANTY Bosch Clothes Dryer What this Warranty Covers & Who it Applies to...damaged or scratch and dent" model, or a previously returned model, a free give-away, charitable donation or contest prize. Bosch will provide replacement parts, free of charge, any microprocessor or printed circuit board that have been made without limitation, any such event, if you (...

User Guide
Page 34
...wear and tear, spills of installation problems (you are scratches, nicks, minor dents, and cosmetic damages on external surfaces and exposed parts; SOME STATES DO NOT ALLOW THE EXCLUSION OR LIMITATION OF INCIDENTAL OR CONSEQUENTIAL DAMAGES, AND SOME STATES DO NOT ALLOW LIMITATIONS ON... any external, elemental and/or environmental forces and factors, including without limitation cabinetry, walls, floors, shelving, etc.); In no event shall Bosch have been altered, defaced, or removed; Products on , in writing by an officer of BSH. service visits to surrounding property, including ...
...wear and tear, spills of installation problems (you are scratches, nicks, minor dents, and cosmetic damages on external surfaces and exposed parts; SOME STATES DO NOT ALLOW THE EXCLUSION OR LIMITATION OF INCIDENTAL OR CONSEQUENTIAL DAMAGES, AND SOME STATES DO NOT ALLOW LIMITATIONS ON... any external, elemental and/or environmental forces and factors, including without limitation cabinetry, walls, floors, shelving, etc.); In no event shall Bosch have been altered, defaced, or removed; Products on , in writing by an officer of BSH. service visits to surrounding property, including ...


