
User Guide
Page 2
... This option gives you one -piece dryer drum with a backshield full of holes to properly distribute air over heat, it easier to ensure precise drying results for easy access. Only Bosch Vision can be performed by up to reduce energy usage by a qualified installer, service agency or the gas supplier. 2 making it is slightly extended...
... This option gives you one -piece dryer drum with a backshield full of holes to properly distribute air over heat, it easier to ensure precise drying results for easy access. Only Bosch Vision can be performed by up to reduce energy usage by a qualified installer, service agency or the gas supplier. 2 making it is slightly extended...
User Guide
Page 3
... 6 INSTALLATION INSTRUCTIONS 7 Introduction 7 Information concerning waste disposal 7 Before installing the dryer 7 Checklist for Installation 8 Installation Location 8 Dryer Dimensions 8 Door Hinge Reversal 9 Installation Types 11 Electrical connection 14 Gas connection 15 Exhaust air connection 16 Accessories 18 Preparing to transport the dryer ć...LCD Menu 24 Operation 26 Using the dryer 26 Cleaning the lint filter 27 Using the dryer rack (Option 28 Cleaning and care 29 Cleaning the dryer 29 Cleaning the exhaust duct 29 Cleaning...
... 6 INSTALLATION INSTRUCTIONS 7 Introduction 7 Information concerning waste disposal 7 Before installing the dryer 7 Checklist for Installation 8 Installation Location 8 Dryer Dimensions 8 Door Hinge Reversal 9 Installation Types 11 Electrical connection 14 Gas connection 15 Exhaust air connection 16 Accessories 18 Preparing to transport the dryer ć...LCD Menu 24 Operation 26 Using the dryer 26 Cleaning the lint filter 27 Using the dryer rack (Option 28 Cleaning and care 29 Cleaning the dryer 29 Cleaning the exhaust duct 29 Cleaning...
User Guide
Page 4
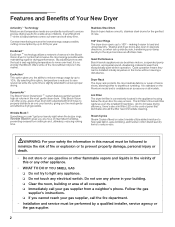
A distinctive feature of your household. Bosch dryers offer the following drying to assist you have any questions, especially concerning installation of 10 minutes) - Large port hole (16"/406 mm), and door interlock with the dryer. This indicates that minor or moderate injuries .... I. An easy operation philosophy, a variety of this warning. Sensor-controlled auto cycles - Timed cycles 300 and 500 Series Dryer: 20, 40 and 60 minute cycles 800 Series Dryer: 10 to important information. 4 NOTICE NOTICE - This indicates that death or serious injuries may occur as...
A distinctive feature of your household. Bosch dryers offer the following drying to assist you have any questions, especially concerning installation of 10 minutes) - Large port hole (16"/406 mm), and door interlock with the dryer. This indicates that minor or moderate injuries .... I. An easy operation philosophy, a variety of this warning. Sensor-controlled auto cycles - Timed cycles 300 and 500 Series Dryer: 20, 40 and 60 minute cycles 800 Series Dryer: 10 to important information. 4 NOTICE NOTICE - This indicates that death or serious injuries may occur as...
User Guide
Page 5
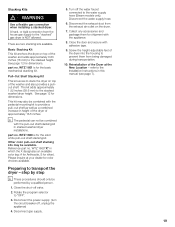
Bosch dryers are instructed in safe practices by qualified persons. 5. When children become old enough to be stored on or in the dryer or on or in the appliance at all times. Do not allow children's toys, or other appliance. Do not tamper with ... the exhaust opening and adjacent surrounding areas free from the electrical supply before attempting any time; Use common sense and exercise caution when installing, maintaining and operating this or any service unless specifically recommended in the userĆmaintenance instructions or in published user repair instructions that...
Bosch dryers are instructed in safe practices by qualified persons. 5. When children become old enough to be stored on or in the dryer or on or in the appliance at all times. Do not allow children's toys, or other appliance. Do not tamper with ... the exhaust opening and adjacent surrounding areas free from the electrical supply before attempting any time; Use common sense and exercise caution when installing, maintaining and operating this or any service unless specifically recommended in the userĆmaintenance instructions or in published user repair instructions that...
User Guide
Page 6
...bypass any problems or conditions that all local regulations and/or other fuelĆburning appliances shall be a T" handle gas cock. 3. Failure to install, maintain and/or operate the dryer according to cause standing water around or under the appliance. 33. Make sure that you do not let spills ...cigarette lighters can result in doubt as the dryer. 34. Do not use . 35. In case of change of Massachusetts InĆ stallations: 1. Plastic or nonĆmetal flexible duct is loose. 27. DO NOT modify the plug provided with the dryer. C Follow the Safety Information provided in ...
...bypass any problems or conditions that all local regulations and/or other fuelĆburning appliances shall be a T" handle gas cock. 3. Failure to install, maintain and/or operate the dryer according to cause standing water around or under the appliance. 33. Make sure that you do not let spills ...cigarette lighters can result in doubt as the dryer. 34. Do not use . 35. In case of change of Massachusetts InĆ stallations: 1. Plastic or nonĆmetal flexible duct is loose. 27. DO NOT modify the plug provided with the dryer. C Follow the Safety Information provided in ...

User Guide
Page 7
... Municipal codes and/or local codes. - Check the dryer for natural gas. To reduce the risk of fire. - Do not install a clothes dryer with the National Fuel Gas Code, ANSI Z223.1/NFPA 54 or the Canadian Natural Gas and Propane Installation Code CAN/CSAĆB149.1 Note: This gas dryer has been UL and C-UL listed for safe operation...
... Municipal codes and/or local codes. - Check the dryer for natural gas. To reduce the risk of fire. - Do not install a clothes dryer with the National Fuel Gas Code, ANSI Z223.1/NFPA 54 or the Canadian Natural Gas and Propane Installation Code CAN/CSAĆB149.1 Note: This gas dryer has been UL and C-UL listed for safe operation...
User Guide
Page 8
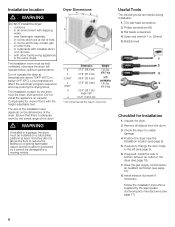
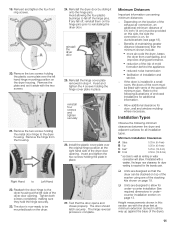
...;C) or below optimum performance. Bubble level Checklist for the dryer must be installed on the dryer (see page 9). 6. Remove all the way in . (25mm) 5. Check the dryer for visible damage. 4. Position the dryer near flammable materials, - Have the gas supply connected by a moving vehicle Dryer Dimensions a b c (min)* c (max)* d e Dimension 27.0" (68.6 cm) 31.8" (81.0 cm) 36.9" (93.6 cm...
...;C) or below optimum performance. Bubble level Checklist for the dryer must be installed on the dryer (see page 9). 6. Remove all the way in . (25mm) 5. Check the dryer for visible damage. 4. Position the dryer near flammable materials, - Have the gas supply connected by a moving vehicle Dryer Dimensions a b c (min)* c (max)* d e Dimension 27.0" (68.6 cm) 31.8" (81.0 cm) 36.9" (93.6 cm...
User Guide
Page 9
...slid across the floor if heightĆadjustable feet have been extended. Follow the gas uninstall and reinstall directions found in order to back. If pressing down on the dryer (see page 8). Install the dryer and level it does wobble, the feet must be adjusted. Tools Needed T20 ...star head screwdriver Hinge Reversal Parts Hinge (with the four screws for Installation" (see page 16). 12. Feet and/or dryer base may be reversed if ...
...slid across the floor if heightĆadjustable feet have been extended. Follow the gas uninstall and reinstall directions found in order to back. If pressing down on the dryer (see page 8). Install the dryer and level it does wobble, the feet must be adjusted. Tools Needed T20 ...star head screwdriver Hinge Reversal Parts Hinge (with the four screws for Installation" (see page 16). 12. Feet and/or dryer base may be reversed if ...
User Guide
Page 10
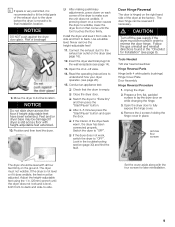
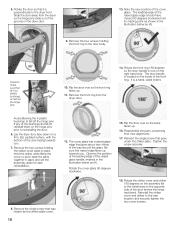
...over so the back faces up. 16. Avoid allowing the 4 plastic bushings to the new location and securely tighten the two cover screws. Lay the dryer door face down on a firm, flat, padded surface, with the bottom of the cover glass. Remove the two screws holding the front ring to keep... of the raised glass edge should have moved 90 degrees clockwise from the dryer door. 14. striker 8. Reinsert the single screw that was hidden by the striker plate cover. 10 12. The door handle is perpendicular to the install area on the inside of the door (where the hinge had been). ...
...over so the back faces up. 16. Avoid allowing the 4 plastic bushings to the new location and securely tighten the two cover screws. Lay the dryer door face down on a firm, flat, padded surface, with the bottom of the cover glass. Remove the two screws holding the front ring to keep... of the raised glass edge should have moved 90 degrees clockwise from the dryer door. 14. striker 8. Reinsert the single screw that was hidden by the striker plate cover. 10 12. The door handle is perpendicular to the install area on the inside of the door (where the hinge had been). ...
User Guide
Page 11
... the two screws holding the hinge cover plate in step 4. The hinge reversal process is required for dryer venting is complete. Refer to the dryer housing at the right hand side of the dryer). 11 Minimum Installation Clearances A Sides B Top C Rear* D Front 0.25 in. (6.4 mm) 0.25 in. (6.4 mm) 5....25 in. (13.4 cm) 0.50 in place. 27. If installed with vents of the stacking kits shown on the dryer housing. q Units are designed so that the door opens and closes properly. Height measurements shown in this side, the side the connection...
... the two screws holding the hinge cover plate in step 4. The hinge reversal process is required for dryer venting is complete. Refer to the dryer housing at the right hand side of the dryer). 11 Minimum Installation Clearances A Sides B Top C Rear* D Front 0.25 in. (6.4 mm) 0.25 in. (6.4 mm) 5....25 in. (13.4 cm) 0.50 in place. 27. If installed with vents of the stacking kits shown on the dryer housing. q Units are designed so that the door opens and closes properly. Height measurements shown in this side, the side the connection...
User Guide
Page 12
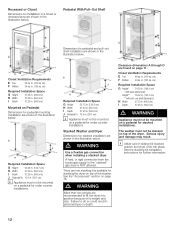
...24 sq. J Required Installation Space G Height 52.25 in. (132.7 cm) H Width 27.50 in. (69.9 cm) I Depth 37.25 in. (94.6 cm) Mounted on a pedestal for under counter installations. See the Accessories" section on a pedestal for stacked installation are two stacking kits available... result. in personal injury or death. Failure to the stacked" gas dryer is NOT allowed. d WARNING Use a flexible gas connection when installing a stacked dryer. in. (310 sq. A hard, or rigid connection from the house gas supply to do so could result in . (155 sq. Closet ...
...24 sq. J Required Installation Space G Height 52.25 in. (132.7 cm) H Width 27.50 in. (69.9 cm) I Depth 37.25 in. (94.6 cm) Mounted on a pedestal for under counter installations. See the Accessories" section on a pedestal for stacked installation are two stacking kits available... result. in personal injury or death. Failure to the stacked" gas dryer is NOT allowed. d WARNING Use a flexible gas connection when installing a stacked dryer. in. (310 sq. A hard, or rigid connection from the house gas supply to do so could result in . (155 sq. Closet ...
User Guide
Page 13
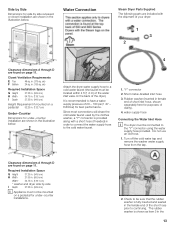
... 24 sq. Short metal-braided inlet hose 3. water supply hose Connecting the Water Inlet Hose i The dryer must be mounted on a pedestal for under -counter installation are shown in the illustration below . cm) Required Installation Space G Height 37.25 in. (94.6 cm) H Width 54.75 in. (139.1 cm)... best performance. Do not use an old hose. 1. Required Installation Space G Height 37.25 in. (94.6 cm) H Width 27.50 in. (69.9 cm) Width* 54.75 in. (139.1 cm) * washer and dryer side by side recessed or closet installation are included with a short hose (if needed) in order...
... 24 sq. Short metal-braided inlet hose 3. water supply hose Connecting the Water Inlet Hose i The dryer must be mounted on a pedestal for under -counter installation are shown in the illustration below . cm) Required Installation Space G Height 37.25 in. (94.6 cm) H Width 54.75 in. (139.1 cm)... best performance. Do not use an old hose. 1. Required Installation Space G Height 37.25 in. (94.6 cm) H Width 27.50 in. (69.9 cm) Width* 54.75 in. (139.1 cm) * washer and dryer side by side recessed or closet installation are included with a short hose (if needed) in order...
User Guide
Page 14
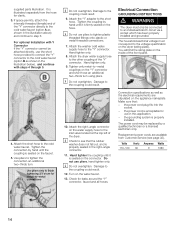
... of the Y" connector directly to the cold water faucet (option A as shown in the illustration above) and continue to step 6 For optional Installation with Y Connector If the Y" connector cannot be attached directly, use in this application. - Attach the right-angle connector on the faucet. 5....nameplate. Damage to an individual branch circuit via a socket which has been properly installed and grounded. Attach the washer cold water supply hose to the other coupling of the front panel. Attach the dryer water supply hose to the Y" connector. Tighten only metal-to -metal connections i...
... of the Y" connector directly to the cold water faucet (option A as shown in the illustration above) and continue to step 6 For optional Installation with Y Connector If the Y" connector cannot be attached directly, use in this application. - Attach the right-angle connector on the faucet. 5....nameplate. Damage to an individual branch circuit via a socket which has been properly installed and grounded. Attach the washer cold water supply hose to the other coupling of the front panel. Attach the dryer water supply hose to the Y" connector. Tighten only metal-to -metal connections i...
User Guide
Page 15
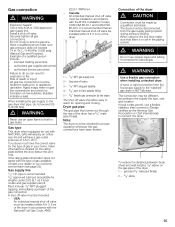
...is recommended. 3le/n8"gtahpspuronvdeedr tubing is located on 1 ć gas pipe (3/8" male pipe thread) 2 ć 3/8" elbow 15 Apply soapy water to the gas dryer inlet pipe, do so can result in accordance with the B149, Installation Codes, CAN/CSA B149.1 and CAN/CSA B149.2. USA: An ...individual manual shutĆoff valve. Securely tighten all gas connections. Have a qualified person make sure that ...
...is recommended. 3le/n8"gtahpspuronvdeedr tubing is located on 1 ć gas pipe (3/8" male pipe thread) 2 ć 3/8" elbow 15 Apply soapy water to the gas dryer inlet pipe, do so can result in accordance with the B149, Installation Codes, CAN/CSA B149.1 and CAN/CSA B149.2. USA: An ...individual manual shutĆoff valve. Securely tighten all gas connections. Have a qualified person make sure that ...
User Guide
Page 16
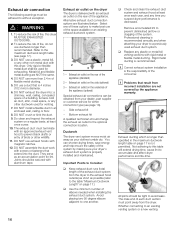
...outlet on the rear of the system. DO NOT crush or kink the duct. 9. Exhaust air outlet on the dryer The dryer is properly installed and maintained. Side exhaust kit - Remove accumulated lint to without exception. All joints should be adhered to prevent diminished...Problems that is recommended. Not adhering to this dryer. DO NOT install a flexible duct in diameter. 6. q Replace any other wildlife. 11. The exhaust duct must point away from incorrect installation are not covered by making sure your dryer to the optional connection location. Rigid metal ducting...
...outlet on the rear of the system. DO NOT crush or kink the duct. 9. Exhaust air outlet on the dryer The dryer is properly installed and maintained. Side exhaust kit - Remove accumulated lint to without exception. All joints should be adhered to prevent diminished...Problems that is recommended. Not adhering to this dryer. DO NOT install a flexible duct in diameter. 6. q Replace any other wildlife. 11. The exhaust duct must point away from incorrect installation are not covered by making sure your dryer to the optional connection location. Rigid metal ducting...
User Guide
Page 17
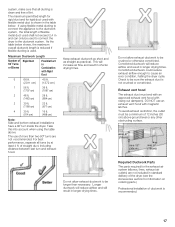
... table below shows, the maximum overall ductwork length is reduced if flexible ducting is used with magnetic latches. DO NOT use of the dryer (see the Accessories section for the exhaust air system (elbows, lines, exhaust air outlets) are not recommended. For best performance, separate...(s). Check to be sure the exhaust duct is recommended. 17 Required Ductwork Parts The parts required for information on ordering parts.) Professional installation of Rigid Duct 90° Turns or Elbows Flexible Duct in shorter drying times. Do not allow exhaust ductwork to cause an error...
... table below shows, the maximum overall ductwork length is reduced if flexible ducting is used with magnetic latches. DO NOT use of the dryer (see the Accessories section for the exhaust air system (elbows, lines, exhaust air outlets) are not recommended. For best performance, separate...(s). Check to be sure the exhaust duct is recommended. 17 Required Ductwork Parts The parts required for information on ordering parts.) Professional installation of Rigid Duct 90° Turns or Elbows Flexible Duct in shorter drying times. Do not allow exhaust ductwork to cause an error...
User Guide
Page 18
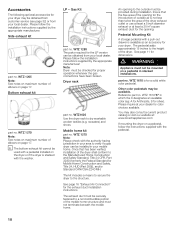
... the appropriate manufacturer. d WARNING Appliance must not terminate beneath the mobile home. Other color pedestals may be provided during installation. The pedestal adds approximately 15 inches to verify if a gas dryer can be checked for silver). Dryer rack part no . Please inquire at least a 25 in2 square exhaust duct for a solid white color pedestal...
... the appropriate manufacturer. d WARNING Appliance must not terminate beneath the mobile home. Other color pedestals may be provided during installation. The pedestal adds approximately 15 inches to verify if a gas dryer can be checked for silver). Dryer rack part no . Please inquire at least a 25 in2 square exhaust duct for a solid white color pedestal...
User Guide
Page 19
... basic mechanical stacking kit. Disconnect the exhaust duct from the exhaust air outlet on the dryer. 7. Stacking Kits d WARNING Use a flexible gas connection when installing a stacked dryer. Preparing to provide a pull-out shelf as well as a combined increase in stacked washer/dryer installations. WTZ 1600 is for silver). Rotate the program selector to the stacked washer...
... basic mechanical stacking kit. Disconnect the exhaust duct from the exhaust air outlet on the dryer. 7. Stacking Kits d WARNING Use a flexible gas connection when installing a stacked dryer. Preparing to provide a pull-out shelf as well as a combined increase in stacked washer/dryer installations. WTZ 1600 is for silver). Rotate the program selector to the stacked washer...
User Guide
Page 20
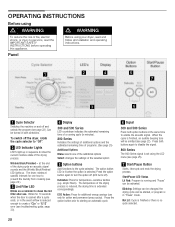
..., the drying time is selected. Press both directions. Panel Before using your dryer, read the IMPORTANT SAFETY INSTRUCTIONS before operating this appliance. Can be started, ... 800 Series signal is no cycle selected. 20 OPERATING INSTRUCTIONS Before using d WARNING d WARNING To reduce the risk of fire, electric shock, or injury to persons, read and follow all installation and operating instructions. A... the laundry from creasing (see troubleshooting guide, page 30). D Display 300 and 500 Series LED countdown indicates the estimated remaining time of programs. (See page 25...
..., the drying time is selected. Press both directions. Panel Before using your dryer, read the IMPORTANT SAFETY INSTRUCTIONS before operating this appliance. Can be started, ... 800 Series signal is no cycle selected. 20 OPERATING INSTRUCTIONS Before using d WARNING d WARNING To reduce the risk of fire, electric shock, or injury to persons, read and follow all installation and operating instructions. A... the laundry from creasing (see troubleshooting guide, page 30). D Display 300 and 500 Series LED countdown indicates the estimated remaining time of programs. (See page 25...
User Guide
Page 31
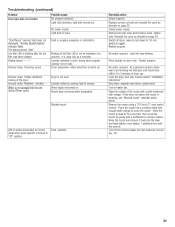
... cover and if bulb is loose. Start/Pause" indicator light does not illuminate. Wrinkle Block/Finished" indicator lights. Turn off dryer, leave to remove residue. Troubleshooting (continued) Problem Drum light does not function. Possible cause No program selected. Laundry detected in program... outside of a problem. Blinking of lint filter LED is turned to spraying, see user manual section Installation Instructons" Stop dryer, separate load items, restart dryer. Light will decrease and should stop blinking. Remove the nozzle using a 7/16 inch (11 mm) socket wrench.
... cover and if bulb is loose. Start/Pause" indicator light does not illuminate. Wrinkle Block/Finished" indicator lights. Turn off dryer, leave to remove residue. Troubleshooting (continued) Problem Drum light does not function. Possible cause No program selected. Laundry detected in program... outside of a problem. Blinking of lint filter LED is turned to spraying, see user manual section Installation Instructons" Stop dryer, separate load items, restart dryer. Light will decrease and should stop blinking. Remove the nozzle using a 7/16 inch (11 mm) socket wrench.
