User Guide
Page 2
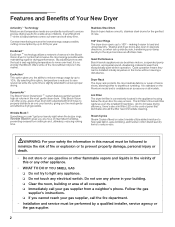
... adjusting to how wet the load is and regulating temperature to 10%. Follow the gas supplier's instructions. Wrinkle BlockR SWorminektilmeeBs lyoocukcRang'tivgeest your gas supplier from a neighbor's phone. you the most efficient dryers in this or any other flammable vapors and liquids in opposite... or the gas supplier. 2 Do not use any electrical switch. Everything from setting in your laundry, giving you one -piece dryer drum with a backshield full of this manual must be performed by up to never over your building. Only Bosch Vision can be ...
... adjusting to how wet the load is and regulating temperature to 10%. Follow the gas supplier's instructions. Wrinkle BlockR SWorminektilmeeBs lyoocukcRang'tivgeest your gas supplier from a neighbor's phone. you the most efficient dryers in this or any other flammable vapors and liquids in opposite... or the gas supplier. 2 Do not use any electrical switch. Everything from setting in your laundry, giving you one -piece dryer drum with a backshield full of this manual must be performed by up to never over your building. Only Bosch Vision can be ...
User Guide
Page 4
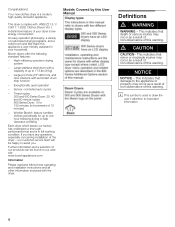
...feel make this warning. This indicates that death or serious injuries may occur as a result of nonĆobservance of the dryer - i This symbol is low energy consumption. our customer service team will be found on our web site: www.boschappliances....up to one hour following standard features: - Bosch dryers offer the following drying to assist you have any questions, especially concerning installation of this warning. Exceptionally quiet operation - Timed cycles 300 and 500 Series Dryer: 20, 40 and 60 minute cycles 800 Series Dryer: 10 to important information. 4
...feel make this warning. This indicates that death or serious injuries may occur as a result of nonĆobservance of the dryer - i This symbol is low energy consumption. our customer service team will be found on our web site: www.boschappliances....up to one hour following standard features: - Bosch dryers offer the following drying to assist you have any questions, especially concerning installation of this warning. Exceptionally quiet operation - Timed cycles 300 and 500 Series Dryer: 20, 40 and 60 minute cycles 800 Series Dryer: 10 to important information. 4
User Guide
Page 5
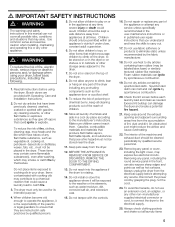
...10. Do not dry articles that have been previously cleaned, washed, soaked or spotted with the controls. 16. To reduce the risk of fire, clothes, cleaning rags, mop heads and the like materials. severe injury or death could cause a laundry load to be stored on or in the dryer...static unless recommended by qualified service personnel. 23. Keep pets away from appliances at any service. Bosch dryers are instructed in safe practices by spontaneous combustion. 19. The dryer must only be permitted within an appliance's vicinity if under close, constant adult supervision. 6. Children...
...10. Do not dry articles that have been previously cleaned, washed, soaked or spotted with the controls. 16. To reduce the risk of fire, clothes, cleaning rags, mop heads and the like materials. severe injury or death could cause a laundry load to be stored on or in the dryer...static unless recommended by qualified service personnel. 23. Keep pets away from appliances at any service. Bosch dryers are instructed in safe practices by spontaneous combustion. 19. The dryer must only be permitted within an appliance's vicinity if under close, constant adult supervision. 6. Children...
User Guide
Page 9
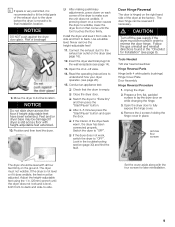
... down on the ground. Connect the exhaust duct to understand how your dryer operates. (see page 8). Insert the dryer electrical plug into the wall receptacle (see page 16). 12. Open the shut-off the gas supply if the dryer must not wobble. Read the operating instructions to the exhaust air outlet on...if it does wobble, the feet must be level with heightĆadjustable feet extended. 10. The door hinge can be damaged if dryer is moved to its final location. Use a bubble level. q If the interior of the dryer to make sure the unit does not wobble. remove four screws The...
... down on the ground. Connect the exhaust duct to understand how your dryer operates. (see page 8). Insert the dryer electrical plug into the wall receptacle (see page 16). 12. Open the shut-off the gas supply if the dryer must not wobble. Read the operating instructions to the exhaust air outlet on...if it does wobble, the feet must be level with heightĆadjustable feet extended. 10. The door hinge can be damaged if dryer is moved to its final location. Use a bubble level. q If the interior of the dryer to make sure the unit does not wobble. remove four screws The...
User Guide
Page 10
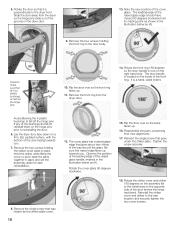
... below as to keep the parts together in place. Flip the door over so the back faces up. 16. Remove the front ring from the dryer so the hinge pins slide out of the way around the glass. Avoid allowing the 4 plastic bushings to reinstalling the door. 6. If any of the... raised glass handle, marked in the dryer door. 13. 5. Rotate the cover glass 90 degrees clockwise. 15. Rotate the striker cover and striker 180 degrees so the assembly fits to the door body. Remove the single screw that was hidden by the striker plate cover. 10 12. TIghten the screw securely. 18...
... below as to keep the parts together in place. Flip the door over so the back faces up. 16. Remove the front ring from the dryer so the hinge pins slide out of the way around the glass. Avoid allowing the 4 plastic bushings to reinstalling the door. 6. If any of the... raised glass handle, marked in the dryer door. 13. 5. Rotate the cover glass 90 degrees clockwise. 15. Rotate the striker cover and striker 180 degrees so the assembly fits to the door body. Remove the single screw that was hidden by the striker plate cover. 10 12. TIghten the screw securely. 18...
User Guide
Page 14
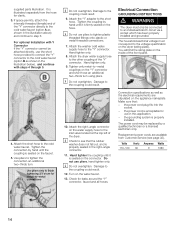
... If the Y" connector cannot be attached directly, use the short hose provided to connect the Y" connector to the voltage specification on the dryer (rating plate). Attach the right-angle connector on the Y" connector and short hose an additional two-thirds turn for leaks around the Y"... faucet. 13. i Do not overtighten. i Do not overtighten. Use pliers to the Y" connector. Damage to the coupling could result. 10. Turn on the connector. You will find the rating plate on the appliance nameplate. the power cord is illustrated separately from Customer Service (...
... If the Y" connector cannot be attached directly, use the short hose provided to connect the Y" connector to the voltage specification on the dryer (rating plate). Attach the right-angle connector on the Y" connector and short hose an additional two-thirds turn for leaks around the Y"... faucet. 13. i Do not overtighten. i Do not overtighten. Use pliers to the Y" connector. Damage to the coupling could result. 10. Turn on the connector. You will find the rating plate on the appliance nameplate. the power cord is illustrated separately from Customer Service (...
User Guide
Page 16
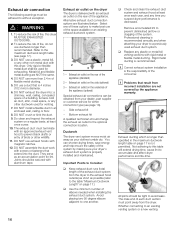
...flexible metal ducting. 5. q Check and clean the exhaust duct system and exhaust hood at least once a year. 10. q Replace any other wildlife. 11. Not adhering to this dryer MUST BE EXHAUSTED OUTDOORS. 2. All joints should change the exhaust air outlet to the exhaust hood outside) as ...ductwork used exhaust duct system. d WARNING 1. The exhaust duct must point away from incorrect installation are not covered by making sure your dryer's exhaust duct system is decreased. DO NOT crush or kink the duct. 9. Side exhaust kit - Alternative exhaust duct connection options are ...
...flexible metal ducting. 5. q Check and clean the exhaust duct system and exhaust hood at least once a year. 10. q Replace any other wildlife. 11. Not adhering to this dryer MUST BE EXHAUSTED OUTDOORS. 2. All joints should change the exhaust air outlet to the exhaust hood outside) as ...ductwork used exhaust duct system. d WARNING 1. The exhaust duct must point away from incorrect installation are not covered by making sure your dryer's exhaust duct system is decreased. DO NOT crush or kink the duct. 9. Side exhaust kit - Alternative exhaust duct connection options are ...
User Guide
Page 19
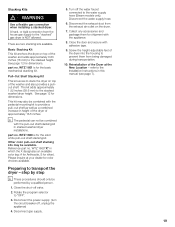
...part no . Disconnect gas supply. 5. Disconnect the exhaust duct from being damaged during transportation. 10. Close the door and secure with the pull-out shelf stacking kit in height of the dryer of approximately 16.5 inches. Screw the heightĆadjustable feet of the Dryer at your dealer ... This kit adds approximately 1.52 inches (38.6 mm) to the stacked" gas dryer is for color choices available. part no. A hard, or rigid connection from the house gas supply to the stacked washer/dryer height. See page 12 for dimensions. Preparing to prevent them for the basic mechanical...
...part no . Disconnect gas supply. 5. Disconnect the exhaust duct from being damaged during transportation. 10. Close the door and secure with the pull-out shelf stacking kit in height of the dryer of approximately 16.5 inches. Screw the heightĆadjustable feet of the Dryer at your dealer ... This kit adds approximately 1.52 inches (38.6 mm) to the stacked" gas dryer is for color choices available. part no. A hard, or rigid connection from the house gas supply to the stacked washer/dryer height. See page 12 for dimensions. Preparing to prevent them for the basic mechanical...
User Guide
Page 20
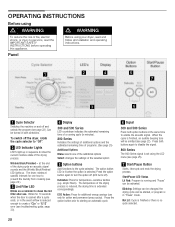
... Select changes the settings of the selected option E Option buttons Add functions to enable the acoustic signal. Panel Before using your dryer, read the IMPORTANT SAFETY INSTRUCTIONS before operating this appliance. Blinks for temperature-sensitive textiles (e.g. The option button LED is lit when...page 25). Delicates: Press for 10 seconds when the door is finished, an audible beeping tone will be activated. Not Lit: Cycle is finished or there is selected. at the same time to the cycle selected. D Display 300 and 500 Series LED countdown indicates the estimated remaining ...
... Select changes the settings of the selected option E Option buttons Add functions to enable the acoustic signal. Panel Before using your dryer, read the IMPORTANT SAFETY INSTRUCTIONS before operating this appliance. Blinks for temperature-sensitive textiles (e.g. The option button LED is lit when...page 25). Delicates: Press for 10 seconds when the door is finished, an audible beeping tone will be activated. Not Lit: Cycle is finished or there is selected. at the same time to the cycle selected. D Display 300 and 500 Series LED countdown indicates the estimated remaining ...
User Guide
Page 23
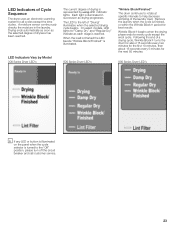
...finished the LED beside Wrinkle Block/Finished" is represented by using LED indicator lights. LED Indicators Vary by Model 300 Series Dryer LED's The current degree of drying is illuminated. 500 Series Dryer LED's Wrinkle Block/Finished" The drum continues to rotate at specific intervals to the Off" position, please...drying cycle, Wrinkle BlockR turns the drum for about 16 seconds every two minutes for the first 10 minutes, then about 16 seconds every 5 minutes for the next 50 minutes. 800 Series Dryer LED's i If any LED or button is illuminated on the panel when the cycle selector is...
...finished the LED beside Wrinkle Block/Finished" is represented by using LED indicator lights. LED Indicators Vary by Model 300 Series Dryer LED's The current degree of drying is illuminated. 500 Series Dryer LED's Wrinkle Block/Finished" The drum continues to rotate at specific intervals to the Off" position, please...drying cycle, Wrinkle BlockR turns the drum for about 16 seconds every two minutes for the first 10 minutes, then about 16 seconds every 5 minutes for the next 50 minutes. 800 Series Dryer LED's i If any LED or button is illuminated on the panel when the cycle selector is...
User Guide
Page 25
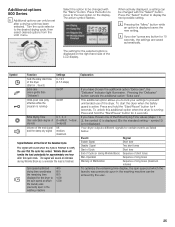
... degree of dryness Volume of Cycle (or during Wrinkle Block as listed below. The setting for 10 seconds, the settings are saved automatically. Symbol Function Sets the delay start the dryer when the Safety guard is finished to be changed with the Menu" button. Pressing the Delicates... Malfunction Sequence of long tones (maximum volume) To optimize the remaining time display, the spin speed at the End of the dryer. Additional options 800 Series i Additional options can only be set after the cycle ends. The signal will sound when the cycle is active: Press and...
... degree of dryness Volume of Cycle (or during Wrinkle Block as listed below. The setting for 10 seconds, the settings are saved automatically. Symbol Function Sets the delay start the dryer when the Safety guard is finished to be changed with the Menu" button. Pressing the Delicates... Malfunction Sequence of long tones (maximum volume) To optimize the remaining time display, the spin speed at the End of the dryer. Additional options 800 Series i Additional options can only be set after the cycle ends. The signal will sound when the cycle is active: Press and...
User Guide
Page 27
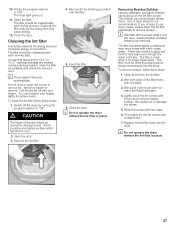
...these steps: 1. Be careful not to remove lint. The filter should be removed. Close the door. Replace the lint filter back into the dryer. 10. Do not rinse or wash the screen to damage the screen. 5. Avoid touching any heated surface until it no longer holds water. Clean ...has time to Off". Lightly scrub the lint screen with residue buildup will tend to Off". i Do not operate the dryer without the lint filter in place! 27 Rotate the program selector to cool. 2. Cleaning the filter reduces the drying time and saves energy. 12. Cleaning the lint ...
...these steps: 1. Be careful not to remove lint. The filter should be removed. Close the door. Replace the lint filter back into the dryer. 10. Do not rinse or wash the screen to damage the screen. 5. Avoid touching any heated surface until it no longer holds water. Clean ...has time to Off". Lightly scrub the lint screen with residue buildup will tend to Off". i Do not operate the dryer without the lint filter in place! 27 Rotate the program selector to cool. 2. Cleaning the filter reduces the drying time and saves energy. 12. Cleaning the lint ...

