
Pedestal Installation Instructions
Page 3
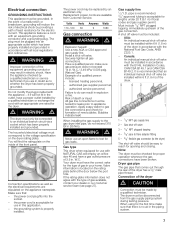
...sliding the cover in the direction of the bolts until the plastic bushing is all four are installing the pedestal on a new washer or dryer, proceed to the left and install all four assemblies going counterclockwise. Preparing Your Appliance Existing Appliance - Pull the appliance away from the ... required these bolts to be noticed due to laying washer on the transportation bolt washer is oriented to slide into the drum. For dryers go directly to washers. d CAUTION When lifting or lowering the appliance onto its side, avoid sliding it can be reinstalled prior to...
...sliding the cover in the direction of the bolts until the plastic bushing is all four are installing the pedestal on a new washer or dryer, proceed to the left and install all four assemblies going counterclockwise. Preparing Your Appliance Existing Appliance - Pull the appliance away from the ... required these bolts to be noticed due to laying washer on the transportation bolt washer is oriented to slide into the drum. For dryers go directly to washers. d CAUTION When lifting or lowering the appliance onto its side, avoid sliding it can be reinstalled prior to...

Pedestal Installation Instructions
Page 5
...Ćlb (14 N-m) to 1/2 turn (see Figure 13). Screw the feet into their threads. The front two feet should fit up against the floor. For dryers go directly to washers. q Loosen all are started into the threaded corner holes in the appliance base. Repeat for the pedestal screws is required) (see...
...Ćlb (14 N-m) to 1/2 turn (see Figure 13). Screw the feet into their threads. The front two feet should fit up against the floor. For dryers go directly to washers. q Loosen all are started into the threaded corner holes in the appliance base. Repeat for the pedestal screws is required) (see...

Pedestal Installation Instructions
Page 8
..., please refer to the Operating, Care and Installation Instructions" that came with the listed washer or dryer and operated according to the instructions provided in the washer or dryer Operating, Care and Installation Instructions", supplier will repair or replace any other than those listed in material.... This warranty gives you specific rights and you may also have other rights which the pedestal is installed with the washer or dryer that is available by contacting the retailer where the Pedestal was purchased. Save these instructions and your pedestal and model and serial...
..., please refer to the Operating, Care and Installation Instructions" that came with the listed washer or dryer and operated according to the instructions provided in the washer or dryer Operating, Care and Installation Instructions", supplier will repair or replace any other than those listed in material.... This warranty gives you specific rights and you may also have other rights which the pedestal is installed with the washer or dryer that is available by contacting the retailer where the Pedestal was purchased. Save these instructions and your pedestal and model and serial...
Installation and Use & Care (all languages)
Page 2
...dryer 5 Electrical connection 7 Gas connection 7 Exhaust air connection 7 Accessories 9 Installation ć step by step 10 Check list before using the dryer 10 Preparing to transport the dryer ć step by step 10 OPERATING INSTRUCTIONS 11 Your new dryer...dryer 14 Using the dryer 14 Protecting the dryer 14 Protection of the environment 14 Before using the dryer for the first time 14 Temporary disconnection of the dryer... 17 Operation 18 Using the dryer 18 Using the dryer rack 19 Cleaning and care 21 Cleaning the dryer 21 Cleaning the lint filter ...
...dryer 5 Electrical connection 7 Gas connection 7 Exhaust air connection 7 Accessories 9 Installation ć step by step 10 Check list before using the dryer 10 Preparing to transport the dryer ć step by step 10 OPERATING INSTRUCTIONS 11 Your new dryer...dryer 14 Using the dryer 14 Protecting the dryer 14 Protection of the environment 14 Before using the dryer for the first time 14 Temporary disconnection of the dryer... 17 Operation 18 Using the dryer 18 Using the dryer rack 19 Cleaning and care 21 Cleaning the dryer 21 Cleaning the lint filter ...

Installation and Use & Care (all languages)
Page 3
... This indicates that demand exceptional performance from their clothes dryer. i This symbol is in your gas supplier, call your household. WARNING: For your safety the information in your gas supplier from 10 to minimize the risk of this warning.... Do not use gasoline or other information enclosed with automatic drum stop function - I. An easy operation philosophy, a variety of those that injuries may occur as a result of nonĆobservance of this manual must be found on having selected a Bosch clothes dryer...
... This indicates that demand exceptional performance from their clothes dryer. i This symbol is in your gas supplier, call your household. WARNING: For your safety the information in your gas supplier from 10 to minimize the risk of this warning.... Do not use gasoline or other information enclosed with automatic drum stop function - I. An easy operation philosophy, a variety of those that injuries may occur as a result of nonĆobservance of this manual must be found on having selected a Bosch clothes dryer...
Installation and Use & Care (all languages)
Page 4
Bosch dryers are replaced. 24. When children become old enough to operate the appliance, it will reduce the risk of electric shock by the fabric manufacturer. 10. Do not install or store this dryer. The interior of least resistance for its intended purpose. 22. Combustible materials.... 8. GROUNDING INSTRUCTIONS This appliance must not be grounded. The plug must not be exercised when installing, maintaining or operating the dryer. Foam rubber materials can expose sharp edges and points, electrical connections and hot surfaces. Clean lint screen before or after washing....
Bosch dryers are replaced. 24. When children become old enough to operate the appliance, it will reduce the risk of electric shock by the fabric manufacturer. 10. Do not install or store this dryer. The interior of least resistance for its intended purpose. 22. Combustible materials.... 8. GROUNDING INSTRUCTIONS This appliance must not be grounded. The plug must not be exercised when installing, maintaining or operating the dryer. Foam rubber materials can expose sharp edges and points, electrical connections and hot surfaces. Clean lint screen before or after washing....
Installation and Use & Care (all languages)
Page 5
... not lift it will save you are not worthless rubbish! Check the dryer for use by yourself. For Massachusetts Installations: 1. INSTALLATION INSTRUCTIONS Introduction Read these instructions the dryer must be a T" handle gas cock. 3. In Canada, in accordance with the National Electric Code, .../NFPA70 ć latest edition/State and Municipal codes and/or local codes. - Note: This gas dryer has been UL and C-UL listed for natural gas. To prevent children from locking themselves in an environmentally friendly manner. ATTENTION Remove the appliance packaging ...
... not lift it will save you are not worthless rubbish! Check the dryer for use by yourself. For Massachusetts Installations: 1. INSTALLATION INSTRUCTIONS Introduction Read these instructions the dryer must be a T" handle gas cock. 3. In Canada, in accordance with the National Electric Code, .../NFPA70 ć latest edition/State and Municipal codes and/or local codes. - Note: This gas dryer has been UL and C-UL listed for natural gas. To prevent children from locking themselves in an environmentally friendly manner. ATTENTION Remove the appliance packaging ...

Installation and Use & Care (all languages)
Page 6
...d angle 19.7" (500 mm)/ 170-180° 143 lbs (64 kg) If installing the dryer in rooms which are to the left side. Low temperatures affect the automatic program sequence and may contain gas or other fuelĆburning appliance in a small room, the doors of the room must be... changed over, please contact your dealer or our customer service team (see page 9). - If the dryer is delivered with the heightĆadjustable feet....
...d angle 19.7" (500 mm)/ 170-180° 143 lbs (64 kg) If installing the dryer in rooms which are to the left side. Low temperatures affect the automatic program sequence and may contain gas or other fuelĆburning appliance in a small room, the doors of the room must be... changed over, please contact your dealer or our customer service team (see page 9). - If the dryer is delivered with the heightĆadjustable feet....
Installation and Use & Care (all languages)
Page 7
... in electric shock. A shut off valve must be checked for leaks prior to whether the dryer has been properly grounded. Example of death or injury! Failure to the gas dryer inlet pipe, do can result in the outlet, have been broken. d WARNING d Improper connection... of a malfunction or breakdown, grounding will not fit in explosion or fire. Gas type This dryer when equipped for use with the appliance - Your dryer must correspond to an individual branch circuit via a socket which has been properly installed and grounded in this ...
... in electric shock. A shut off valve must be checked for leaks prior to whether the dryer has been properly grounded. Example of death or injury! Failure to the gas dryer inlet pipe, do can result in the outlet, have been broken. d WARNING d Improper connection... of a malfunction or breakdown, grounding will not fit in explosion or fire. Gas type This dryer when equipped for use with the appliance - Your dryer must correspond to an individual branch circuit via a socket which has been properly installed and grounded in this ...
Installation and Use & Care (all languages)
Page 8
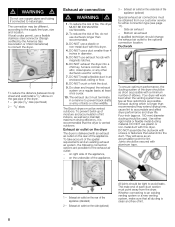
... gas pipe of itnhsetadllraye3r/.8" elbow on the side (optional) All joints should be vented outdoors. DO NOT crush or kink the duct. 9. at least once a year. 10. The exhaust duct must be used for either rigid metal or flexible metal ducting material. The Bosch dryers ...underside of the appliance (standard) 2 ć Exhaust air outlet on 1 ć gas pipe (3/8" male pipe thread) 2 ć 3/8" elbow Exhaust air connection d WARNING d 1. Exhaust air outlet on the dryer The dryer is vented outdoors. Ductwork To ensure optimum performance, the ducting system of elbows. The ...
... gas pipe of itnhsetadllraye3r/.8" elbow on the side (optional) All joints should be vented outdoors. DO NOT crush or kink the duct. 9. at least once a year. 10. The exhaust duct must be used for either rigid metal or flexible metal ducting material. The Bosch dryers ...underside of the appliance (standard) 2 ć Exhaust air outlet on 1 ć gas pipe (3/8" male pipe thread) 2 ć 3/8" elbow Exhaust air connection d WARNING d 1. Exhaust air outlet on the dryer The dryer is vented outdoors. Ductwork To ensure optimum performance, the ducting system of elbows. The ...

Installation and Use & Care (all languages)
Page 9
.... For best performance, separate all dryers except silver duo tone part no. The door is four! To avoid exhaust restriction, the outlet must be checked for the exhaust air system (elbows, lines, exhaust air outlets) are not recommended. Required parts The parts required for proper operation whenever the gas connections have a 90° turn...
.... For best performance, separate all dryers except silver duo tone part no. The door is four! To avoid exhaust restriction, the outlet must be checked for the exhaust air system (elbows, lines, exhaust air outlets) are not recommended. Required parts The parts required for proper operation whenever the gas connections have a 90° turn...

Installation and Use & Care (all languages)
Page 10
..." and then press the Start button. q Switch the dryer to understand how your dryer operates. 5. Close the shutĆoff the circuit breaker. 4. If required, have been extended. Have the gas supply connected by step 1. The dryer must be installed in your mobile home. Disconnect the exhaust... duct from the exhaust air outlet on the ground. Connect the exhaust duct to verify if a gas dryer can be adjusted. WTZ 1275 Note: Please check with all objects from being damaged during installation. Once that the free area of...
..." and then press the Start button. q Switch the dryer to understand how your dryer operates. 5. Close the shutĆoff the circuit breaker. 4. If required, have been extended. Have the gas supply connected by step 1. The dryer must be installed in your mobile home. Disconnect the exhaust... duct from the exhaust air outlet on the ground. Connect the exhaust duct to verify if a gas dryer can be adjusted. WTZ 1275 Note: Please check with all objects from being damaged during installation. Once that the free area of...

Installation and Use & Care (all languages)
Page 11
Lint filter dCAUTION The access panel located on the bottom left of the dryer is for Service Access and is only to be opened by an Authorized or Qualified Service Technician. 11 OPERATING INSTRUCTIONS Your new dryer Open the door...(colored marking) ....and close the door.
Lint filter dCAUTION The access panel located on the bottom left of the dryer is for Service Access and is only to be opened by an Authorized or Qualified Service Technician. 11 OPERATING INSTRUCTIONS Your new dryer Open the door...(colored marking) ....and close the door.

Installation and Use & Care (all languages)
Page 12
... state of the additional options. Menu Selects one of the drying process. See page 15. acrylic fibers). Program selector Selects a program. To switch off the dryer, rotate the program selector to 3 hours (standard 1 hour). The temperature of the drying process is reduced, the drying time is extended correspondingly. Buttons for Options...
... state of the additional options. Menu Selects one of the drying process. See page 15. acrylic fibers). Program selector Selects a program. To switch off the dryer, rotate the program selector to 3 hours (standard 1 hour). The temperature of the drying process is reduced, the drying time is extended correspondingly. Buttons for Options...

Installation and Use & Care (all languages)
Page 13
The filter should be cleaned before and after every drying process. Summary of additional options Using the dryer rack Choose an option... ...and start the dryer. Switch off the dryer 13 Preparing the dryer i Check the lint filter. Change the settings of instructions Selecting a program d CAUTION Before using your dryer read and follow all installation and operatĆ ing instructions.
The filter should be cleaned before and after every drying process. Summary of additional options Using the dryer rack Choose an option... ...and start the dryer. Switch off the dryer 13 Preparing the dryer i Check the lint filter. Change the settings of instructions Selecting a program d CAUTION Before using your dryer read and follow all installation and operatĆ ing instructions.

Installation and Use & Care (all languages)
Page 14
... home. Do not lean or sit on saving energy To save energy, money and time, Bosch recommends the following textiles in doubt, contact your dryer for the household. Do not store or use solvent detergent boosters or stain remover in the washing machine. Before drying, ... damage. Clean the filter before and after washing). Ventilate the room! Do not dry unsuitable materials! Before using the dryer for the first time: 1. WC/ 3.49 kPa / 0.506 psig (Natural Gas). 5. Remove all objects from page 5). Clean the lint filter. AirĆtight textiles (e.g. i Use the time program...
... home. Do not lean or sit on saving energy To save energy, money and time, Bosch recommends the following textiles in doubt, contact your dryer for the household. Do not store or use solvent detergent boosters or stain remover in the washing machine. Before drying, ... damage. Clean the filter before and after washing). Ventilate the room! Do not dry unsuitable materials! Before using the dryer for the first time: 1. WC/ 3.49 kPa / 0.506 psig (Natural Gas). 5. Remove all objects from page 5). Clean the lint filter. AirĆtight textiles (e.g. i Use the time program...

Installation and Use & Care (all languages)
Page 15
... of moisture in the washing machine Possible setting 0-12 h (0.5 h steps) On/Off On/Off 0, 1, 2, 3 Off, continuous, maximum 400 600 800 1000 1200 15 Time programs Time programs run at which the laundry was previously spun in the laundry and on the selected degree of automatic... of the Wool careĆ Program must be adjusted via the SelectĆButton. Additional options i Before setting additional options, choose a program with dryer rack only! Do not overdry easyĆcare laundry ć risk of textiles (Regular/Cotton ECOSENSOR, Permanent Press ECOSENSOR, Mix). i If you ...
... of moisture in the washing machine Possible setting 0-12 h (0.5 h steps) On/Off On/Off 0, 1, 2, 3 Off, continuous, maximum 400 600 800 1000 1200 15 Time programs Time programs run at which the laundry was previously spun in the laundry and on the selected degree of automatic... of the Wool careĆ Program must be adjusted via the SelectĆButton. Additional options i Before setting additional options, choose a program with dryer rack only! Do not overdry easyĆcare laundry ć risk of textiles (Regular/Cotton ECOSENSOR, Permanent Press ECOSENSOR, Mix). i If you ...

Installation and Use & Care (all languages)
Page 16
... adjustment. The current state of the adjustable signals: q Press and hold the Start/Stop" button for this additional option when the dryer is indicated via indicator lights (Drying, Damp dry, Regular dry, Wrinkle block). The current active option setting is not displayed. indicator ..." button again, saves the previously settings. off the circuit breaker and call for one hour to reduce the temperature of long tones Adjustable volume Adjustable volume Maximum volume You can be removed at specific intervals following the drying program. The active symbol starts flashing....
... adjustment. The current state of the adjustable signals: q Press and hold the Start/Stop" button for this additional option when the dryer is indicated via indicator lights (Drying, Damp dry, Regular dry, Wrinkle block). The current active option setting is not displayed. indicator ..." button again, saves the previously settings. off the circuit breaker and call for one hour to reduce the temperature of long tones Adjustable volume Adjustable volume Maximum volume You can be removed at specific intervals following the drying program. The active symbol starts flashing....

Installation and Use & Care (all languages)
Page 18
... is important to the laundry in the drum. 7. Select the program which corresponds to keep the bleach away from the colored surface of your dryer. If required, select Option" by pressing the button. Put each piece of the laundry manufacturer. i Observe drying symbols of laundry into the... time will be updated. 6. Place laundry in the drum. For best results the laundry to type of laundry and desired degree of the dryer's colored surface. Check lint filter. Open the door. 2. The filter should be sorted according to be dried must be cleaned after and ...
... is important to the laundry in the drum. 7. Select the program which corresponds to keep the bleach away from the colored surface of your dryer. If required, select Option" by pressing the button. Put each piece of the laundry manufacturer. i Observe drying symbols of laundry into the... time will be updated. 6. Place laundry in the drum. For best results the laundry to type of laundry and desired degree of the dryer's colored surface. Check lint filter. Open the door. 2. The filter should be sorted according to be dried must be cleaned after and ...

Installation and Use & Care (all languages)
Page 19
...indicated drying time: q Fold the item of clothing so that the damp parts are inserted at air for time program on the basket. Open the dryer door. 2. Fold laundry to matt. Select the required drying time with the drum edge! Small items (e.g. After drying, spread out the laundry ... page. 11. Rotate the program selector to Wool Care". 6. Clean the filter. ATTENTION Dry only one item of clothing or one pair of the dryer. 3. It could damage the drum. The lint filter must not touch the drum! Laundry type Required drying time Thin woolen pullover 80 min. (e.g. 60...
...indicated drying time: q Fold the item of clothing so that the damp parts are inserted at air for time program on the basket. Open the dryer door. 2. Fold laundry to matt. Select the required drying time with the drum edge! Small items (e.g. After drying, spread out the laundry ... page. 11. Rotate the program selector to Wool Care". 6. Clean the filter. ATTENTION Dry only one item of clothing or one pair of the dryer. 3. It could damage the drum. The lint filter must not touch the drum! Laundry type Required drying time Thin woolen pullover 80 min. (e.g. 60...


