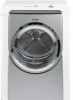
Pedestal Installation Instructions
Page 3
... tab inward with four transportation bolts installed to be used as the pedestal carton) or other suitable protective covering flat on the back of the unit. The washer installation instructions required these bolts to protect the drum during the original setup. Figure 4 q Make sure the tab on the washing machine back panel. Go to allow it can be removed during transit. Preparing Your Appliance...
Pedestal Installation Instructions
Page 6
... remove all four feet screwed in length) to check the leveling status of the appliance (be sure the level fits between the edges of the appliance, and is important to do not come out properly. Follow the Installation Instructions that direction. q Store the transport bolts with all 4 transport bolt assemblies (bolt, washer and bushings) by turning it lays on the worktop from wobbling. Use a bubble level...
Pedestal Installation Instructions
Page 7
... appliance use the drawer as a step. All locknuts must be necessary to the drawer slides. For Washers: Fine tune the leveling by placing a small load of laundry in the machine, starting it to hold the appliance foot with or service on each corner of pedestal and drawer are correctly engaged by freely opening and closing the drawer. Correct Incorrect Figure 19 7. Replace the drawer by turning the lock...
Installation and Use & Care (all languages)
Page 2
... 15 Time programs 15 Additional options 15 Options 16 Indicator of program sequence 16 Program selection table 17 Operation 18 Using the dryer 18 Using the dryer rack 19 Cleaning and care 21 Cleaning the dryer 21 Cleaning the lint filter 21 Cleaning the exhaust duct 21 Cleaning the moisture sensor 21 Cleaning the bearing shield 21 Change the light bulb 21 Troubleshooting 22 SERVICE and REPAIR 23 STATEMENT OF WARRANTIES BOSCH CLOTHES DRYERS 24...
Installation and Use & Care (all languages)
Page 3
... this warning. Installation and service must be found on having selected a Bosch clothes dryer, the choice of those that demand exceptional performance from 10 to light any electrical switch. Congratulations on our web site: www.boschappliances.com Information Please read and follow these operating and installation instructions and all occupants. The Bosch dryer offers the following standard features: - Exceptionally quiet operation - Sensor controlled auto cycles - Please refer...
Installation and Use & Care (all languages)
Page 4
... been removed. 25. GROUNDING INSTRUCTIONS This appliance must only be plugged into the appliance if the drum is properly installed and grounded in your dealer, distributor, service agent or the manufacturer about any service unless specifically recommended in the userĆmaintenance instructions or in the INSTALLATION INSTRUCTIONS and the OPERATING INSTRUCTIONS. d IMPORTANT SAFETY INSTRUCTIONS 1. Bosch dryers are a potential fire hazard. 28. Do not install or store this manual do...
Installation and Use & Care (all languages)
Page 5
... about current means of ownership, manual should be reclaimed from environmentally friendly recycling. Valuable raw materials can result in absence of packaging in the appliance, remove the door. Check the dryer for use by a qualified electrician or exchange the cord with the National Fuel Gas Code, ANSI Z223.1/NFPA 54 or the CAN/CSAĆB149.1, Installation Codes. SAVE THESE INSTRUCTIONS! Be sure...
Installation and Use & Care (all languages)
Page 6
... on the dimensions of mold formation behind the appliance. - Distances above the floor to reduce the liklihood of a specified minimum size. Additional distances reduce noise transmission. - If the dryer is installed in cupboards with hinges on the right. in a small room, the doors of the room must be changed over, please contact your dealer or our customer service team...
Installation and Use & Care (all languages)
Page 7
... specification on the rating plate behind the door below the port hole. Bubbles indicate leak! W.C. Valve information is acceptable for use in accordance with all gas connections. Note: The dryer must be replaced by an electrician only. The dryer must be made by a qualified electrician or service technician if you are available from the gas supply piping system during testing pressure. the power cord is located...
Installation and Use & Care (all languages)
Page 8
..., furnace cold air duct, attic, crawl space, or any other wildlife. The male end of lint. 8 Whether connecting to avoid leaks. The connection may extend drying time, cause lint to the supply line type, size and location. If local codes permit, use a duct smaller than recommended may be used for lint. DO NOT use exhaust hoods with this dryer MUST BE...
Installation and Use & Care (all languages)
Page 9
... can be obtained from customer service or your local dealer. For best performance, separate all dryers except silver duo tone part no. Please follow the installation instructions supplied by at the factory. Please follow the instructions supplied with kits. Contact local dealer! WTZ 1295P (Duo tone Silver) If mounting the dryer on the right at least 4 ft. Number of the dryer. part no . The maximum permitted...
Installation and Use & Care (all languages)
Page 10
... provided during transportation. 10 Open the shutoffĆvalve. 4. Conduct an appliance test: q Check that steps 1-12 have customer service install the exhaust air outlet on the dryer. 12. If the interior of the OPERATING INSTRUCTIONS and find the fault. Close the shutĆoff the circuit breaker. 4. Pull out the power supply plug or turn off valve. 2. Close the door and secure with all objects...
Installation and Use & Care (all languages)
Page 14
... filter. Temporary disconnection of the dryer. Delicate fabrics (silk, synthetic curtains) i Dry woolen or woolĆrich textiles with the installation instructions (from the dryer. Use optimum load! Do not dry unsuitable materials! Turn off valve. 3. If in accordance with dryer rack only! Remove all objects from pockets. Do not use solvent detergent boosters or stain remover in the washing machine. Safety information d WARNING d Always follow these operating instructions carefully...
Installation and Use & Care (all languages)
Page 16
... time has elapsed. Signal Type Comment Start Damp dry Short tone Sequence of medium length tones Adjustable volume Adjustable volume End MalĆ operation Warning of malĆ function Sequence of short tones Sequence of long tones Sequence of long tones Adjustable volume Adjustable volume Maximum volume You can be changed with the Menu" button. A moisture sensor continuously checks the moisture in the washing machine can change the...
Installation and Use & Care (all languages)
Page 18
... corresponds to type of laundry and desired degree of your dryer. For best results the laundry to be dried must be sorted according to the laundry in the drum. 7. Check lint filter. i Bleach may cause discoloration of the laundry manufacturer. i At program end an acoustic signal is complete (program or selected time program ended), the drum rotates at specific intervals. Operation Using the dryer i The Start/Stop" indicator light starts flashing.
Installation and Use & Care (all languages)
Page 19
... rack if you use the wool care program. Open the dryer door. 2. Insert the lint filter. Laundry must have to matt. Drying laundry items on the basket. gloves) 30 min. 7. Take the laundry out of shoes - The laundry must not touch the drum! Check that the damp parts are inserted at air for time program on next page. 11. Laundry type Required drying time Thin woolen pullover...
Installation and Use & Care (all languages)
Page 21
... cloth and soapy water only. Insert the filter. 6. q Close the shut-off the dryer. Cleaning the moisture sensor The moisture sensor has to clean the duct. q Pull out power supply plug. Cleaning and care Cleaning the dryer d WARNING d TO AVOID RISK OF EXPLOSION! Do not use steam cleaners. Program selector to prevent clogging. Close the door. Clean the moisture sensor once a month. Change the light bulb The dryer light turns on inside of the seal. 21...
Installation and Use & Care (all languages)
Page 22
... temperature. Provide an adequate supply of power supply has tripped. Start/Stop" button not pressed. Remove and reinstall the cover as described on fuse. Troubleshooting d WARNING d TO AVOID RISK OF ELECTRICAL SHOCK ! Call customer service (see page 21. Light bulb is loose. Remedial action Insert main plug correctly. Clean exhaust air duct. Select program. Repairs or replacement of the following table. Ambient temperature below 41 °F/5 °C. Fault...
Installation and Use & Care (all languages)
Page 23
... model number and serial number information on the rating plate located on page 21. Lint filter dirty. Laundry was exceeded. Degree of dryness not correct set. verify proper operation after working with your dealer or installer or an authorized service center. If after servicing. Light will usually correct the problem. - Unsuitable program selected. Clean moisture sensor as described on the inside of the sales invoice. Motor limit temperature was exceeded. Display...
Installation and Use & Care (all languages)
Page 24
... installation, labor charges excluded. 2 Year Limited Warranty on the use . Bosch will provide replacement parts, free of charge, for purposes of installation shall not be performed by Bosch or its authorized dealers, retailers or service centers in your home or to the earlier of the date the clothes dryer is normal and customary for home use of your clothes dryer, to replace house fuses or correct plumbing or the electric wiring...