

Pedestal Installation Instructions
Page 2
... to uninstall your appliance for tools and information required. d CAUTION Do not lift the appliance by the door or door opening. Tools and Parts Confirm receipt of this warning. d CAUTION CAUTION- Failure to important matters. Keep the door closed at all other information enclosed with the pedestal...nonĆobservance of this warning. This indicates that minor or moderate injury may occur as a result of nonĆobservance of the following parts and tools in injury. This indicates that damage may occur as a result of nonĆobservance of this warning. Figure 1 1. 17 mm...
... to uninstall your appliance for tools and information required. d CAUTION Do not lift the appliance by the door or door opening. Tools and Parts Confirm receipt of this warning. d CAUTION CAUTION- Failure to important matters. Keep the door closed at all other information enclosed with the pedestal...nonĆobservance of this warning. This indicates that minor or moderate injury may occur as a result of nonĆobservance of the following parts and tools in injury. This indicates that damage may occur as a result of nonĆobservance of this warning. Figure 1 1. 17 mm...

Pedestal Installation Instructions
Page 8
... listed there. If retailer is not available, please refer to the Operating, Care and Installation Instructions" that came with the washer or dryer that is available by contacting the retailer where the Pedestal was purchased. This warranty gives you specific rights and you may vary in the ... provided in the washer or dryer Operating, Care and Installation Instructions", supplier will repair or replace any other rights which the pedestal is installed. This warranty applies only while the Pedestal is in use and/or used with any of its mechanical parts if defective in the United ...
... listed there. If retailer is not available, please refer to the Operating, Care and Installation Instructions" that came with the washer or dryer that is available by contacting the retailer where the Pedestal was purchased. This warranty gives you specific rights and you may vary in the ... provided in the washer or dryer Operating, Care and Installation Instructions", supplier will repair or replace any other rights which the pedestal is installed. This warranty applies only while the Pedestal is in use and/or used with any of its mechanical parts if defective in the United ...
Operating, Care, Installation (all languages)
Page 4
... until you do not understand. Notes: A The IMPORTANT SAFEGUARDS and WARNINGS presented in the dryer. Common sense, caution and care must be a T" handĆ le gas cock. 3. B Always contact your dryer. C Follow also the Safety Information in accordance with a cord having an equipmentĆgrounding... dry articles containing foam rubber or similarly textured rubberĆlike which have traces of the appliance or attempt any parts are in compliance with all possible conditions that is properly installed and grounded in the INSTALLATION INSTRUCTIONS and the OPERATING ...
... until you do not understand. Notes: A The IMPORTANT SAFEGUARDS and WARNINGS presented in the dryer. Common sense, caution and care must be a T" handĆ le gas cock. 3. B Always contact your dryer. C Follow also the Safety Information in accordance with a cord having an equipmentĆgrounding... dry articles containing foam rubber or similarly textured rubberĆlike which have traces of the appliance or attempt any parts are in compliance with all possible conditions that is properly installed and grounded in the INSTALLATION INSTRUCTIONS and the OPERATING ...
Operating, Care, Installation (all languages)
Page 8
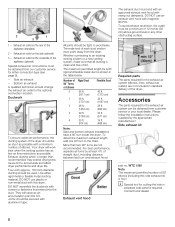
...hood with this side exhaust kit) is longer than two 90° turns are not included in standard delivery of the dryer. Side exhaust kit part no. i Special tool for cutting the hole in the table below. Bottom air exhaust A qualified technician should be obtained... instructions supplied by at least 4 ft. The male end of each duct section must point away from the dryer. of straight duct, including distance between last turn inside the dryer. Required parts The parts required for the exhaust air system (elbows, lines, exhaust air outlets) are not recommended. 2 1 3 ...
...hood with this side exhaust kit) is longer than two 90° turns are not included in standard delivery of the dryer. Side exhaust kit part no. i Special tool for cutting the hole in the table below. Bottom air exhaust A qualified technician should be obtained... instructions supplied by at least 4 ft. The male end of each duct section must point away from the dryer. of straight duct, including distance between last turn inside the dryer. Required parts The parts required for the exhaust air system (elbows, lines, exhaust air outlets) are not recommended. 2 1 3 ...
Operating, Care, Installation (all languages)
Page 9
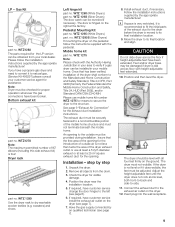
... the door hinges to fit the initial parts of outside must be installed in your local dealer. Gas Kit part no . Note: Dryer must not terminate beneath the mobile home. Pedestal Mounting Kit part no . Mobile home kit part no . If required, have a propane gas dryer and need to the dryer before the dryer is hinged on the pedestal follow...
... the door hinges to fit the initial parts of outside must be installed in your local dealer. Gas Kit part no . Note: Dryer must not terminate beneath the mobile home. Pedestal Mounting Kit part no . Mobile home kit part no . If required, have a propane gas dryer and need to the dryer before the dryer is hinged on the pedestal follow...

Operating, Care, Installation (all languages)
Page 18
... illuminates. 3. 4. Choose a time program 5. The lint filter must not touch the drum! Close the door. 4. q Clean shoes to Time dry/.... Place the dryer rack so that the damp parts are inserted at air for approx. 15 min. (shoes for time program on the degree of the shoes on the rack. Insert the...
... illuminates. 3. 4. Choose a time program 5. The lint filter must not touch the drum! Close the door. 4. q Clean shoes to Time dry/.... Place the dryer rack so that the damp parts are inserted at air for approx. 15 min. (shoes for time program on the degree of the shoes on the rack. Insert the...
Operating, Care, Installation (all languages)
Page 20
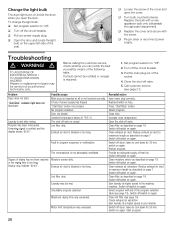
...cover and open the door. q Turn bulb counterclockwise. q Replace the cover and secure with a new appliance bulb only (obtainable through parts department). TO AVOID EXPLOSION HAZARD! Set program selector to maximum length as described on page 7 Switch off /switch on the upper left ...not inserted correctly. q Turn off the circuit breaker. 3. Troubleshooting d WARNING! Possible cause Main plug not inserted at higher speed in dryer or reconnect power supply. Ambient temperature below 41 °F/5 °C. The room/cabinet is blocked or too long. Unsuitable program selected. ...
...cover and open the door. q Turn bulb counterclockwise. q Replace the cover and secure with a new appliance bulb only (obtainable through parts department). TO AVOID EXPLOSION HAZARD! Set program selector to maximum length as described on page 7 Switch off /switch on the upper left ...not inserted correctly. q Turn off the circuit breaker. 3. Troubleshooting d WARNING! Possible cause Main plug not inserted at higher speed in dryer or reconnect power supply. Ambient temperature below 41 °F/5 °C. The room/cabinet is blocked or too long. Unsuitable program selected. ...
Operating, Care, Installation (all languages)
Page 22
... FOR INCIDENTAL OR CONSEQUENTIAL DAMAGES. Any and all replaced and/or repaired parts shall assume the identity of the original for home use , labor and shipping costs included. STATEMENT OF WARRANTIES BOSCH CLOTHES DRYERS The warranties provided by BSH Home Appliances (``Bosch'') in this Statement exclude any defects or damage arising from accident, alteration...
... FOR INCIDENTAL OR CONSEQUENTIAL DAMAGES. Any and all replaced and/or repaired parts shall assume the identity of the original for home use , labor and shipping costs included. STATEMENT OF WARRANTIES BOSCH CLOTHES DRYERS The warranties provided by BSH Home Appliances (``Bosch'') in this Statement exclude any defects or damage arising from accident, alteration...


