
Pedestal Installation Instructions
Page 3
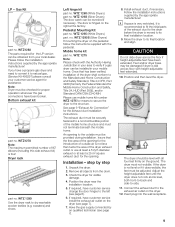
... Appliance -If you are in the plastic cover (see Figure 2). NOTICE Make sure the washer transportation bolts are installing the pedestal on a new washer or dryer, proceed to the Preparing Your New Appliance" section on the washing machine back panel. To reinstall the transportation bolts: q Locate the four transportation bolt assemblies... area. Preparing Your Appliance Existing Appliance - Helpful Hint: Rolled up towels can be removed during transit. Go to push against the floor as support. For dryers go directly to pedestal installation. 2.
... Appliance -If you are in the plastic cover (see Figure 2). NOTICE Make sure the washer transportation bolts are installing the pedestal on a new washer or dryer, proceed to the Preparing Your New Appliance" section on the washing machine back panel. To reinstall the transportation bolts: q Locate the four transportation bolt assemblies... area. Preparing Your Appliance Existing Appliance - Helpful Hint: Rolled up towels can be removed during transit. Go to push against the floor as support. For dryers go directly to pedestal installation. 2.

Pedestal Installation Instructions
Page 5
... down toward the base of the bolts completely. NOTICE Use only the feet supplied with the washers and spacers in any of the pedestal. For dryers go directly to removing the top two bolts. 5 Use the wrench to 1/2 turn (see Figure 10). After all screws (see Figure 12). Do not use...
... down toward the base of the bolts completely. NOTICE Use only the feet supplied with the washers and spacers in any of the pedestal. For dryers go directly to removing the top two bolts. 5 Use the wrench to 1/2 turn (see Figure 10). After all screws (see Figure 12). Do not use...

Pedestal Installation Instructions
Page 8
... is not available, please refer to the Operating, Care and Installation Instructions" that came with the washer or dryer that is installed with the listed washer or dryer and operated according to province. *Warranty terms may also have other product than private family use in material or ... of the appliance on Mechanical Parts For one year from state to state or province to the instructions provided in the washer or dryer Operating, Care and Installation Instructions", supplier will repair or replace any other rights which the pedestal is available by contacting the retailer...
... is not available, please refer to the Operating, Care and Installation Instructions" that came with the washer or dryer that is installed with the listed washer or dryer and operated according to province. *Warranty terms may also have other product than private family use in material or ... of the appliance on Mechanical Parts For one year from state to state or province to the instructions provided in the washer or dryer Operating, Care and Installation Instructions", supplier will repair or replace any other rights which the pedestal is available by contacting the retailer...
Operating, Care, Installation (all languages)
Page 2
... Options 15 Indicator of program sequence 15 Program selection table 16 Operation 16 Using the dryer 16 Using the dryer rack (Option 17 Cleaning and care 19 Cleaning the dryer 19 Cleaning the lint filter 19 Cleaning the exhaust duct 19 Cleaning the moisture sensor ...19 Cleaning the bearing shield 19 Change the light bulb 20 Troubleshooting 20 SERVICE and REPAIR 21 STATEMENT OF WARRANTIES BOSCH CLOTHES DRYERS...
... Options 15 Indicator of program sequence 15 Program selection table 16 Operation 16 Using the dryer 16 Using the dryer rack (Option 17 Cleaning and care 19 Cleaning the dryer 19 Cleaning the lint filter 19 Cleaning the exhaust duct 19 Cleaning the moisture sensor ...19 Cleaning the bearing shield 19 Change the light bulb 20 Troubleshooting 20 SERVICE and REPAIR 21 STATEMENT OF WARRANTIES BOSCH CLOTHES DRYERS...
Operating, Care, Installation (all languages)
Page 3
... d WARNING d WARNING - Do not use gasoline or other flammable vapors and liquids in safe practices by a qualified installer, service agency or the gas supplier. Follow the gas supplier's instructions. Bosch dryers are instructed in the vicinity of this or any other flammable, or explosive substances as a result of nonĆobservance of this warning...
... d WARNING d WARNING - Do not use gasoline or other flammable vapors and liquids in safe practices by a qualified installer, service agency or the gas supplier. Follow the gas supplier's instructions. Bosch dryers are instructed in the vicinity of this or any other flammable, or explosive substances as a result of nonĆobservance of this warning...
Operating, Care, Installation (all languages)
Page 4
... duct with all local regulations and/or other fuelĆburning appliances shall be placed in the same closet as the dryer. 33. Flexible gas connector must be cleaned periodically by providing a path of the machine and exhaust duct should be grounded. Removing any panel...avoid floor damage and mold growth, do not cover all local codes and ordinances. This appliance is being installed. 2. B Always contact your dryer. Do not tamper with a cord having an equipmentĆgrounding conductor and a grounding plug. Notes: A The IMPORTANT SAFEGUARDS and WARNINGS presented ...
... duct with all local regulations and/or other fuelĆburning appliances shall be placed in the same closet as the dryer. 33. Flexible gas connector must be cleaned periodically by providing a path of the machine and exhaust duct should be grounded. Removing any panel...avoid floor damage and mold growth, do not cover all local codes and ordinances. This appliance is being installed. 2. B Always contact your dryer. Do not tamper with a cord having an equipmentĆgrounding conductor and a grounding plug. Notes: A The IMPORTANT SAFEGUARDS and WARNINGS presented ...
Operating, Care, Installation (all languages)
Page 5
...qualified electrician or service person if you time and effort and help to a height of 7,700 ft. The gas installation must be well ventilated, otherwise the dryer will save you are not worthless rubbish! Please ask your dealer or inquire at your local authority about current means... the door. Installation location d WARNING! Low temperatures affect the automatic program sequence and may contain gas or other fuelĆburning appliance in a risk of electric shock. Note: This gas dryer has been UL and C-UL listed for uneven floors with the Canadian Electric Code C22.1 ć...
...qualified electrician or service person if you time and effort and help to a height of 7,700 ft. The gas installation must be well ventilated, otherwise the dryer will save you are not worthless rubbish! Please ask your dealer or inquire at your local authority about current means... the door. Installation location d WARNING! Low temperatures affect the automatic program sequence and may contain gas or other fuelĆburning appliance in a risk of electric shock. Note: This gas dryer has been UL and C-UL listed for uneven floors with the Canadian Electric Code C22.1 ć...
Operating, Care, Installation (all languages)
Page 6
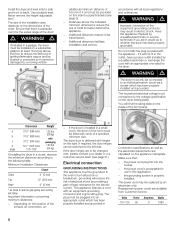
d WARNING! accordance with c 37.2" (945 mm) packaging d 19.7" (500 mm)/ 143 lbs angle 170-180° (64 kg) If installing the dryer in a closet, observe the minimum distances according to the following table: Minimum Installation Clearances Closet Sides 0" (O mm) Top 12" (3O5 mm) Rear* ... been properly installed and grounded. Use a bubble level. Never remove the heightĆadjustable feet! d If installed in doubt as gasĆpiping and venting will find the rating plate on a substantial platform at least 18 inches above the indicated minimum dimensions reduce the...
d WARNING! accordance with c 37.2" (945 mm) packaging d 19.7" (500 mm)/ 143 lbs angle 170-180° (64 kg) If installing the dryer in a closet, observe the minimum distances according to the following table: Minimum Installation Clearances Closet Sides 0" (O mm) Top 12" (3O5 mm) Rear* ... been properly installed and grounded. Use a bubble level. Never remove the heightĆadjustable feet! d If installed in doubt as gasĆpiping and venting will find the rating plate on a substantial platform at least 18 inches above the indicated minimum dimensions reduce the...
Operating, Care, Installation (all languages)
Page 7
...the piping system. d WARNING d Never use copper pipes and tubing if connected to natural gas. Gas type This gas dryer when equipped for Ć mation of the appliance, - This gas dryer when equipped for gas leaks. Valve information is no air in . USA: An individual manual shutĆoff valve... Installation Codes, CAN/CSA B149.1 and CAN/CSA B149.2. The dryer must be disconnected from the gas supply piping system during testing pressure. The Bosch dryer must be vented outdoors. It is recommended that the dryer is recommended that an individual manual shutĆoff valve should be ...
...the piping system. d WARNING d Never use copper pipes and tubing if connected to natural gas. Gas type This gas dryer when equipped for Ć mation of the appliance, - This gas dryer when equipped for gas leaks. Valve information is no air in . USA: An individual manual shutĆoff valve... Installation Codes, CAN/CSA B149.1 and CAN/CSA B149.2. The dryer must be disconnected from the gas supply piping system during testing pressure. The Bosch dryer must be vented outdoors. It is recommended that the dryer is recommended that an individual manual shutĆoff valve should be ...
Operating, Care, Installation (all languages)
Page 8
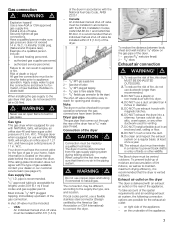
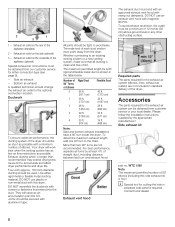
... parts required for lint. Side exhaust kit part no. Contact local dealer! 8 Ductwork To ensure optimum performance, the ducting system of the dryer should be tight to avoid leaks. They will work best when the venting system has as few air flow restrictions as possible with magnetic latches...as short as possible. DO NOT assemble the ductwork with swing out damper(s). of straight duct, including distance between last turn inside the dryer. Exhaust ducting which is clean and free of lint. The male end of each duct section must point away from our customer service for...
... parts required for lint. Side exhaust kit part no. Contact local dealer! 8 Ductwork To ensure optimum performance, the ducting system of the dryer should be tight to avoid leaks. They will work best when the venting system has as few air flow restrictions as possible with magnetic latches...as short as possible. DO NOT assemble the ductwork with swing out damper(s). of straight duct, including distance between last turn inside the dryer. Exhaust ducting which is clean and free of lint. The male end of each duct section must point away from our customer service for...
Operating, Care, Installation (all languages)
Page 9
... slid across the floor if heightĆadjustable feet have a propane gas dryer and need to convert it does wobble, the feet must be securely fastened to a noncombustible portion of the dryer shall conform to verify if a gas dryer can be adjusted. See page 9 Exhaust Air Connection" for visible ...damage. 4. Adjust the heightĆadjustable feet until the dryer does not rock and is moved to fit the initial ...
... slid across the floor if heightĆadjustable feet have a propane gas dryer and need to convert it does wobble, the feet must be securely fastened to a noncombustible portion of the dryer shall conform to verify if a gas dryer can be adjusted. See page 9 Exhaust Air Connection" for visible ...damage. 4. Adjust the heightĆadjustable feet until the dryer does not rock and is moved to fit the initial ...

Operating, Care, Installation (all languages)
Page 10
... drum. 7. Screw the heightĆadjustable feet of the dryer into the housing to understand how your dryer operates. 5. q Close the dryer door. Preparing to the power supply. 3. Close the shutĆoff the circuit breaker. 4. Disconnect gas supply 5. Close the door and secure with adhesive tape. ...8. Ensure that the dryer is empty. Open the shutoffĆvalve. 4. Conduct an appliance test: q Check that steps 1-12 have ...
... drum. 7. Screw the heightĆadjustable feet of the dryer into the housing to understand how your dryer operates. 5. q Close the dryer door. Preparing to the power supply. 3. Close the shutĆoff the circuit breaker. 4. Disconnect gas supply 5. Close the door and secure with adhesive tape. ...8. Ensure that the dryer is empty. Open the shutoffĆvalve. 4. Conduct an appliance test: q Check that steps 1-12 have ...
Operating, Care, Installation (all languages)
Page 11
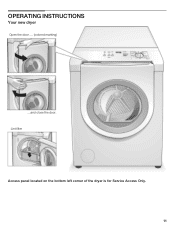
OPERATING INSTRUCTIONS Your new dryer Open the door .... (colored marking) ....and close the door. Lint filter Access panel located on the bottom left corner of the dryer is for Service Access Only. 11
OPERATING INSTRUCTIONS Your new dryer Open the door .... (colored marking) ....and close the door. Lint filter Access panel located on the bottom left corner of the dryer is for Service Access Only. 11
Operating, Care, Installation (all languages)
Page 12
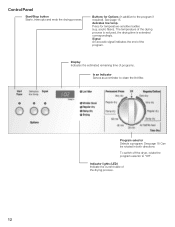
... lights (LED) Indicate the current state of the drying process is reduced, the drying time is extended correspondingly. See page 15. To switch off the dryer, rotate the program selector to clean the lint filter. delicates low temp. acrylic fibers). Control Panel Start/Stop button Starts, interrupts and ends the drying...
... lights (LED) Indicate the current state of the drying process is reduced, the drying time is extended correspondingly. See page 15. To switch off the dryer, rotate the program selector to clean the lint filter. delicates low temp. acrylic fibers). Control Panel Start/Stop button Starts, interrupts and ends the drying...
Operating, Care, Installation (all languages)
Page 13
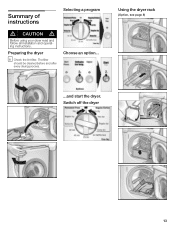
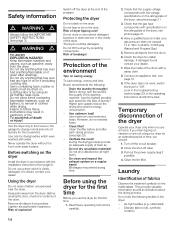
Switch off the dryer 13 The filter should be cleaned before and after every drying process. Choose an option... Using the dryer rack (Option, see page 8) ...and start the dryer. Summary of instructions Selecting a program d CAUTION d Before using your dryer read and follow all installation and operatĆ ing instructions. Preparing the dryer i Check the lint filter.
Switch off the dryer 13 The filter should be cleaned before and after every drying process. Choose an option... Using the dryer rack (Option, see page 8) ...and start the dryer. Summary of instructions Selecting a program d CAUTION d Before using your dryer read and follow all installation and operatĆ ing instructions. Preparing the dryer i Check the lint filter.
Operating, Care, Installation (all languages)
Page 14
...as limitations about the drying process. If in doubt, contact your dealer. 7. Protecting the dryer Do not climb on saving energy To save energy, money and time, Bosch recommends the following textiles in the vicinity of fabrics Observe the treatment symbols on vacation or ...normal amounts of time, you intend going on the textile labels. WC/ 3.49 kPa / 0.506 psig (Natural and Propane Gas). 5. Close the shutĆoff the dryer at home. Delicate fabrics (silk, synthetic curtains) Safety information d WARNING d Always follow these operating instructions carefully. 2. To ...
...as limitations about the drying process. If in doubt, contact your dealer. 7. Protecting the dryer Do not climb on saving energy To save energy, money and time, Bosch recommends the following textiles in the vicinity of fabrics Observe the treatment symbols on vacation or ...normal amounts of time, you intend going on the textile labels. WC/ 3.49 kPa / 0.506 psig (Natural and Propane Gas). 5. Close the shutĆoff the dryer at home. Delicate fabrics (silk, synthetic curtains) Safety information d WARNING d Always follow these operating instructions carefully. 2. To ...
Operating, Care, Installation (all languages)
Page 15
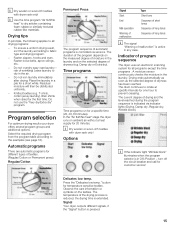
...indicated via sensors. Time programs Time programs run for the first time. The current degree of malfunction" is pressed. 15 Signal Your dryer outputs different signals, if the "Signal" button is active in the laundry and on ambient air without a heat supply for one ... the time programs . turn off the circuit breaker and call for temperature sensitive textiles. Program selection For optimum drying results your dryer offers several program groups and additional options. button for customer service! Observe the care information or symbols on the measured degree of...
...indicated via sensors. Time programs Time programs run for the first time. The current degree of malfunction" is pressed. 15 Signal Your dryer outputs different signals, if the "Signal" button is active in the laundry and on ambient air without a heat supply for one ... the time programs . turn off the circuit breaker and call for temperature sensitive textiles. Program selection For optimum drying results your dryer offers several program groups and additional options. button for customer service! Observe the care information or symbols on the measured degree of...
Operating, Care, Installation (all languages)
Page 16
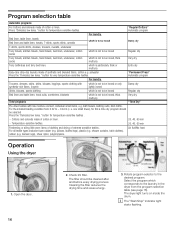
pillows, stuffed toys), plastic (e.g. shower curtains, table clothes), rubber (e.g. Air fluff/No heat Operation Using the dryer 1. The dryer light turns on inside the drum. button for this a time dry program should be ironed Regular dry Terry towels, kitchen towels, hand ...time and saves energy. 3. Cottons and coloreds made of extreme sensitive textiles. Open the door. 16 2. Rotate program selector to the laundry in the dryer from 0.22 lb ć 0.44 lb (i. For the smallest loading condition from the program selection table (see page 16). button for very temperature...
pillows, stuffed toys), plastic (e.g. shower curtains, table clothes), rubber (e.g. Air fluff/No heat Operation Using the dryer 1. The dryer light turns on inside the drum. button for this a time dry program should be ironed Regular dry Terry towels, kitchen towels, hand ...time and saves energy. 3. Cottons and coloreds made of extreme sensitive textiles. Open the door. 16 2. Rotate program selector to the laundry in the dryer from 0.22 lb ć 0.44 lb (i. For the smallest loading condition from the program selection table (see page 16). button for very temperature...
Operating, Care, Installation (all languages)
Page 17
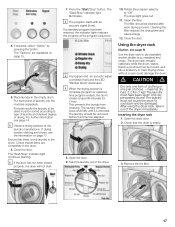
...select Option" by pressing the button. Place laundry in the drum. 6. For further information see the information on page 15. 5. Open the dryer door. 2. Ensure that the drum is removed. The Start/Stop" indicator light illuminates. Rotate the program selector to dry washable woolen textiles ...(e.g. The filter should not be removed before this time has elapsed. 8. After using the dryer rack, take it is empty. 3. The Start/Stop" indicator light continues flashing. The laundry remains loose and fluffy until it out ...
...select Option" by pressing the button. Place laundry in the drum. 6. For further information see the information on page 15. 5. Open the dryer door. 2. Ensure that the drum is removed. The Start/Stop" indicator light illuminates. Rotate the program selector to dry washable woolen textiles ...(e.g. The filter should not be removed before this time has elapsed. 8. After using the dryer rack, take it is empty. 3. The Start/Stop" indicator light continues flashing. The laundry remains loose and fluffy until it out ...

Operating, Care, Installation (all languages)
Page 18
...If the item of clothing still contains residual moisture after the indicated drying time: q Fold the item of the shoes on next page. Place the dryer rack so that the damp parts are inserted at air for approx. 15 min. (shoes for time program on the towel. Prepare shoes. This...90-120 min. (approx. 1.9lbs/850 g) (e.g. 60 + 40 min) Skirt 60-90 min. q Restart the program and reduce the drying duration depending on the dryer rack 1. After drying, spread out the laundry at the front in the locating holes. 6. Place laundry loosely on the rack. Laundry must be inserted flush...
...If the item of clothing still contains residual moisture after the indicated drying time: q Fold the item of the shoes on next page. Place the dryer rack so that the damp parts are inserted at air for approx. 15 min. (shoes for time program on the towel. Prepare shoes. This...90-120 min. (approx. 1.9lbs/850 g) (e.g. 60 + 40 min) Skirt 60-90 min. q Restart the program and reduce the drying duration depending on the dryer rack 1. After drying, spread out the laundry at the front in the locating holes. 6. Place laundry loosely on the rack. Laundry must be inserted flush...


