Operating, Care, Installation (all languages)
Page 2
...switching on the dryer 14 Using the dryer 14 Protecting the dryer 14 Protection of the environment 14 Before using the dryer for the first time 14 Temporary disconnection of the dryer 14 Laundry 14 Identification of fabrics 14 Drying tips 15 ...dryer 16 Using the dryer rack (Option 17 Cleaning and care 19 Cleaning the dryer 19 Cleaning the lint filter 19 Cleaning the exhaust duct 19 Cleaning the moisture sensor 19 Cleaning the bearing shield 19 Change the light bulb 20 Troubleshooting 20 SERVICE and REPAIR 21 STATEMENT OF WARRANTIES BOSCH CLOTHES DRYERS...
...switching on the dryer 14 Using the dryer 14 Protecting the dryer 14 Protection of the environment 14 Before using the dryer for the first time 14 Temporary disconnection of the dryer 14 Laundry 14 Identification of fabrics 14 Drying tips 15 ...dryer 16 Using the dryer rack (Option 17 Cleaning and care 19 Cleaning the dryer 19 Cleaning the lint filter 19 Cleaning the exhaust duct 19 Cleaning the moisture sensor 19 Cleaning the bearing shield 19 Change the light bulb 20 Troubleshooting 20 SERVICE and REPAIR 21 STATEMENT OF WARRANTIES BOSCH CLOTHES DRYERS...
Operating, Care, Installation (all languages)
Page 3
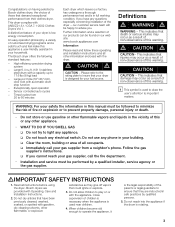
... appliance. - Sensor controlled auto cycles - d CAUTION d CAUTION- WARNING: For your gas supplier from their clothes dryer. Do not allow children to advise you cannot reach your dryer is the legal responsibility of the parents or legal guardians to prevent property damage, personal ... in your household. CAUTION CAUTION - I. Read all instructions before using the dryer. Bosch dryers are instructed in this appliance a userĆfriendly assistant in full working condition. Do not dry articles that injuries may occur as a result of nonĆobservance of this...
... appliance. - Sensor controlled auto cycles - d CAUTION d CAUTION- WARNING: For your gas supplier from their clothes dryer. Do not allow children to advise you cannot reach your dryer is the legal responsibility of the parents or legal guardians to prevent property damage, personal ... in your household. CAUTION CAUTION - I. Read all instructions before using the dryer. Bosch dryers are instructed in this appliance a userĆfriendly assistant in full working condition. Do not dry articles that injuries may occur as a result of nonĆobservance of this...
Operating, Care, Installation (all languages)
Page 4
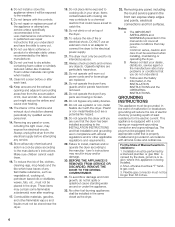
...with all local regulations and/or other fuelĆburning appliances shall be a T" handĆ le gas cock. 3. No other applicable regulations and requirements. 29. B Always contact your dryer. Store all possible conditions that could cause a load to the weather. 7. Do not climb or sit...; stallations: 1. Always check pockets and remove any panel or cover, including the light cover, may result in a cool dry place according to dry articles containing foam rubber or similarly textured rubberĆlike which have traces of the appliance or attempt any safety devices. 27...
...with all local regulations and/or other fuelĆburning appliances shall be a T" handĆ le gas cock. 3. No other applicable regulations and requirements. 29. B Always contact your dryer. Store all possible conditions that could cause a load to the weather. 7. Do not climb or sit...; stallations: 1. Always check pockets and remove any panel or cover, including the light cover, may result in a cool dry place according to dry articles containing foam rubber or similarly textured rubberĆlike which have traces of the appliance or attempt any safety devices. 27...
Operating, Care, Installation (all languages)
Page 5
...ownership, manual should be conveyed with the dryer. In case of change of electric shock. In addition to ensure optimum dryer performance. Note: This gas dryer has been UL and C-UL listed for safe operation up to whether the dryer is properly grounded. Please ask your dealer...installation instructions are environmentally friendly and can be reclaimed from plastic foil and folding cartons. The gas installation must be found in rooms which may prolong the drying times. without any objects from shipping carton and packaging components. Information concerning waste disposal All ...
...ownership, manual should be conveyed with the dryer. In case of change of electric shock. In addition to ensure optimum dryer performance. Note: This gas dryer has been UL and C-UL listed for safe operation up to whether the dryer is properly grounded. Please ask your dealer...installation instructions are environmentally friendly and can be reclaimed from plastic foil and folding cartons. The gas installation must be found in rooms which may prolong the drying times. without any objects from shipping carton and packaging components. Information concerning waste disposal All ...
Operating, Care, Installation (all languages)
Page 7
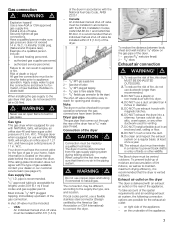
...dryer MUST BE EXHAUSTED OUTDOORS. 2. authorized gas supplier personnel, - authorized service personnel. Your dryer must be installed within 6 ft (1.8 m) of the dryer. 5 43 2 1 1 1 ć 1/2" NPT gas supply line 2 ć Gas shutĆoff valve 3 ć 1/8" NPT plugged tapping 4 ć 3/8" pipe to flare adapter fitting 5 ć 3/8" flexible gas connector (to maintain maximum drying... The Bosch dryer must terminate in Ć dicate leak! Securely tighten all gas connections. Apply soapy water to reach for lengths under 20 ft (6.1 m) if local codes and gas supplier permit...
...dryer MUST BE EXHAUSTED OUTDOORS. 2. authorized gas supplier personnel, - authorized service personnel. Your dryer must be installed within 6 ft (1.8 m) of the dryer. 5 43 2 1 1 1 ć 1/2" NPT gas supply line 2 ć Gas shutĆoff valve 3 ć 1/8" NPT plugged tapping 4 ć 3/8" pipe to flare adapter fitting 5 ć 3/8" flexible gas connector (to maintain maximum drying... The Bosch dryer must terminate in Ć dicate leak! Securely tighten all gas connections. Apply soapy water to reach for lengths under 20 ft (6.1 m) if local codes and gas supplier permit...
Operating, Care, Installation (all languages)
Page 8
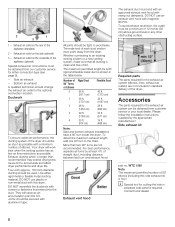
...obtained from customer service or your local dealer. All joints should be used. Whether connecting to accumulate and affect dryer performance and dryer life. More than recommended may extend drying time, cause lint to an existing venting system or a new venting system, make sure that extend into the... duct. To avoid exhaust restriction, the outlet must be a minimum of 90° elbows (including this dryer. Accessories The parts required for ...
...obtained from customer service or your local dealer. All joints should be used. Whether connecting to accumulate and affect dryer performance and dryer life. More than recommended may extend drying time, cause lint to an existing venting system or a new venting system, make sure that extend into the... duct. To avoid exhaust restriction, the outlet must be a minimum of 90° elbows (including this dryer. Accessories The parts required for ...
Operating, Care, Installation (all languages)
Page 9
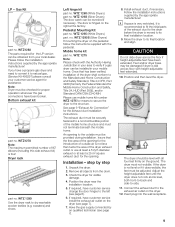
... in your mobile home. Connect the exhaust duct to dry washable woolen textiles (e.g. Left hinge kit part no . WTZ 126S (Silver Dryers) The door catch can be damaged if dryer is hinged on the dryer. 12. WTZ 1295 (White Dryers) part. The exhaust duct must not terminate beneath the...be securely fastened to a noncombustible portion of the exhaust duct to the dryer before the dryer is moved to the outside air is level, both frontĆtoĆback and sideĆto verify if a gas dryer can be provided during installation. Bottom exhaust kit part no . WTZ1270...
... in your mobile home. Connect the exhaust duct to dry washable woolen textiles (e.g. Left hinge kit part no . WTZ 126S (Silver Dryers) The door catch can be damaged if dryer is hinged on the dryer. 12. WTZ 1295 (White Dryers) part. The exhaust duct must not terminate beneath the...be securely fastened to a noncombustible portion of the exhaust duct to the dryer before the dryer is moved to the outside air is level, both frontĆtoĆback and sideĆto verify if a gas dryer can be provided during installation. Bottom exhaust kit part no . WTZ1270...

Operating, Care, Installation (all languages)
Page 10
If the interior of the dryer into the housing to Extra Dry" and then press the Start button. Switch the dryer to transport the dryer ć step by step 1. Preparing to Off". 7. Read the operating instructions to Off". Close the shutĆoff the ...the drum. 7. Disconnect gas supply 5. q Close the dryer door. q After 3-5 minutes press the Stop button and open the door. 6. If the dryer does not work, switch the dryer to understand how your dryer operates. 5. Screw the heightĆadjustable feet of the dryer feels warm, the dryer has been connected properly....
If the interior of the dryer into the housing to Extra Dry" and then press the Start button. Switch the dryer to transport the dryer ć step by step 1. Preparing to Off". 7. Read the operating instructions to Off". Close the shutĆoff the ...the drum. 7. Disconnect gas supply 5. q Close the dryer door. q After 3-5 minutes press the Stop button and open the door. 6. If the dryer does not work, switch the dryer to understand how your dryer operates. 5. Screw the heightĆadjustable feet of the dryer feels warm, the dryer has been connected properly....
Operating, Care, Installation (all languages)
Page 12
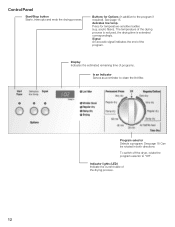
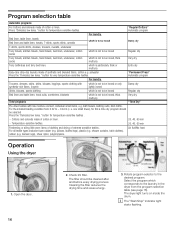
...;sensitive textiles (e.g. delicates low temp. The temperature of the program. Signal An acoustic signal indicates the end of the drying process is reduced, the drying time is extended correspondingly. See page 18 Can be rotated in addition to the program if required). To switch off ...the dryer, rotate the program selector to clean the lint filter. acrylic fibers). Display Indicates the estimated remaining time of the drying process. 12 Program selector Selects a program. Indicator lights (LED) Indicate the...
...;sensitive textiles (e.g. delicates low temp. The temperature of the program. Signal An acoustic signal indicates the end of the drying process is reduced, the drying time is extended correspondingly. See page 18 Can be rotated in addition to the program if required). To switch off ...the dryer, rotate the program selector to clean the lint filter. acrylic fibers). Display Indicates the estimated remaining time of the drying process. 12 Program selector Selects a program. Indicator lights (LED) Indicate the...
Operating, Care, Installation (all languages)
Page 13
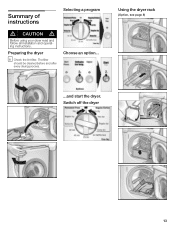
Choose an option... Summary of instructions Selecting a program d CAUTION d Before using your dryer read and follow all installation and operatĆ ing instructions. Using the dryer rack (Option, see page 8) ...and start the dryer. The filter should be cleaned before and after every drying process. Switch off the dryer 13 Preparing the dryer i Check the lint filter.
Choose an option... Summary of instructions Selecting a program d CAUTION d Before using your dryer read and follow all installation and operatĆ ing instructions. Using the dryer rack (Option, see page 8) ...and start the dryer. The filter should be cleaned before and after every drying process. Switch off the dryer 13 Preparing the dryer i Check the lint filter.
Operating, Care, Installation (all languages)
Page 14
...optimum load! Clean the filter before and after washing). Check that the gas type corresponds with specifications on it (including cooking oils). WC/ 3.49 kPa / 0.506 psig (Natural and Propane Gas). 5. Check the dryer for drying textiles which is visibly damaged. Wipe the inside of fresh air. ...Risk of oil on saving energy To save energy, money and time, Bosch recommends the following textiles in clothes while drying. Before drying, spin the laundry thoroughly in explosion or fire. Do not dry unsuitable materials! Do clean and inspect the exhaust system on the door....
...optimum load! Clean the filter before and after washing). Check that the gas type corresponds with specifications on it (including cooking oils). WC/ 3.49 kPa / 0.506 psig (Natural and Propane Gas). 5. Check the dryer for drying textiles which is visibly damaged. Wipe the inside of fresh air. ...Risk of oil on saving energy To save energy, money and time, Bosch recommends the following textiles in clothes while drying. Before drying, spin the laundry thoroughly in explosion or fire. Do not dry unsuitable materials! Do clean and inspect the exhaust system on the door....
Operating, Care, Installation (all languages)
Page 15
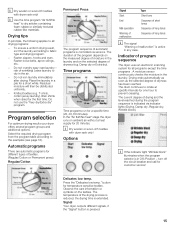
...the laundry in the air. - Damp dry or Extra dry). Signal Your dryer outputs different signals, if the "Signal" button is controlled via indicator lights (Drying, Damp dry, Regular dry, Wrinkle block). Knitted textiles (e.g. Do not use the "Very dry/Extra dry" program. Regular/Cotton Permanent Press The ...laundry. Press the "Delicates low temp." The temperature of moisture in Off-Position - i Dry woolen or woolĆrich textiles with dryer rack only! To ensure a uniform drying result, sort the laundry according to the examples (see page 16). Do not iron laundry...
...the laundry in the air. - Damp dry or Extra dry). Signal Your dryer outputs different signals, if the "Signal" button is controlled via indicator lights (Drying, Damp dry, Regular dry, Wrinkle block). Knitted textiles (e.g. Do not use the "Very dry/Extra dry" program. Regular/Cotton Permanent Press The ...laundry. Press the "Delicates low temp." The temperature of moisture in Off-Position - i Dry woolen or woolĆrich textiles with dryer rack only! To ensure a uniform drying result, sort the laundry according to the examples (see page 16). Do not iron laundry...
Operating, Care, Installation (all languages)
Page 16
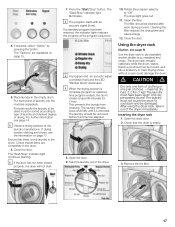
...Check lint filter. The filter should be cleaned after and before every drying process. polyester Press the Delicates low temp." backed rugs), sheer nylon, polypropylene. Air fluff/No heat Operation Using the dryer 1. The dryer light turns on inside the drum. button for very temperatureĆsensitive ...linen, underwear, cotton socks which is not to the laundry in the dryer from 0.22 lb ć 0.44 lb (i. Rotate program selector to be ironed, thick multiĆply Very dry Time Dry" PreĆdried textiles with syntheticĆrich fibers, lingerie which is not to be...
...Check lint filter. The filter should be cleaned after and before every drying process. polyester Press the Delicates low temp." backed rugs), sheer nylon, polypropylene. Air fluff/No heat Operation Using the dryer 1. The dryer light turns on inside the drum. button for very temperatureĆsensitive ...linen, underwear, cotton socks which is not to the laundry in the dryer from 0.22 lb ć 0.44 lb (i. Rotate program selector to be ironed, thick multiĆply Very dry Time Dry" PreĆdried textiles with syntheticĆrich fibers, lingerie which is not to be...
Operating, Care, Installation (all languages)
Page 17
...drum. 6. i If the door has not been closed properly, the dryer will not start. 7. Rotate the program selector to dry washable woolen textiles (e.g. The dryer light goes out. 11. The filter should be dried must have been spun! maximal dry load 2.2 lbs (1 kg)! The laundry must be sorted according to be... machine separately. If required, select Option" by pressing the button. Ensure that the drum is emitted (if set ). Open the dryer door. 2. If drying woolen clothing and shoes, see page 14. Open the door. 9. Close the door. Damp wool should be damaged...
...drum. 6. i If the door has not been closed properly, the dryer will not start. 7. Rotate the program selector to dry washable woolen textiles (e.g. The dryer light goes out. 11. The filter should be dried must have been spun! maximal dry load 2.2 lbs (1 kg)! The laundry must be sorted according to be... machine separately. If required, select Option" by pressing the button. Ensure that the drum is emitted (if set ). Open the dryer door. 2. If drying woolen clothing and shoes, see page 14. Open the door. 9. Close the door. Damp wool should be damaged...

Operating, Care, Installation (all languages)
Page 18
...approx. 30 min.). 5. Rotate program selector to fit the dryer rack. 2. Press the Start/Stop" button. Drying laundry items on the rack. Prepare shoes. Remove the lint filter. q Directly on next page. After drying, spread out the laundry at the front in the locating ...shoes on the outside. q Remove insoles and heel pads. Small items (e.g. This will ensure a more uniform drying result. 3. Lift the dryer rack horizontally into the drum. Laundry type Required drying time Thin woolen pullover 80 min. (approx. 0.8lbs/350 g) (e.g. 60 + 20 min) Thick woolen...
...approx. 30 min.). 5. Rotate program selector to fit the dryer rack. 2. Press the Start/Stop" button. Drying laundry items on the rack. Prepare shoes. Remove the lint filter. q Directly on next page. After drying, spread out the laundry at the front in the locating ...shoes on the outside. q Remove insoles and heel pads. Small items (e.g. This will ensure a more uniform drying result. 3. Lift the dryer rack horizontally into the drum. Laundry type Required drying time Thin woolen pullover 80 min. (approx. 0.8lbs/350 g) (e.g. 60 + 20 min) Thick woolen...

Operating, Care, Installation (all languages)
Page 19
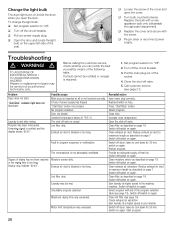
... Off". Clean the moisture sensor once a month. Cleaning the bearing shield Over time, fluff from the dryer. Remove the lint filter. d WARNING d Remove gas connection before and after each drying process. Do not use scouring agents or allĆpurpose cleaners. If a warning signal and an E01.... 2. This deposit can easily be cleaned because a fine layer of the door heats up during a drying program, clean the filter immediately and check the exhaust duct. 4. Take the dryer rack out of the door with a damp cloth only. ReĆinsert the lint filter. 3. Wipe the housing...
... Off". Clean the moisture sensor once a month. Cleaning the bearing shield Over time, fluff from the dryer. Remove the lint filter. d WARNING d Remove gas connection before and after each drying process. Do not use scouring agents or allĆpurpose cleaners. If a warning signal and an E01.... 2. This deposit can easily be cleaned because a fine layer of the door heats up during a drying program, clean the filter immediately and check the exhaust duct. 4. Take the dryer rack out of the door with a damp cloth only. ReĆinsert the lint filter. 3. Wipe the housing...
Operating, Care, Installation (all languages)
Page 20
... be rectified or a repair is emitted and the display shows E:01". Door not closed . Lint filter dirty. The room/cabinet is wet after drying. Lint filter dirty. Laundry was exceeded. Unsuitable program selected. Press Start/Stop" button. Reduce exhaust air duct to cool down for 30 min.... Start/Stop" indicator light does not illuminate. Possible cause Main plug not inserted at higher speed in dryer or reconnect power supply. Exhaust air duct is blocked or too long. Maximum drying time was too wet. Switch off /switch on page 19. Switch off /switch on again. Switch ...
... be rectified or a repair is emitted and the display shows E:01". Door not closed . Lint filter dirty. The room/cabinet is wet after drying. Lint filter dirty. Laundry was exceeded. Unsuitable program selected. Press Start/Stop" button. Reduce exhaust air duct to cool down for 30 min.... Start/Stop" indicator light does not illuminate. Possible cause Main plug not inserted at higher speed in dryer or reconnect power supply. Exhaust air duct is blocked or too long. Maximum drying time was too wet. Switch off /switch on page 19. Switch off /switch on again. Switch ...


