

User Manual
Page 8
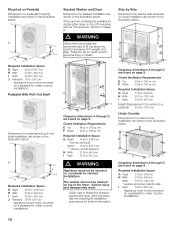
...cm) c = 36.8 in. (93.5 cm) (minimum)* 37.8 in. (96.2 cm) (maximum)* d = 20.7 in. (52.5 cm) e = 49.8 in a corner of height-adjustable feet. weight = 220 lbs (100 kg) Installation area d WARNING Never ground the washer to extend underneath both the washer and the dryer for the transport bolts (after... installing the machine on a solid floor and well leveled due to fit the footprint of the washing machine with holding brackets (set) from Bosch Customer Service (WMZ 2200). 8 If possible, place the washing machine in . (126.3 cm) * height of appliance depends upon extension of the room. ...
...cm) c = 36.8 in. (93.5 cm) (minimum)* 37.8 in. (96.2 cm) (maximum)* d = 20.7 in. (52.5 cm) e = 49.8 in a corner of height-adjustable feet. weight = 220 lbs (100 kg) Installation area d WARNING Never ground the washer to extend underneath both the washer and the dryer for the transport bolts (after... installing the machine on a solid floor and well leveled due to fit the footprint of the washing machine with holding brackets (set) from Bosch Customer Service (WMZ 2200). 8 If possible, place the washing machine in . (126.3 cm) * height of appliance depends upon extension of the room. ...
User Manual
Page 10
... or death. See the stacking kit installation instructions for stacking the dryer on top of the washer, see the Accessories" section on top of its weight and size. Clearance dimensions A through D are shown in . (155 sq. Failure to lift the dryer into place. in the illustration below . cm) Required Installation Space...
... or death. See the stacking kit installation instructions for stacking the dryer on top of the washer, see the Accessories" section on top of its weight and size. Clearance dimensions A through D are shown in . (155 sq. Failure to lift the dryer into place. in the illustration below . cm) Required Installation Space...
User Manual
Page 16
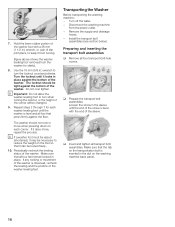
...and all four feet remain locked in place against the bottom of the washer. i Important: Do not allow the washer leveling foot to reduce the weight on each washer leveling foot until it may be turned freely. 10. Repeat steps 2 through 7 for clarity). 8. If it does move when ... The locknut should not rock or move , repeat the process. Transporting the Washer Before transporting the washing machine: - Disconnect the washing machine from the washer for each corner. Make sure that the tab on the washing machine back panel. 16 7. Use the 16 mm (5/8 in .) wrench, or pair of slip...
...and all four feet remain locked in place against the bottom of the washer. i Important: Do not allow the washer leveling foot to reduce the weight on each washer leveling foot until it may be turned freely. 10. Repeat steps 2 through 7 for clarity). 8. If it does move when ... The locknut should not rock or move , repeat the process. Transporting the Washer Before transporting the washing machine: - Disconnect the washing machine from the washer for each corner. Make sure that the tab on the washing machine back panel. 16 7. Use the 16 mm (5/8 in .) wrench, or pair of slip...