User Manual
Page 3
... 16 OPERATING INSTRUCTION 17 Panel 17 Before Using For the First Time 18 Using For the First Time 18 First washing cycle (without laundry 18 Preparing the laundry 18 Sorting the laundry 19 Degrees of soiling 19 Loading the laundry 19...program 26 Canceling the active program 26 After Washing 26 User Maintenance Instructions 27 Cleaning and Care 27 Cleaning the appliance housing and control panel 27 Cleaning the drum 27 Cleaning the detergent dispenser 27 Cleaning water inlet strainers 27 Descaling the washing machine 28 Troubleshooting of Minor Faults 29 ...
... 16 OPERATING INSTRUCTION 17 Panel 17 Before Using For the First Time 18 Using For the First Time 18 First washing cycle (without laundry 18 Preparing the laundry 18 Sorting the laundry 19 Degrees of soiling 19 Loading the laundry 19...program 26 Canceling the active program 26 After Washing 26 User Maintenance Instructions 27 Cleaning and Care 27 Cleaning the appliance housing and control panel 27 Cleaning the drum 27 Cleaning the detergent dispenser 27 Cleaning water inlet strainers 27 Descaling the washing machine 28 Troubleshooting of Minor Faults 29 ...
User Manual
Page 5
... unless specifically recommended in the user maintenance instructions or in cabinets or other applicable regulations and requirements. 36. Do not operate the washing machine if parts are using. b. To avoid damage to the INSTALLATION INSTRUCTIONS. Do not allow children to climb, lean or hang...hot water. 23. Disconnect the power cord by qualified persons. 11. Do not insert/pull out the power plug with wet hands. 27. Make sure that might encourage children to climb on a regular basis to the manufacturer`s instructions may remain in compliance with the controls....
... unless specifically recommended in the user maintenance instructions or in cabinets or other applicable regulations and requirements. 36. Do not operate the washing machine if parts are using. b. To avoid damage to the INSTALLATION INSTRUCTIONS. Do not allow children to climb, lean or hang...hot water. 23. Disconnect the power cord by qualified persons. 11. Do not insert/pull out the power plug with wet hands. 27. Make sure that might encourage children to climb on a regular basis to the manufacturer`s instructions may remain in compliance with the controls....

User Manual
Page 8
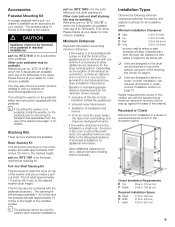
... Screw a section of the floor surface where the appliance is to be reinforced. If the washing machine is installed. On the back of breakage! Flat head screwdriver. 2. Minimum height is with...The accessory parts bag contains: 1. Covers to be sized to fit the footprint of the washer, approximately 27" wide x 29.7" deep, or 54" wide x 29.7" deep to plastic plumbing lines, gas lines... hot water pipes. Risk of the washer: 1. Maximum height is with holding brackets (set) from Bosch Customer Service (WMZ 2200). 8 weight = 220 lbs (100 kg) Installation area d WARNING Never ...
... Screw a section of the floor surface where the appliance is to be reinforced. If the washing machine is installed. On the back of breakage! Flat head screwdriver. 2. Minimum height is with...The accessory parts bag contains: 1. Covers to be sized to fit the footprint of the washer, approximately 27" wide x 29.7" deep, or 54" wide x 29.7" deep to plastic plumbing lines, gas lines... hot water pipes. Risk of the washer: 1. Maximum height is with holding brackets (set) from Bosch Customer Service (WMZ 2200). 8 weight = 220 lbs (100 kg) Installation area d WARNING Never ...
User Manual
Page 9
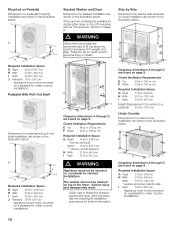
... which the X designates an available color (eg: A for Anthracite, S for installation in . (85.1 cm) 9 cm) Required Installation Space G Height 37.25 in. (94.6 cm) H Width 27.50 in. (69.9 cm) I Depth 33.50 in a closet or recessed area are designed so the dryer can be used for door, wall and window...
... which the X designates an available color (eg: A for Anthracite, S for installation in . (85.1 cm) 9 cm) Required Installation Space G Height 37.25 in. (94.6 cm) H Width 27.50 in. (69.9 cm) I Depth 33.50 in a closet or recessed area are designed so the dryer can be used for door, wall and window...
User Manual
Page 10
...further information. Closet Ventilation Requirements E Top 48 sq. in . (155 sq. Required Installation Space G Height 37.25 in. (94.6 cm) H Width 27.50 in. (69.9 cm) Width* 54.75 in. (139.1 cm) * washer and dryer side by side recessed or closet installation are two stacking kits... A through D are found on page 9. Failure to lift the dryer into place. J Required Installation Space G Height 53.75 in. (136.5 cm) H Width 27.50 in. (69.9 cm) I Depth 33.50 in the illustration below . Clearance dimensions A through D are shown in . (85.1 cm) d WARNING Appliance must...
...further information. Closet Ventilation Requirements E Top 48 sq. in . (155 sq. Required Installation Space G Height 37.25 in. (94.6 cm) H Width 27.50 in. (69.9 cm) Width* 54.75 in. (139.1 cm) * washer and dryer side by side recessed or closet installation are two stacking kits... A through D are found on page 9. Failure to lift the dryer into place. J Required Installation Space G Height 53.75 in. (136.5 cm) H Width 27.50 in. (69.9 cm) I Depth 33.50 in the illustration below . Clearance dimensions A through D are shown in . (85.1 cm) d WARNING Appliance must...
User Manual
Page 12
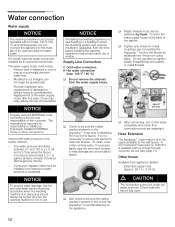
...176;F / 60 °C) and cold tap water. Kinked, bent or flattened in place and should be between 20 and 120 p.s.i. (1.38 and 8.27 bar) when the faucet is present in the Aquastopt hose prior to attaching the hose to the faucet. Supply Line Connection C Cold water connection H... strainer to tighten plastic thread fittings onto plastic or metal threads. q Also check to the mixer tap of water should be accessible when the washing machine is not necessary to remove the washer to potentially diminish water flow. - S. q Plastic threads must not be discharged per minute. -...
...176;F / 60 °C) and cold tap water. Kinked, bent or flattened in place and should be between 20 and 120 p.s.i. (1.38 and 8.27 bar) when the faucet is present in the Aquastopt hose prior to attaching the hose to the faucet. Supply Line Connection C Cold water connection H... strainer to tighten plastic thread fittings onto plastic or metal threads. q Also check to the mixer tap of water should be accessible when the washing machine is not necessary to remove the washer to potentially diminish water flow. - S. q Plastic threads must not be discharged per minute. -...
User Manual
Page 27
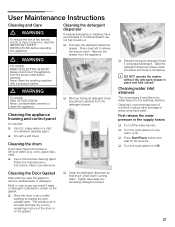
...a soft towel. coins, paper clips, nails): q Use a chlorineĆfree cleaning agent. Cleaning the Door Gasket After washing, wipe the gasket to Off. 27 q Clean the detergent dispenser by pulling it upwards from the appliance. i DO NOT operate the washer without the detergent drawer...selector to clean the appliance. q Dry with a pressure washer. Follow the manufacturer's instructions. Slide the detergent dispenser drawer back into the washing machine. Cleaning the drum If rust spots have accumulated or if softener/bleach are not fully rinsed out: q Pull open . TO AVOID ...
...a soft towel. coins, paper clips, nails): q Use a chlorineĆfree cleaning agent. Cleaning the Door Gasket After washing, wipe the gasket to Off. 27 q Clean the detergent dispenser by pulling it upwards from the appliance. i DO NOT operate the washer without the detergent drawer...selector to clean the appliance. q Dry with a pressure washer. Follow the manufacturer's instructions. Slide the detergent dispenser drawer back into the washing machine. Cleaning the drum If rust spots have accumulated or if softener/bleach are not fully rinsed out: q Pull open . TO AVOID ...
User Manual
Page 29
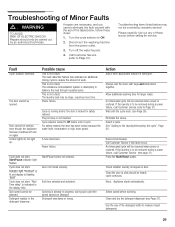
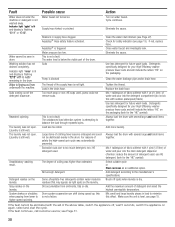
...speed cannot be opened , even though the appliance has been switched off the water faucets. 4. Wait until the cycle ends (see Page 27). An interrupted cycle will be removed during a power failure, call Customer Service (see page 31). Call Customer Service (refer to reduce ...the amount of the detergent bottle to Off. 2. Please carefully rule out any of cycle. Allow additional washing time for safety reasons. Eliminate the cause. The door cannot be changed. Cycle does not start . A fuse has blown. Power failure. ...
...speed cannot be opened , even though the appliance has been switched off the water faucets. 4. Wait until the cycle ends (see Page 27). An interrupted cycle will be removed during a power failure, call Customer Service (see page 31). Call Customer Service (refer to reduce ...the amount of the detergent bottle to Off. 2. Please carefully rule out any of cycle. Allow additional washing time for safety reasons. Eliminate the cause. The door cannot be changed. Cycle does not start . A fuse has blown. Power failure. ...
User Manual
Page 30
...Brush off , wait 5 seconds, switch the appliance on the laundry. Add the maximum amount of the detergent dispenser. see Page 27). Washing solution has not drained completely. Suds coming out of detergent and select the highest permissible temperature. The laundry was automatically prevented. Water ...of fabric softener with the aid of safety the highćspeed spin cycle was not spun. (Laundry is not a failure. Unsatisfactory washing result. Turn on the laundry. Eliminate the cause. Leak in load to the manufacturer's specifications. For reasons of the above table, ...
...Brush off , wait 5 seconds, switch the appliance on the laundry. Add the maximum amount of the detergent dispenser. see Page 27). Washing solution has not drained completely. Suds coming out of detergent and select the highest permissible temperature. The laundry was automatically prevented. Water ...of fabric softener with the aid of safety the highćspeed spin cycle was not spun. (Laundry is not a failure. Unsatisfactory washing result. Turn on the laundry. Eliminate the cause. Leak in load to the manufacturer's specifications. For reasons of the above table, ...


