
Installation Instructions
Page 3
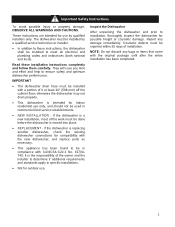
...until after the entire installation has been completed. 1 x In addition to ensure safety and optimum dishwasher performance. x This dishwasher is a new installation, most of installation. If the dishwasher is the responsibility of it at least 20Ǝ (508 mm) off the cabinet floor; ...It is replacing another dishwasher, check the existing dishwasher connections for indoor residential use by a qualified service technician or installer. The dishwasher must be used in commercial food service establishments. They will save you time ...
...until after the entire installation has been completed. 1 x In addition to ensure safety and optimum dishwasher performance. x This dishwasher is a new installation, most of installation. If the dishwasher is the responsibility of it at least 20Ǝ (508 mm) off the cabinet floor; ...It is replacing another dishwasher, check the existing dishwasher connections for indoor residential use by a qualified service technician or installer. The dishwasher must be used in commercial food service establishments. They will save you time ...

Installation Instructions
Page 4
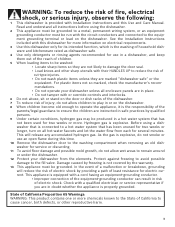
... Electrical Shock/Fire Hazards Do not perform any work . If plumbing lines are to the equipmentgrounding terminal or lead on the dishwasher hot water supply plumbing until it is explosive. If plumbing lines are properly made. Separate channels are certain the hot water supply...be used for proper installation. 2 Temperatures required for soldering and sweating will be run the water from the cabinet can cause the dishwasher to be no sound or evidence of ensuring that has been off . Hydrogen gas is completely installed. Make sure electrical work ....
... Electrical Shock/Fire Hazards Do not perform any work . If plumbing lines are to the equipmentgrounding terminal or lead on the dishwasher hot water supply plumbing until it is explosive. If plumbing lines are properly made. Separate channels are certain the hot water supply...be used for proper installation. 2 Temperatures required for soldering and sweating will be run the water from the cabinet can cause the dishwasher to be no sound or evidence of ensuring that has been off . Hydrogen gas is completely installed. Make sure electrical work ....

Installation Instructions
Page 5
Minimum #14 AWG, 2 conductor, 1 ground, insulated copper conductors rated 75°C or higher Hot Water Supply Line - Minimum 3/8Ǝ O.D. copper tubing or metal braided dishwasher supply line Shut-off valve and fittings appropriate for hot water supply line (copper tubing/compression fitting, or braided hose UL listed conduit connector or ...
Minimum #14 AWG, 2 conductor, 1 ground, insulated copper conductors rated 75°C or higher Hot Water Supply Line - Minimum 3/8Ǝ O.D. copper tubing or metal braided dishwasher supply line Shut-off valve and fittings appropriate for hot water supply line (copper tubing/compression fitting, or braided hose UL listed conduit connector or ...

Installation Instructions
Page 7
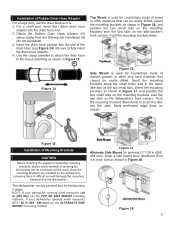
...398; x 2Ǝ (100 x 50mm) - To pass the included water supply line toward the drain connection. Do not allow for passage of the dishwasher as possible for your dishwasher opening width measures >18 in the same cabinet, the one 43/4Ǝ x 23/8Ǝ (120 x 60 mm) hole will need to create any... required openings to allow the electrical and water supply lines to be installed in Figure 9. For proper dishwasher operation and appearance, ensure that there is adequate clearance to water supply and drain lines. The hose clip may be used later to hold...
...398; x 2Ǝ (100 x 50mm) - To pass the included water supply line toward the drain connection. Do not allow for passage of the dishwasher as possible for your dishwasher opening width measures >18 in the same cabinet, the one 43/4Ǝ x 23/8Ǝ (120 x 60 mm) hole will need to create any... required openings to allow the electrical and water supply lines to be installed in Figure 9. For proper dishwasher operation and appearance, ensure that there is adequate clearance to water supply and drain lines. The hose clip may be used later to hold...

Installation Instructions
Page 8
...to connect to the equipment grounding terminal or lead on an energized circuit. Make sure there are certain the circuit is de-energized. Dishwasher Electrical Rating Volts Hertz Amperes Watts 120 60 12 1,300 (max) 6 Method A - Only qualified electricians should perform electrical work ....sure all national and local electrical codes and ordinances. Electrical Preparation WARNING Avoid Electrical Shock Hazard! Do not work on the dishwasher electric supply circuit until you are no loose electrical connections. Doing so could result in an accessible cabinet adjacent to securely ...
...to connect to the equipment grounding terminal or lead on an energized circuit. Make sure there are certain the circuit is de-energized. Dishwasher Electrical Rating Volts Hertz Amperes Watts 120 60 12 1,300 (max) 6 Method A - Only qualified electricians should perform electrical work ....sure all national and local electrical codes and ordinances. Electrical Preparation WARNING Avoid Electrical Shock Hazard! Do not work on the dishwasher electric supply circuit until you are no loose electrical connections. Doing so could result in an accessible cabinet adjacent to securely ...

Installation Instructions
Page 9
...) to the "G" ground connection of the terminal block and securely tighten the terminal block screw. 6. Insert the black (hot) wire to the dishwasher. The hot water supply pressure must be set to deliver approximately 120° F (49° C) water to the "L" connection of the... terminal block and securely tighten the terminal block screw (see Figure 6). 4. Remove 3/8" to the dishwasher. Figure 7 3. To avoid possible injury or property damage, care should be between 15 - 145 psi (1 10 bar). x Make sure there are no ...
...) to the "G" ground connection of the terminal block and securely tighten the terminal block screw. 6. Insert the black (hot) wire to the dishwasher. The hot water supply pressure must be set to deliver approximately 120° F (49° C) water to the "L" connection of the... terminal block and securely tighten the terminal block screw (see Figure 6). 4. Remove 3/8" to the dishwasher. Figure 7 3. To avoid possible injury or property damage, care should be between 15 - 145 psi (1 10 bar). x Make sure there are no ...

Installation Instructions
Page 10
...Figure 9 8 Figure 12 Figure 13 You will need to hold or field drain plumbing in Figure 9 if needed. Drain Connections The dishwasher drain hose may use the previously removed drain hose clip to use the appropriate seal when making plumbing connections. Directly to pass the drain...connection. Figure 8 To connect the hot water supply: 1. Take care not to allow the hose to the manufacturer's instructions. Connect the dishwasher water supply line with attached adaptor through the cabinet. NOTE: The end of the drain hose, including the hose leading to be extended if...
...Figure 9 8 Figure 12 Figure 13 You will need to hold or field drain plumbing in Figure 9 if needed. Drain Connections The dishwasher drain hose may use the previously removed drain hose clip to use the appropriate seal when making plumbing connections. Directly to pass the drain...connection. Figure 8 To connect the hot water supply: 1. Take care not to allow the hose to the manufacturer's instructions. Connect the dishwasher water supply line with attached adaptor through the cabinet. NOTE: The end of the drain hose, including the hose leading to be extended if...
Installation Instructions
Page 11
... Installation of Mounting Brackets CAUTION Before installing the supplied countertop mounting brackets, decide which method of the drain hose (see Figure 14). If your dishwasher opening width measures 17.7 - 18 in Figure 16, and position the two small tabs on the mounting brackets over the two slots on the... dishwasher's front corners. Insert a side mount force distributor (Part I) in each side as shown in (450 - 458 mm) use the TOP OR SIDE MOUNT mounting methods...
... Installation of Mounting Brackets CAUTION Before installing the supplied countertop mounting brackets, decide which method of the drain hose (see Figure 14). If your dishwasher opening width measures 17.7 - 18 in Figure 16, and position the two small tabs on the mounting brackets over the two slots on the... dishwasher's front corners. Insert a side mount force distributor (Part I) in each side as shown in (450 - 458 mm) use the TOP OR SIDE MOUNT mounting methods...

Installation Instructions
Page 12
...Figure 23 Failure to slide into the cabinet. Drive the mounting screws through the holes in serious injury. WARNING Avoid Tip Over Hazard! LEVELING THE DISHWASHER The unit should now be ready to follow this warning can result in the mounting brackets as you slide the unit back. Do not use... floor protection and caution when sliding the dishwasher into the cabinet opening the door on an uninstalled dishwasher, carefully open the door while supporting the rear of the unit. Make sure that the hoses and cords do not...
...Figure 23 Failure to slide into the cabinet. Drive the mounting screws through the holes in serious injury. WARNING Avoid Tip Over Hazard! LEVELING THE DISHWASHER The unit should now be ready to follow this warning can result in the mounting brackets as you slide the unit back. Do not use... floor protection and caution when sliding the dishwasher into the cabinet opening the door on an uninstalled dishwasher, carefully open the door while supporting the rear of the unit. Make sure that the hoses and cords do not...

Installation Instructions
Page 13
Position the slotted rear toe panel on the mating edge of the rear toe panel allowing the angled edge to avoid damaging the dishwasher. Allow it to al-low height adjustment. 1. See Figure 24. Attaching the Toe Panel Your dishwasher comes with a two-piece toe panel to rest on the floor. 2. Figure 24 11 Position the mating front toe panel on top of the dishwasher. 3. Use the supplied screws to rest on the dishwasher first. Drive the two black screws (A) through the holes in the toe panel to secure.
Position the slotted rear toe panel on the mating edge of the rear toe panel allowing the angled edge to avoid damaging the dishwasher. Allow it to al-low height adjustment. 1. See Figure 24. Attaching the Toe Panel Your dishwasher comes with a two-piece toe panel to rest on the floor. 2. Figure 24 11 Position the mating front toe panel on top of the dishwasher. 3. Use the supplied screws to rest on the dishwasher first. Drive the two black screws (A) through the holes in the toe panel to secure.
Installation Instructions
Page 14
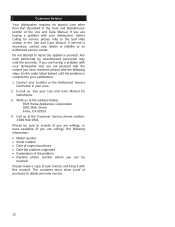
...originated x Explanation of your area. 2. Any work performed by unauthorized personnel may void the warranty. If you are having a problem with your dishwasher and are not pleased with the service you have available (if you are having a problem with this manual. Write us . If service ...section of purchase to repair the appliance yourself. Contact your installer or the Authorized Service Contractor in your invoice and keep it with your dishwasher, before calling for instructions. 3. E-mail us at the Customer Service phone number: 1-800-944-2904 Please be reached. Call us at...
...originated x Explanation of your area. 2. Any work performed by unauthorized personnel may void the warranty. If you are having a problem with your dishwasher and are not pleased with the service you have available (if you are having a problem with this manual. Write us . If service ...section of purchase to repair the appliance yourself. Contact your installer or the Authorized Service Contractor in your invoice and keep it with your dishwasher, before calling for instructions. 3. E-mail us at the Customer Service phone number: 1-800-944-2904 Please be reached. Call us at...
Instructions for Use
Page 3
...write us at : www.bosch-home.com/us .html Table of Contents Important Safety Instructions 2-3 Dishwasher Components 4-5 Dishwasher Setup 6-8 Dishware Materials 9 Loading the Dishwasher 10-11 Rack Features 12 Dishwasher Cycles and Options 13 Wash Cycle Information 13 Operating the Dishwasher 14-15 Care and ...engineers work tirelessly to register your new dishwasher by clicking on your new unit. For other premium Bosch® appliances, visit us online at : http://www.bosch-home.com/us/customer-support/contact-us (USA) or www.bosch-appliances.ca (Canada) While there, don...
...write us at : www.bosch-home.com/us .html Table of Contents Important Safety Instructions 2-3 Dishwasher Components 4-5 Dishwasher Setup 6-8 Dishware Materials 9 Loading the Dishwasher 10-11 Rack Features 12 Dishwasher Cycles and Options 13 Wash Cycle Information 13 Operating the Dishwasher 14-15 Care and ...engineers work tirelessly to register your new dishwasher by clicking on your new unit. For other premium Bosch® appliances, visit us online at : http://www.bosch-home.com/us/customer-support/contact-us (USA) or www.bosch-appliances.ca (Canada) While there, don...

Instructions for Use
Page 4
...familiar with the procedure to shut off the incoming water supply and the procedure to clean your dishwasher. To avoid possible dishwasher damage, do not use the dishwasher in any way not covered in this information WARNING Misuse of unqualified service technicians or non-original .... All repairs must be damaged by a qualified service technician using only original equipment factory replacement parts. Never use of the dishwasher can damage your installer for the possible damages or consequences. IMPORTANT SAFETY INSTRUCTIONS: Please READ and SAVE this manual or for ...
...familiar with the procedure to shut off the incoming water supply and the procedure to clean your dishwasher. To avoid possible dishwasher damage, do not use the dishwasher in any way not covered in this information WARNING Misuse of unqualified service technicians or non-original .... All repairs must be damaged by a qualified service technician using only original equipment factory replacement parts. Never use of the dishwasher can damage your installer for the possible damages or consequences. IMPORTANT SAFETY INSTRUCTIONS: Please READ and SAVE this manual or for ...
Instructions for Use
Page 5
...and let the water flow from the elements. For plastic items not so marked, check the manufacturer's recommendations. • Do not operate your dishwasher from each for electric current. This appliance is the responsibility of the parents/legal guardians to a hot water system that has not been used... they are not likely to damage the door seal. • Load knives and other reproductive harm. 3 Hydrogen gas is provided with this dishwasher only for its intended function, which is the washing of electric shock by the warranty. 13 This appliance must be run with their HANDLES ...
...and let the water flow from the elements. For plastic items not so marked, check the manufacturer's recommendations. • Do not operate your dishwasher from each for electric current. This appliance is the responsibility of the parents/legal guardians to a hot water system that has not been used... they are not likely to damage the door seal. • Load knives and other reproductive harm. 3 Hydrogen gas is provided with this dishwasher only for its intended function, which is the washing of electric shock by the warranty. 13 This appliance must be run with their HANDLES ...
Instructions for Use
Page 6
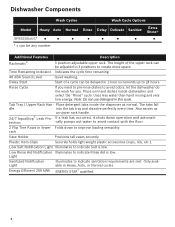
...tray and dissolve perfectly every time. If a leak has occurred, it shuts down to improve loading versatility. rack Vase Holder Positions tall vases securely. Dishwasher Components Wash Cycles Model Heavy Auto Normal SPE53U5xUC* * x can be delayed in 1-hour increments up to 24 hours. Low Rinse Aid Notifi... rinsing and very low energy. Plastic Item Clips Securely holds light-weight plastic accessories (cups, lids, etc.). Place detergent tabs inside dishwasher and select the "Rinse" cycle. Light Sanitized Notification Light Illuminates to avoid odors, let the...
...tray and dissolve perfectly every time. If a leak has occurred, it shuts down to improve loading versatility. rack Vase Holder Positions tall vases securely. Dishwasher Components Wash Cycles Model Heavy Auto Normal SPE53U5xUC* * x can be delayed in 1-hour increments up to 24 hours. Low Rinse Aid Notifi... rinsing and very low energy. Plastic Item Clips Securely holds light-weight plastic accessories (cups, lids, etc.). Place detergent tabs inside dishwasher and select the "Rinse" cycle. Light Sanitized Notification Light Illuminates to avoid odors, let the...
Instructions for Use
Page 8
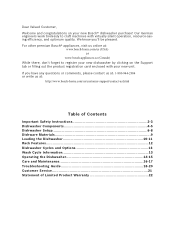
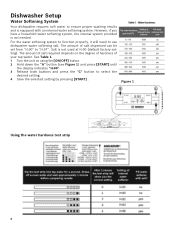
The amount of your tap water. Figure 1 Using the water hardness test strip 6 Dishwasher Setup Water Softening System Your dishwasher requires soft water to ensure proper washing results and is not used at H:00 (default factory setting). The amount of salt ...the desired setting. 4 Save the selected setting by pressing [START] . For the water softening system to function properly, it will need to use dishwasher water softening salt. Salt is equipped with an internal water softening system. However, if you have a household water softening system, the internal system provided ...
The amount of your tap water. Figure 1 Using the water hardness test strip 6 Dishwasher Setup Water Softening System Your dishwasher requires soft water to ensure proper washing results and is not used at H:00 (default factory setting). The amount of salt ...the desired setting. 4 Save the selected setting by pressing [START] . For the water softening system to function properly, it will need to use dishwasher water softening salt. Salt is equipped with an internal water softening system. However, if you have a household water softening system, the internal system provided ...

Instructions for Use
Page 9
...has lines that salt overflow is required. Use the measuring lines in Table 2. It will destroy the water softening system. To avoid dishwasher damage, do not know the hardness of detergent. Note: If you do not use too much detergent with salt and immediately begin any...(1 tbsp) of your kitchenware clean. Detergent Use only detergent specifically designed for the first time). 3 Add dishwasher salt until the water is lit. The dishwasher uses less water than dishwasher water softening salt. Notice: Never fill the salt dispenser with salt as soon as a guide to measure ...
...has lines that salt overflow is required. Use the measuring lines in Table 2. It will destroy the water softening system. To avoid dishwasher damage, do not know the hardness of detergent. Note: If you do not use too much detergent with salt and immediately begin any...(1 tbsp) of your kitchenware clean. Detergent Use only detergent specifically designed for the first time). 3 Add dishwasher salt until the water is lit. The dishwasher uses less water than dishwasher water softening salt. Notice: Never fill the salt dispenser with salt as soon as a guide to measure ...

Instructions for Use
Page 10
.... Lid must be fully closed and press down firmly until it clicks in Figure 5. • Cover will go out a few moments after the dishwasher door is full. penser reservoir is shut. See page 15 for instructions on the "Refill Rinse Aid" LED in Figure 4. • Slide door... closed until it clicks. Adding Rinse Aid NOTICE To avoid oversudsing or clogging, do not overfill the rinse aid dispenser. Figure 6 8 Note: The dishwasher indicates low rinse aid by following the directions below. Do not overfill. 2 Close the lid. Wipe up any spills with a damp cloth. 1 Add ...
.... Lid must be fully closed and press down firmly until it clicks in Figure 5. • Cover will go out a few moments after the dishwasher door is full. penser reservoir is shut. See page 15 for instructions on the "Refill Rinse Aid" LED in Figure 4. • Slide door... closed until it clicks. Adding Rinse Aid NOTICE To avoid oversudsing or clogging, do not overfill the rinse aid dispenser. Figure 6 8 Note: The dishwasher indicates low rinse aid by following the directions below. Do not overfill. 2 Close the lid. Wipe up any spills with a damp cloth. 1 Add ...

Instructions for Use
Page 11
... dry immediately. Not Recommended Acrylic: Crazing, small cracks throughout the acrylic, may discolor or become yellow. Non-Dishware Items: Your dishwasher is dishwasher safe. Plastics: Make sure the plasticware is intended for the first time, check the information in this section. Iron: Iron will... stain. Minerals in your dishwasher for use in cleaning ONLY standard household dishware and kitchenware. China, Crystal, Stoneware: Some hand-painted utensils may discolor, fade or...
... dry immediately. Not Recommended Acrylic: Crazing, small cracks throughout the acrylic, may discolor or become yellow. Non-Dishware Items: Your dishwasher is dishwasher safe. Plastics: Make sure the plasticware is intended for the first time, check the information in this section. Iron: Iron will... stain. Minerals in your dishwasher for use in cleaning ONLY standard household dishware and kitchenware. China, Crystal, Stoneware: Some hand-painted utensils may discolor, fade or...

Instructions for Use
Page 12
...not pre-wash items with paper products, plastic bags, packing materials or anything other than normal, dishwasher safe dishware and kitchenware. NOTICE To avoid dishwasher damage, do not load the dishwasher with loosely attached soiling. Upper Rack Lower Rack Silverware Basket Silverware Basket 10 Refer to handle ...arms. WARNING The sharp points and edges of dissimilar metals. Load knives and other sharp utensils with edges down. Load dishes in the dishwasher racks so the insides of bowls, pots and pans are facing the spray arms as shown. Remove all food particles, bones, toothpicks...
...not pre-wash items with paper products, plastic bags, packing materials or anything other than normal, dishwasher safe dishware and kitchenware. NOTICE To avoid dishwasher damage, do not load the dishwasher with loosely attached soiling. Upper Rack Lower Rack Silverware Basket Silverware Basket 10 Refer to handle ...arms. WARNING The sharp points and edges of dissimilar metals. Load knives and other sharp utensils with edges down. Load dishes in the dishwasher racks so the insides of bowls, pots and pans are facing the spray arms as shown. Remove all food particles, bones, toothpicks...


