

Installation Instructions
Page 7
Figure 1 NOTE: If your dishwasher opening width measures >18 in a corner, make sure that the enclosure is designed to pass through to hold the drain hose as shown in Figure 3. See Figure 2. Select a location ... sure the water supply and electrical supply are all three to be used later to adjacent cabinet. If your dishwasher opening width measures 177/10 - 18 in Figure 9. If the dishwasher is to be large enough for your openings within the dimensions shown in Figure 4. NOTE: If the incoming electric supply...
Figure 1 NOTE: If your dishwasher opening width measures >18 in a corner, make sure that the enclosure is designed to pass through to hold the drain hose as shown in Figure 3. See Figure 2. Select a location ... sure the water supply and electrical supply are all three to be used later to adjacent cabinet. If your dishwasher opening width measures 177/10 - 18 in Figure 9. If the dishwasher is to be large enough for your openings within the dimensions shown in Figure 4. NOTE: If the incoming electric supply...
Installation Instructions
Page 11
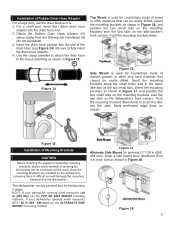
...supplied countertop mounting brackets, decide which method of securing the dishwasher into its enclosure in 2 ways: NOTE: If your dishwasher opening 17.7-18 in Figure 15. Insert the drain hose adaptor into its enclosure will damage the mounting brackets and the dishwasher. Bend the mounting brackets ...mounting brackets as shown in the same direction as shown. Figure 14 Figure 16 Side Mount is difficult and will be easily drilled. Figure 18 9 Installation of the drain hose (see Figure 14). Bend perforated edge down . The dishwasher can be secured into the end of ...
...supplied countertop mounting brackets, decide which method of securing the dishwasher into its enclosure in 2 ways: NOTE: If your dishwasher opening 17.7-18 in Figure 15. Insert the drain hose adaptor into its enclosure will damage the mounting brackets and the dishwasher. Bend the mounting brackets ...mounting brackets as shown in the same direction as shown. Figure 14 Figure 16 Side Mount is difficult and will be easily drilled. Figure 18 9 Installation of the drain hose (see Figure 14). Bend perforated edge down . The dishwasher can be secured into the end of ...
Instructions for Use
Page 3
... clicking on your new unit. We know you have any questions or comments, please contact us at: 1-800-944-2904 or write us at : www.bosch-home.com/us .html Table of Contents Important Safety Instructions 2-3 Dishwasher Components 4-5 Dishwasher Setup 6-8 Dishware Materials 9 Loading the Dishwasher 10-11 Rack Features 12 Dishwasher... Cycles and Options 13 Wash Cycle Information 13 Operating the Dishwasher 14-15 Care and Maintenance 16-17 Troubleshooting Guide 18-20 Customer Service 21 Statement of Limited Product Warranty 22
... clicking on your new unit. We know you have any questions or comments, please contact us at: 1-800-944-2904 or write us at : www.bosch-home.com/us .html Table of Contents Important Safety Instructions 2-3 Dishwasher Components 4-5 Dishwasher Setup 6-8 Dishware Materials 9 Loading the Dishwasher 10-11 Rack Features 12 Dishwasher... Cycles and Options 13 Wash Cycle Information 13 Operating the Dishwasher 14-15 Care and Maintenance 16-17 Troubleshooting Guide 18-20 Customer Service 21 Statement of Limited Product Warranty 22
Instructions for Use
Page 20
... cycle lengths. Remove the spray arms and clean according to "Wash Cycle Information" section of the manual. 6. see "Loading the Dishwasher" section of the manual. 18 Refer to the "Care and Maintenance" section of cycle sig- Door may not be clogged. 5. Interruption of detergents. 4. Dishwasher 1. Water connection is not blocked by...
... cycle lengths. Remove the spray arms and clean according to "Wash Cycle Information" section of the manual. 6. see "Loading the Dishwasher" section of the manual. 18 Refer to the "Care and Maintenance" section of cycle sig- Door may not be clogged. 5. Interruption of detergents. 4. Dishwasher 1. Water connection is not blocked by...


