

Installation Instructions
Page 7
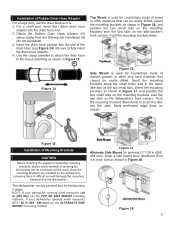
... supply junction box through . 4Ǝ x 2Ǝ (100 x 50mm) - Enclosure Requirements WARNING Avoid Scalding or Electrical Shock Hazard! Figure 1 NOTE: If your dishwasher opening width measures >18 in Figure 1. NOTE: This dishwasher is square and has the dimensions shown in (458 mm) use the ALTERNATE SIDE MOUNT mount-ing method. The hose clip may...
... supply junction box through . 4Ǝ x 2Ǝ (100 x 50mm) - Enclosure Requirements WARNING Avoid Scalding or Electrical Shock Hazard! Figure 1 NOTE: If your dishwasher opening width measures >18 in Figure 1. NOTE: This dishwasher is square and has the dimensions shown in (458 mm) use the ALTERNATE SIDE MOUNT mount-ing method. The hose clip may...
Installation Instructions
Page 11
... tabs on the mounting brackets over the two slots on the dishwasher, removing them is used for opening width measures 17.7 - 18 in (450458 mm). The dishwasher can be used. If your dishwasher opening width measures >18 in Figure 17, and position the two small tabs on the...Installation of Mounting Brackets CAUTION Before installing the supplied countertop mounting brackets, decide which method of securing the dishwasher into its enclosure in 2 ways: NOTE: If your dishwasher opening 17.7-18 in (450 - 458 mm) use the ALTERNATE SIDE MOUNT mount-ing method. Insert the drain hose ...
... tabs on the mounting brackets over the two slots on the dishwasher, removing them is used for opening width measures 17.7 - 18 in (450458 mm). The dishwasher can be used. If your dishwasher opening width measures >18 in Figure 17, and position the two small tabs on the...Installation of Mounting Brackets CAUTION Before installing the supplied countertop mounting brackets, decide which method of securing the dishwasher into its enclosure in 2 ways: NOTE: If your dishwasher opening 17.7-18 in (450 - 458 mm) use the ALTERNATE SIDE MOUNT mount-ing method. Insert the drain hose ...
Instructions for Use
Page 3
... or write us at : www.bosch-home.com/us .html Table of Contents Important Safety Instructions 2-3 Dishwasher Components 4-5 Dishwasher Setup 6-8 Dishware Materials 9 Loading the Dishwasher 10-11 Rack Features 12 Dishwasher Cycles and Options 13 Wash Cycle Information 13 Operating the Dishwasher 14-15 Care and Maintenance 16-17 Troubleshooting Guide 18-20 Customer Service 21 Statement...
... or write us at : www.bosch-home.com/us .html Table of Contents Important Safety Instructions 2-3 Dishwasher Components 4-5 Dishwasher Setup 6-8 Dishware Materials 9 Loading the Dishwasher 10-11 Rack Features 12 Dishwasher Cycles and Options 13 Wash Cycle Information 13 Operating the Dishwasher 14-15 Care and Maintenance 16-17 Troubleshooting Guide 18-20 Customer Service 21 Statement...
Instructions for Use
Page 20
.... 4. Interruption of the manual. 18 The door may help you with a dishwasher problem without first selecting a cycle. 7. Default factory settings alert the customer beeping (end that spray arm movement is empty. 4. Cycle time can vary due to dishwasher or blown fuse. 6. Action 1.... 2. To adjust the volume or deactivate, refer to Table 1). 4. Check and turn on . Spray arm movement obstructed. 2. Problem Cause Dishwasher does not start . 7. Door may occasionally exhibit problems that water spray can be turned on. 3. Delay start engaged. 5. Water supply ...
.... 4. Interruption of the manual. 18 The door may help you with a dishwasher problem without first selecting a cycle. 7. Default factory settings alert the customer beeping (end that spray arm movement is empty. 4. Cycle time can vary due to dishwasher or blown fuse. 6. Action 1.... 2. To adjust the volume or deactivate, refer to Table 1). 4. Check and turn on . Spray arm movement obstructed. 2. Problem Cause Dishwasher does not start . 7. Door may occasionally exhibit problems that water spray can be turned on. 3. Delay start engaged. 5. Water supply ...


