
Installation Instructions
Page 3
... items that come with the new dishwasher, and replace parts as necessary. • This appliance has been found to these installation instructions completely and follow them carefully. These instructions are properly made before the dishwasher is designed to meet all connections are intended for possible freight or cosmetic damage. IMPORTANT • The dishwasher drain hose must be installed by qualified installers only. NOTE: Do not...
... items that come with the new dishwasher, and replace parts as necessary. • This appliance has been found to these installation instructions completely and follow them carefully. These instructions are properly made before the dishwasher is designed to meet all connections are intended for possible freight or cosmetic damage. IMPORTANT • The dishwasher drain hose must be installed by qualified installers only. NOTE: Do not...

Installation Instructions
Page 4
... installed. Avoiding Electrical Shock/Fire Hazards Do not work is designed for an electrical supply of the unit. Make sure electrical work on an uninstalled dishwasher, carefully open the door while supporting the rear of 120V, 60 Hz, AC, connected to follow this warning can expose hot water connections, electrical power and sharp edges or points. Handle with a fuse or breaker rated for 15 amps. WARNING Avoiding General Hazards Do not use...
... installed. Avoiding Electrical Shock/Fire Hazards Do not work is designed for an electrical supply of the unit. Make sure electrical work on an uninstalled dishwasher, carefully open the door while supporting the rear of 120V, 60 Hz, AC, connected to follow this warning can expose hot water connections, electrical power and sharp edges or points. Handle with a fuse or breaker rated for 15 amps. WARNING Avoiding General Hazards Do not use...
Installation Instructions
Page 12
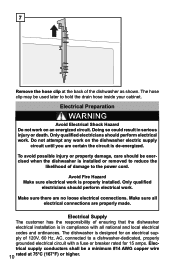
... or property damage, care should be used later to hold the drain hose inside your cabinet. Only qualified electricians should perform electrical work . The dishwasher is in serious injury or death. Only qualified electricians should perform electrical work . Electrical Supply The customer has the responsibility of ensuring that the dishwasher electrical installation is designed for an electrical supply of 120V, 60 Hz, AC, connected to the power cord. 7 Remove the hose clip at 75...
... or property damage, care should be used later to hold the drain hose inside your cabinet. Only qualified electricians should perform electrical work . The dishwasher is in serious injury or death. Only qualified electricians should perform electrical work . Electrical Supply The customer has the responsibility of ensuring that the dishwasher electrical installation is designed for an electrical supply of 120V, 60 Hz, AC, connected to the power cord. 7 Remove the hose clip at 75...
Installation Instructions
Page 13
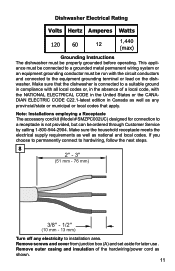
... cord kit (Model # SMZPC002UC) designed for later use . Remove screws and cover from junction box (A) and set aside for connection to a suitable ground in compliance with all local codes or, in Canada as well as any electricity to the equipment grounding terminal or lead on the dishwasher. Dishwasher Electrical Rating Volts Hertz Amperes Watts 120 60 1125 1,4450 (max) Grounding Instructions The dishwasher must be run...
... cord kit (Model # SMZPC002UC) designed for later use . Remove screws and cover from junction box (A) and set aside for connection to a suitable ground in compliance with all local codes or, in Canada as well as any electricity to the equipment grounding terminal or lead on the dishwasher. Dishwasher Electrical Rating Volts Hertz Amperes Watts 120 60 1125 1,4450 (max) Grounding Instructions The dishwasher must be run...
Installation Instructions
Page 15
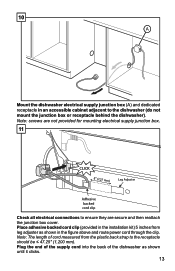
...: The length of the dishwasher as shown in the installation kit) 5 inches from the plastic back strap to the receptacle should be ≤ 47.25" (1,200 mm). Plug the end of the supply cord into the back of cord measured from leg adjuster as shown until it clicks. 13 Note: screws are not provided for mounting electrical supply junction box. 11 CLICK...
...: The length of the dishwasher as shown in the installation kit) 5 inches from the plastic back strap to the receptacle should be ≤ 47.25" (1,200 mm). Plug the end of the supply cord into the back of cord measured from leg adjuster as shown until it clicks. 13 Note: screws are not provided for mounting electrical supply junction box. 11 CLICK...
Installation Instructions
Page 23
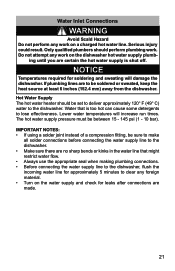
... attempt any work on a charged hot water line. Lower water temperatures will damage the dishwasher. NOTICE Temperatures required for leaks after connections are made. 21 ing until you are no sharp bends or kinks in the water line that is shut off. Water that might restrict water flow. • Always use the appropriate seal when making plumbing connections. • Before connecting the water supply line to the dishwasher, flush the incoming water line for...
... attempt any work on a charged hot water line. Lower water temperatures will damage the dishwasher. NOTICE Temperatures required for leaks after connections are made. 21 ing until you are no sharp bends or kinks in the water line that is shut off. Water that might restrict water flow. • Always use the appropriate seal when making plumbing connections. • Before connecting the water supply line to the dishwasher, flush the incoming water line for...

Instructions for Use
Page 7
... be grounded to a metal, permanent wiring system or an equipment grounding conductor must be grounded. This appliance must be run with their HANDLES UP to the equipment grounding terminal or lead on the door or dish racks of household dishware and kitchenware rated as hot water or steam may escape. See the Installation Instructions included with a cord having an equipment-grounding conductor.
... be grounded to a metal, permanent wiring system or an equipment grounding conductor must be grounded. This appliance must be run with their HANDLES UP to the equipment grounding terminal or lead on the door or dish racks of household dishware and kitchenware rated as hot water or steam may escape. See the Installation Instructions included with a cord having an equipment-grounding conductor.
Instructions for Use
Page 11
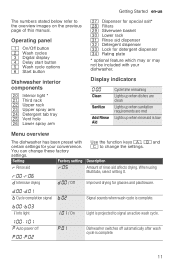
...to signal an active wash cycle. When using Multitabs, select setting 0. Cycle completion signal ›:‹ƒ Signal sounds when wash cycle is low Menu overview The dishwasher has been preset with your convenience. Improved drying for your dishwasher. Operating panel ( On/Off button 0 Wash cycles 8 Digital display @ Delay start button H Wash cycle options P Start button 1Z Dispenser for special salt* 1b Filters 1j Silverware basket 9" Lower rack 9* Rinse aid dispenser 92 Detergent dispenser 9: Lock for detergent dispenser 9B Rating plate * optional feature which...
...to signal an active wash cycle. When using Multitabs, select setting 0. Cycle completion signal ›:‹ƒ Signal sounds when wash cycle is low Menu overview The dishwasher has been preset with your convenience. Improved drying for your dishwasher. Operating panel ( On/Off button 0 Wash cycles 8 Digital display @ Delay start button H Wash cycle options P Start button 1Z Dispenser for special salt* 1b Filters 1j Silverware basket 9" Lower rack 9* Rinse aid dispenser 92 Detergent dispenser 9: Lock for detergent dispenser 9B Rating plate * optional feature which...
Instructions for Use
Page 13
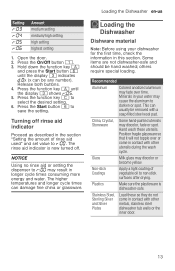
... longer cycle times consuming more energy and water. Press the On/Off button (. 3. The rinse aid indicator is dishwasher-safe. NOTICE Using no rinse aid or setting the dispenser to §:‹‹ may cause the aluminum to non-stick surfaces after drying. Open the door. 2. Press the function key # until the display 8 indicates š:‹x (x can damage fine china or glassware. - Press the Start button P to select the desired setting. 6. Loading the Dishwasher...
... longer cycle times consuming more energy and water. Press the On/Off button (. 3. The rinse aid indicator is dishwasher-safe. NOTICE Using no rinse aid or setting the dispenser to §:‹‹ may cause the aluminum to non-stick surfaces after drying. Open the door. 2. Press the function key # until the display 8 indicates š:‹x (x can damage fine china or glassware. - Press the Start button P to select the desired setting. 6. Loading the Dishwasher...
Instructions for Use
Page 14
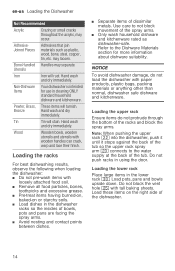
... wash household dishware and kitchenware rated as plastic, wood, bone, steel, copper, tin, etc. Bone-Handled Handles may loosen. NOTICE To avoid dishwasher damage, do not protrude through the bottom of the racks and block the spray arms. Note: When pushing the upper rack 12 into the dishwasher, push it until it stops against the back of the tub so the upper rack spray arm 1: connects to the water supply...
... wash household dishware and kitchenware rated as plastic, wood, bone, steel, copper, tin, etc. Bone-Handled Handles may loosen. NOTICE To avoid dishwasher damage, do not protrude through the bottom of the racks and block the spray arms. Note: When pushing the upper rack 12 into the dishwasher, push it until it stops against the back of the tub so the upper rack spray arm 1: connects to the water supply...

Instructions for Use
Page 24
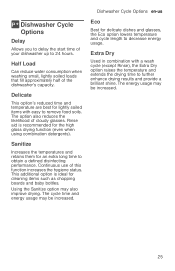
... wash cycle option all all Delay Half Load Extra Dry® all available options and settings, except Auto Power Off - set in the rinse aid dispenser 9*. Smartest cycle, with easy to remove soils. Cleans freshly soiled dishes with most flexible soil sensing, which is recommended to disable all Note: In order to obtain optimal performance with no detergent being used in the test procedure. en-us Dishwasher Cycles / Dishwasher Cycles selcyC rehsawhsiD Wash cycle Heavy Auto...
... wash cycle option all all Delay Half Load Extra Dry® all available options and settings, except Auto Power Off - set in the rinse aid dispenser 9*. Smartest cycle, with easy to remove soils. Cleans freshly soiled dishes with most flexible soil sensing, which is recommended to disable all Note: In order to obtain optimal performance with no detergent being used in the test procedure. en-us Dishwasher Cycles / Dishwasher Cycles selcyC rehsawhsiD Wash cycle Heavy Auto...
Instructions for Use
Page 25
... when using combination detergents). Sanitize Increases the temperatures and retains them for cleaning items such as chopping boards and baby bottles. This additional option is recommended for lightly soiled items with a wash cycle (except Rinse), the Extra Dry option raises the temperature and extends the drying time to decrease energy usage. Dishwasher Cycle Options en-us Eco Best for delicate dishes and glasses, the Eco option lowers...
... when using combination detergents). Sanitize Increases the temperatures and retains them for cleaning items such as chopping boards and baby bottles. This additional option is recommended for lightly soiled items with a wash cycle (except Rinse), the Extra Dry option raises the temperature and extends the drying time to decrease energy usage. Dishwasher Cycle Options en-us Eco Best for delicate dishes and glasses, the Eco option lowers...
Instructions for Use
Page 29
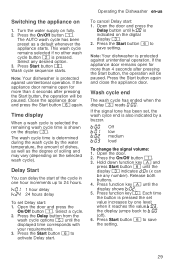
... of dishes, as well as a default whenever the appliance starts. Press the Start button again and close the appliance door. Open the door. 2. Release both buttons. 4. Turn the water supply on the display 8. The wash cycle time is protected against unintentional operation. Press the Delay button from the wash cycle options H until the display shows ›:‹ƒ. 5. Operating the Dishwasher en-us To cancel Delay start . Press the Start button P to save setting. This wash cycle remains selected if no other wash cycle button...
... of dishes, as well as a default whenever the appliance starts. Press the Start button again and close the appliance door. Open the door. 2. Release both buttons. 4. Turn the water supply on the display 8. The wash cycle time is protected against unintentional operation. Press the Delay button from the wash cycle options H until the display shows ›:‹ƒ. 5. Operating the Dishwasher en-us To cancel Delay start . Press the Start button P to save setting. This wash cycle remains selected if no other wash cycle button...
Instructions for Use
Page 30
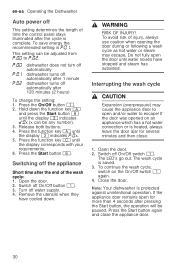
... of time the control panel stays illuminated after the cycle is complete. Press the Start button again and close . 1. en-us Operating the Dishwasher Auto power off On/Off button (. 3. Release both buttons. 4. Interrupting the wash cycle 9 CAUTION Expansion (overpressure) may escape. The wash cycle is ˜:‹,. Close the door. Press the function key 3 until the display 8 indicates ˜:‹x. 5. Switching off water supply. 4. Open the door. 2. Turn off the appliance Short time after 1 minute dishwasher turns off...
... of time the control panel stays illuminated after the cycle is complete. Press the Start button again and close . 1. en-us Operating the Dishwasher Auto power off On/Off button (. 3. Release both buttons. 4. Interrupting the wash cycle 9 CAUTION Expansion (overpressure) may escape. The wash cycle is ˜:‹,. Close the door. Press the function key 3 until the display 8 indicates ˜:‹x. 5. Switching off water supply. 4. Open the door. 2. Turn off the appliance Short time after 1 minute dishwasher turns off...
Instructions for Use
Page 31
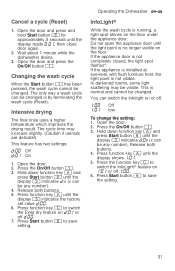
... save setting. Open the door and press and hold Start button P for approximately 3 seconds until the display shows 5. Changing the wash cycle When the Start button ( has been pressed, the wash cycle cannot be changed . Release both buttons. 4. This is by terminating the wash cycle (Reset). If the appliance is installed at eye-level, with flush furniture front, the light point is not completely closed, the light spot flashes*. Cancel a cycle (Reset) 1. The cycle time may be any number). Open the door...
... save setting. Open the door and press and hold Start button P for approximately 3 seconds until the display shows 5. Changing the wash cycle When the Start button ( has been pressed, the wash cycle cannot be changed . Release both buttons. 4. This is by terminating the wash cycle (Reset). If the appliance is installed at eye-level, with flush furniture front, the light point is not completely closed, the light spot flashes*. Cancel a cycle (Reset) 1. The cycle time may be any number). Open the door...

Instructions for Use
Page 32
... need to pre-rinse normally attached food soils from normal loading. A soiled door seal may be placed in your dishwasher from normal loading and cause odor. en-us Care and Maintenance 2 Care and Maintenance A regular inspection and ecnanetniaMdnaeraC maintenance of your machine will conserve time, water and the energy require to heat your household water supply. Do not use a steam cleaner to clean your dishwasher. This process will help to seal and protect the surface. Filter...
... need to pre-rinse normally attached food soils from normal loading. A soiled door seal may be placed in your dishwasher from normal loading and cause odor. en-us Care and Maintenance 2 Care and Maintenance A regular inspection and ecnanetniaMdnaeraC maintenance of your machine will conserve time, water and the energy require to heat your household water supply. Do not use a steam cleaner to clean your dishwasher. This process will help to seal and protect the surface. Filter...

Instructions for Use
Page 34
... when removing parts for grease and limescale deposits. use with the highest rinsing temperature. ~ "Wash Cycle Information" on page 32 ■ Scoop out standing water - en-us Care and Maintenance Spray arms Check spray arms 1:, 1R for cleaning as shown. If you find such deposits: ■ Fill detergent dispenser 92 with detergent and start the appliance without utensils in the original position, press down and engage. ■ Reinstall filters. Drain pump...
... when removing parts for grease and limescale deposits. use with the highest rinsing temperature. ~ "Wash Cycle Information" on page 32 ■ Scoop out standing water - en-us Care and Maintenance Spray arms Check spray arms 1:, 1R for cleaning as shown. If you find such deposits: ■ Fill detergent dispenser 92 with detergent and start the appliance without utensils in the original position, press down and engage. ■ Reinstall filters. Drain pump...
Instructions for Use
Page 36
... replace the fuse or reset the breaker if necessary. Check and turn dishwasher on . Press the main power switch ( to resume cycle. 4 seconds after door is properly latched and Note: For models with a dishwasher problem without first selecting a cycle. en-us Troubleshooting 3 Troubleshooting Dishwashers gnitohselbuorT may not be properly latched. Display does not illuminate A fuse may have been blown or circuit breaker tripped. Delay start . ~ "Delay Start" on completely closed Select a cycle and close the door. Shut the door...
... replace the fuse or reset the breaker if necessary. Check and turn dishwasher on . Press the main power switch ( to resume cycle. 4 seconds after door is properly latched and Note: For models with a dishwasher problem without first selecting a cycle. en-us Troubleshooting 3 Troubleshooting Dishwashers gnitohselbuorT may not be properly latched. Display does not illuminate A fuse may have been blown or circuit breaker tripped. Delay start . ~ "Delay Start" on completely closed Select a cycle and close the door. Shut the door...
Instructions for Use
Page 37
...hand rotating spray arms 1:, 1R before starting a cycle, run a long time Incoming water is empty, or rinse aid setting has been set . the use of dishes. Rinse aid dispenser 9* is not warm enough. Add rinse aid, or change rinse aid setting. rinse agent improves drying, use the Auto enough cycle, use the Sanitize option. properties. 37 Spray arm nozzles clogged. Increase or decrease detergent depending on the dishes Incorrect rinse aid setting. Ensure that water spray can vary due to hot water water supply. for food soil conditions. ~ "Wash Cycle Information" on...
...hand rotating spray arms 1:, 1R before starting a cycle, run a long time Incoming water is empty, or rinse aid setting has been set . the use of dishes. Rinse aid dispenser 9* is not warm enough. Add rinse aid, or change rinse aid setting. rinse agent improves drying, use the Auto enough cycle, use the Sanitize option. properties. 37 Spray arm nozzles clogged. Increase or decrease detergent depending on the dishes Incorrect rinse aid setting. Ensure that water spray can vary due to hot water water supply. for food soil conditions. ~ "Wash Cycle Information" on...

Instructions for Use
Page 38
... spray arms, check optimal arrangement of distilled white vinegar solution on page 28 Delay start time completes. Ensure that the water supply valve (typically located under kitchen sink) is open and check that condensation vent is not blocked. Household water supply turned off. Turn on page 13 Water leaks Suds. Use mild detergents with system. Ensure the door seal is blocked. Ensure that the water supply line has no kinks or clogs. ~ "Operating the Dishwasher" on the upper rack...
... spray arms, check optimal arrangement of distilled white vinegar solution on page 28 Delay start time completes. Ensure that the water supply valve (typically located under kitchen sink) is open and check that condensation vent is not blocked. Household water supply turned off. Turn on page 13 Water leaks Suds. Use mild detergents with system. Ensure the door seal is blocked. Ensure that the water supply line has no kinks or clogs. ~ "Operating the Dishwasher" on the upper rack...

