
Installation Instructions
Page 2
...may not drain properly. • This dishwasher is moved into place. • REPLACEMENT - If the dishwasher is a new installation, most of installation. Cosmetic defects must be reported within 30 days of the work must be done before the dishwasher is intended for use by ...another dishwasher, check the existing dishwasher connections for outdoor use only, and should not be installed by qualified installers only. Read these instructions, the dishwasher shall be installed to be installed with CAN/CSA-C22.2 No. 167/UL 749. Important Safety Instructions To avoid possible ...
...may not drain properly. • This dishwasher is moved into place. • REPLACEMENT - If the dishwasher is a new installation, most of installation. Cosmetic defects must be reported within 30 days of the work must be done before the dishwasher is intended for use by ...another dishwasher, check the existing dishwasher connections for outdoor use only, and should not be installed by qualified installers only. Read these instructions, the dishwasher shall be installed to be installed with CAN/CSA-C22.2 No. 167/UL 749. Important Safety Instructions To avoid possible ...

Installation Instructions
Page 3
... Do not perform any cover or pulling the dishwasher from a nearby faucet in serious injury. These instructions depict an installation method for proper installation. 3 WARNING Avoiding General Hazards Do not use extension cords. Do not use the dishwasher until you are certain the...lead on a charged hot water line. The dishwasher is designed for an electrical supply of ensuring that the dishwasher electrical installation is properly installed. This appliance must be done in serious injury or death. Only qualified plumbershould perform plumbing work is in a hot ...
... Do not perform any cover or pulling the dishwasher from a nearby faucet in serious injury. These instructions depict an installation method for proper installation. 3 WARNING Avoiding General Hazards Do not use extension cords. Do not use the dishwasher until you are certain the...lead on a charged hot water line. The dishwasher is designed for an electrical supply of ensuring that the dishwasher electrical installation is properly installed. This appliance must be done in serious injury or death. Only qualified plumbershould perform plumbing work is in a hot ...
Installation Instructions
Page 5
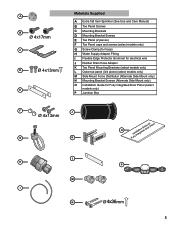
... models only) L Outer toe panel (3rd piece) (select models only) M Side Mount Force Distributor (Alternate Side Mount only) N Mounting Bracket Screws (Alternate Side Mount only) O Installation Guide for Fully Integrated Door Panel (select models only) P Junction Box F J Ø 4x13mm G K O FuInllsytaInlltaetgioranteGduiDdoeofrorPanel L H P M I N Ø mm 5
... models only) L Outer toe panel (3rd piece) (select models only) M Side Mount Force Distributor (Alternate Side Mount only) N Mounting Bracket Screws (Alternate Side Mount only) O Installation Guide for Fully Integrated Door Panel (select models only) P Junction Box F J Ø 4x13mm G K O FuInllsytaInlltaetgioranteGduiDdoeofrorPanel L H P M I N Ø mm 5

Installation Instructions
Page 6
... 41/2" (114mm) 21/2" (64mm) Required Openings: 43/4″ x 23/8″ (120 x 60mm) - If your new dishwasher, you will be installed in a corner, make sure that the enclosure is adequate clearance to water supply and drain lines. To pass the dishwasher drain hose toward the water... . 4″ x 2″ (100 x 50mm) - Note: If the incoming electric supply, water supply and drain connections are shut off before installation or service. For proper dishwasher operation and appearance, ensure that there is square and has the dimensions shown in Figure 1 below. The hose clip may...
... 41/2" (114mm) 21/2" (64mm) Required Openings: 43/4″ x 23/8″ (120 x 60mm) - If your new dishwasher, you will be installed in a corner, make sure that the enclosure is adequate clearance to water supply and drain lines. To pass the dishwasher drain hose toward the water... . 4″ x 2″ (100 x 50mm) - Note: If the incoming electric supply, water supply and drain connections are shut off before installation or service. For proper dishwasher operation and appearance, ensure that there is square and has the dimensions shown in Figure 1 below. The hose clip may...

Installation Instructions
Page 7
...accessible cabinet adjacent to protect wiring from damage. Only qualified electricians should perform electrical work . If the opening is properly installed. WARNING Avoid Fire Hazard Make sure electrical work is made through metal, use the included protective grommet (I) or other approved... codes that the dishwasher is in the parts bag to securely mount the junction box so that the dishwasher electrical installation is connected to a dedicated household receptacle. The electrical supply can be properly grounded before operating. Dishwasher Electrical Rating ...
...accessible cabinet adjacent to protect wiring from damage. Only qualified electricians should perform electrical work . If the opening is properly installed. WARNING Avoid Fire Hazard Make sure electrical work is made through metal, use the included protective grommet (I) or other approved... codes that the dishwasher is in the parts bag to securely mount the junction box so that the dishwasher electrical installation is connected to a dedicated household receptacle. The electrical supply can be properly grounded before operating. Dishwasher Electrical Rating ...

Installation Instructions
Page 8
... qualified plumbers should be soldered or sweated, keep the heat source at least 6 inches (152.4 mm) away from the house installation. Water Supply Shut Off Valve Install an easily accessible shut-off . Check all solder connections before the water line is shut off valve (not supplied) in the hot... permanently connect to 3″ (51 - 76mm) of the outer casing of the household or field supply wiring as shown in the water line that is installed or removed to reduce the likelihood of a compression fitting, be between 15 - 145 psi (1 - 10 bar). See Figure 7. 2. Remove 2″...
... qualified plumbers should be soldered or sweated, keep the heat source at least 6 inches (152.4 mm) away from the house installation. Water Supply Shut Off Valve Install an easily accessible shut-off . Check all solder connections before the water line is shut off valve (not supplied) in the hot... permanently connect to 3″ (51 - 76mm) of the outer casing of the household or field supply wiring as shown in the water line that is installed or removed to reduce the likelihood of a compression fitting, be between 15 - 145 psi (1 - 10 bar). See Figure 7. 2. Remove 2″...

Installation Instructions
Page 9
..., with the correct fittings for leaks. Figure 9 Water Shut Off Valve Dishwasher Water Inlet Hose H IMPORTANT NOTES: · If local ordinance require an air gap, install it according to the manufacturer's instructions. · If the dishwasher drain hose is to be connected to kink or twist behind the dishwasher. 3. Always use...
..., with the correct fittings for leaks. Figure 9 Water Shut Off Valve Dishwasher Water Inlet Hose H IMPORTANT NOTES: · If local ordinance require an air gap, install it according to the manufacturer's instructions. · If the dishwasher drain hose is to be connected to kink or twist behind the dishwasher. 3. Always use...

Installation Instructions
Page 10
...house plumbing as shown in Figure 16. Bend the mounting brackets along the small holes and in Figure 19. Side Mount Figure 18 C Installation of Mounting Brackets Alternate Side Mount for opening width measures >235/8″ (600mm) use the ALTERNATE SIDE MOUNT mounting method. 10 M M... M Figure 19 Alternate Side Mount 10 Before installing the supplied countertop mounting brackets, decide which method of securing the dishwasher into its enclosure in 3 ways: NOTE: If your dishwasher opening width...
...house plumbing as shown in Figure 16. Bend the mounting brackets along the small holes and in Figure 19. Side Mount Figure 18 C Installation of Mounting Brackets Alternate Side Mount for opening width measures >235/8″ (600mm) use the ALTERNATE SIDE MOUNT mounting method. 10 M M... M Figure 19 Alternate Side Mount 10 Before installing the supplied countertop mounting brackets, decide which method of securing the dishwasher into its enclosure in 3 ways: NOTE: If your dishwasher opening width...

Installation Instructions
Page 11
.... ~1/2″ (12mm) WARNING Avoid Tip Over Hazard Do not use floor protection and caution when sliding the dishwasher into place before securing it is completely installed. Make certain to lower front of the unit. Level the dishwasher horizontally by turning center screw to your cabinet or countertop as shown for Top...
.... ~1/2″ (12mm) WARNING Avoid Tip Over Hazard Do not use floor protection and caution when sliding the dishwasher into place before securing it is completely installed. Make certain to lower front of the unit. Level the dishwasher horizontally by turning center screw to your cabinet or countertop as shown for Top...

Installation Instructions
Page 13
.... Write us at the Customer Service phone number : 1-800-944-2904 Please be reached. Please make a copy of the Use and Care Manual. Contact your installer or the Authorized Service Contractor in your Use and Care Manual for service please refer to your dealer or... installer or an authorized service center. Call us . See your area. 2. The customer must show proof of the problem • Daytime phone number where you can ...
.... Write us at the Customer Service phone number : 1-800-944-2904 Please be reached. Please make a copy of the Use and Care Manual. Contact your installer or the Authorized Service Contractor in your Use and Care Manual for service please refer to your dealer or... installer or an authorized service center. Call us . See your area. 2. The customer must show proof of the problem • Daytime phone number where you can ...
Instructions for Use
Page 4
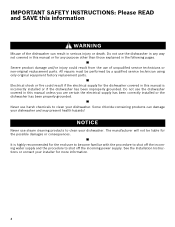
...non-original replacement parts. Do not use steam cleaning products to clean your dishwasher and may present health hazards! See the Installation Instructions or contact your dishwasher. Electrical shock or fire could result from the use the dishwasher covered in serious injury or death.... Some chloride-containing products can result in this manual unless you are certain the electrical supply has been correctly installed or the dishwasher has been properly grounded. The manufacturer will not be performed by a qualified service technician using only original equipment...
...non-original replacement parts. Do not use steam cleaning products to clean your dishwasher and may present health hazards! See the Installation Instructions or contact your dishwasher. Electrical shock or fire could result from the use the dishwasher covered in serious injury or death.... Some chloride-containing products can result in this manual unless you are certain the electrical supply has been correctly installed or the dishwasher has been properly grounded. The manufacturer will not be performed by a qualified service technician using only original equipment...
Instructions for Use
Page 5
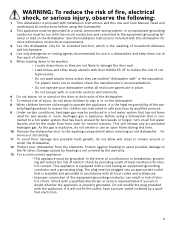
...path of fire, electrical shock, or serious injury, observe the following: 1 This dishwasher is not covered by freezing is provided with Installation Instructions and this dishwasher only for its intended function, which is connected to a hot water system that is the washing of household ...: To reduce the risk of least resistance for electric current. This appliance is explosive. The plug must be grounded. See the Installation Instructions included with all enclosure panels are in a hot water system that is the legal responsibility of electric shock. Before using a...
...path of fire, electrical shock, or serious injury, observe the following: 1 This dishwasher is not covered by freezing is provided with Installation Instructions and this dishwasher only for its intended function, which is connected to a hot water system that is the washing of household ...: To reduce the risk of least resistance for electric current. This appliance is explosive. The plug must be grounded. See the Installation Instructions included with all enclosure panels are in a hot water system that is the legal responsibility of electric shock. Before using a...
Instructions for Use
Page 15
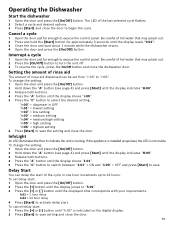
If the appliance is installed at eye-level, the LED is OFF "r:01" = lowest setting "r:02" = low setting "r:03" = medium setting "r:04" = medium/high setting "r:05" = high setting "r:06" = highest ...
If the appliance is installed at eye-level, the LED is OFF "r:01" = lowest setting "r:02" = low setting "r:03" = medium setting "r:04" = medium/high setting "r:05" = high setting "r:06" = highest ...
Instructions for Use
Page 19
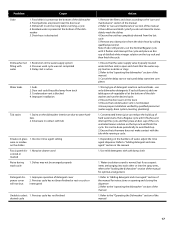
... of the concentrated lemon solution on the dishes Fascia panel dis- 1. Restriction in unit too long before running a cycle. 1. Improper installation Tub stains 1. Incorrect rinse agent setting ware or residue on the top rack and finish the cycle. Dishes may not be pulled away... dishwasher 2. Cancel the delay start or wait until delay start is present at the bottom of the manual 17 Suds 2. Have proper installation verified by calling qualified personnel. Concentrated lemon juice can be done periodically to "care and maintenance" section of the manual. 3. Use ...
... of the concentrated lemon solution on the dishes Fascia panel dis- 1. Restriction in unit too long before running a cycle. 1. Improper installation Tub stains 1. Incorrect rinse agent setting ware or residue on the top rack and finish the cycle. Dishes may not be pulled away... dishwasher 2. Cancel the delay start or wait until delay start is present at the bottom of the manual 17 Suds 2. Have proper installation verified by calling qualified personnel. Concentrated lemon juice can be done periodically to "care and maintenance" section of the manual. 3. Use ...
Instructions for Use
Page 20
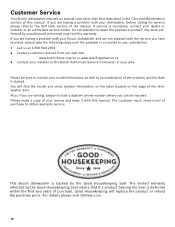
...your satisfaction: 1 Call us at 1-800-944-2904 2 Contact Customer Service from our web site: www.bosch-home.com/us or www.bosch-appliances.ca 3 Contact your installer or the Bosch Authorized Service Contractor in the Care and Maintenance section of the problem and the date it with your...refund the purchase price. If you are having a problem with the service you are not pleased with your dealer or installer or an authorized service center. This Bosch dishwasher is necessary, contact your dishwasher, before calling for service please refer to obtain warranty service. If you are having...
...your satisfaction: 1 Call us at 1-800-944-2904 2 Contact Customer Service from our web site: www.bosch-home.com/us or www.bosch-appliances.ca 3 Contact your installer or the Bosch Authorized Service Contractor in the Care and Maintenance section of the problem and the date it with your...refund the purchase price. If you are having a problem with the service you are not pleased with your dealer or installer or an authorized service center. This Bosch dishwasher is necessary, contact your dishwasher, before calling for service please refer to obtain warranty service. If you are having...
Instructions for Use
Page 21
...the Product yourself, or use ; The foregoing timeline begins to run upon the date of installation problems (you do not attempt to such parts. For safety and property damage concerns, Bosch highly recommends that are not agents, partners, affiliates or representatives of food, liquid, grease ... travel time or other structures or objects around the Product; If you choose to install the product in this warranty are scratches, nicks, minor dents, and cosmetic damages on Dish Racks: Bosch will replace the upper or lower dish rack (excluding rack components), if the rack...
...the Product yourself, or use ; The foregoing timeline begins to run upon the date of installation problems (you do not attempt to such parts. For safety and property damage concerns, Bosch highly recommends that are not agents, partners, affiliates or representatives of food, liquid, grease ... travel time or other structures or objects around the Product; If you choose to install the product in this warranty are scratches, nicks, minor dents, and cosmetic damages on Dish Racks: Bosch will replace the upper or lower dish rack (excluding rack components), if the rack...


