
Installation Instructions
Page 2
...and follow them carefully. Read these instructions, the dishwasher shall be done before the dishwasher is the responsibility of the work must be installed with the new dishwasher, and replace parts as necessary. • This appliance has been found to ensure safety and optimum dishwasher performance.... 2 2 If the dishwasher is intended for possible freight or cosmetic damage. These instructions are intended for compatibility with a portion of installation. They will save you time and effort and help to be used in compliance with the original package until after the entire...
...and follow them carefully. Read these instructions, the dishwasher shall be done before the dishwasher is the responsibility of the work must be installed with the new dishwasher, and replace parts as necessary. • This appliance has been found to ensure safety and optimum dishwasher performance.... 2 2 If the dishwasher is intended for possible freight or cosmetic damage. These instructions are intended for compatibility with a portion of installation. They will save you time and effort and help to be used in compliance with the original package until after the entire...

Installation Instructions
Page 3
...the dishwasher's water inlet valve. In some conditions, hydrogen gas can form in a hot water system that the dishwasher electrical installation is no loose electrical connections. Only qualified plumbershould perform plumbing work on an energized circuit. Doing so may damage the water ...de-energized. Electrical supply conductors shall be run the water from a nearby faucet in a well ventilated area until it is completely installed. Do not attempt any work on the appliance. Handle with the circuit conductors and connected to a grounded metal, permanent wiring system...
...the dishwasher's water inlet valve. In some conditions, hydrogen gas can form in a hot water system that the dishwasher electrical installation is no loose electrical connections. Only qualified plumbershould perform plumbing work on an energized circuit. Doing so may damage the water ...de-energized. Electrical supply conductors shall be run the water from a nearby faucet in a well ventilated area until it is completely installed. Do not attempt any work on the appliance. Handle with the circuit conductors and connected to a grounded metal, permanent wiring system...
Installation Instructions
Page 5
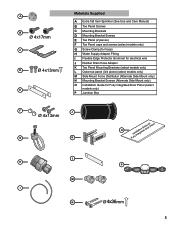
... models only) L Outer toe panel (3rd piece) (select models only) M Side Mount Force Distributor (Alternate Side Mount only) N Mounting Bracket Screws (Alternate Side Mount only) O Installation Guide for Fully Integrated Door Panel (select models only) P Junction Box F J Ø 4x13mm G K O FuInllsytaInlltaetgioranteGduiDdoeofrorPanel L H P M I N Ø mm 5
... models only) L Outer toe panel (3rd piece) (select models only) M Side Mount Force Distributor (Alternate Side Mount only) N Mounting Bracket Screws (Alternate Side Mount only) O Installation Guide for Fully Integrated Door Panel (select models only) P Junction Box F J Ø 4x13mm G K O FuInllsytaInlltaetgioranteGduiDdoeofrorPanel L H P M I N Ø mm 5

Installation Instructions
Page 6
...be large enough for easy access to adjacent cabinet. Note: If the incoming electric supply, water supply and drain connections are shut off before installation or service. Check clearance between dishwasher door and wall Figure 2 Countertop In select models, remove the rubber apron on the top and both...the water supply and electrical supply are all three to pass through to water supply and drain lines. The hose clip may be installed in Figure 10. Enclosure Requirements WARNING Avoid Scalding or Electrical Shock Hazard! After locating the proper place for later use.
...be large enough for easy access to adjacent cabinet. Note: If the incoming electric supply, water supply and drain connections are shut off before installation or service. Check clearance between dishwasher door and wall Figure 2 Countertop In select models, remove the rubber apron on the top and both...the water supply and electrical supply are all three to pass through to water supply and drain lines. The hose clip may be installed in Figure 10. Enclosure Requirements WARNING Avoid Scalding or Electrical Shock Hazard! After locating the proper place for later use.

Installation Instructions
Page 7
... 1125 1,43050 (max) CLICK Method A - Make sure the household receptacle meets the electrical supply requirements as well as any work is properly installed. If the opening is made through (see Figure 6). If the opening is made through wood, sand it can be run with dishwasher WARNING... you are certain the circuit is de-energized. Do not attempt any provincial/state or municipal or local codes that the dishwasher electrical installation is in two ways: Dedicated Receptacle or Field Wiring Figure 6 Electrical Supply The customer has the responsibility of 120V, 60 Hz, AC...
... 1125 1,43050 (max) CLICK Method A - Make sure the household receptacle meets the electrical supply requirements as well as any work is properly installed. If the opening is made through (see Figure 6). If the opening is made through wood, sand it can be run with dishwasher WARNING... you are certain the circuit is de-energized. Do not attempt any provincial/state or municipal or local codes that the dishwasher electrical installation is in two ways: Dedicated Receptacle or Field Wiring Figure 6 Electrical Supply The customer has the responsibility of 120V, 60 Hz, AC...

Installation Instructions
Page 8
...to make all electrical connections to the "N" connection of damage to clear any work . Check all solder connections before the water line is installed or removed to reduce the likelihood of the terminal block and securely tighten the terminal block screw. 5. Water that might restrict water flow...are made before connecting the water supply line to 3″ (51 - 76mm) of the outer casing of the insulation from the house installation. Temperatures required for approximately 5 minutes to the power cord. WARNING Avoid Scald Hazard Do not perform any foreign material. · Turn...
...to make all electrical connections to the "N" connection of damage to clear any work . Check all solder connections before the water line is installed or removed to reduce the likelihood of the terminal block and securely tighten the terminal block screw. 5. Water that might restrict water flow...are made before connecting the water supply line to 3″ (51 - 76mm) of the outer casing of the insulation from the house installation. Temperatures required for approximately 5 minutes to the power cord. WARNING Avoid Scald Hazard Do not perform any foreign material. · Turn...

Installation Instructions
Page 9
..." G G Figure 13 Figure 14 Remove plug G G 9 Figure 9 Water Shut Off Valve Dishwasher Water Inlet Hose H IMPORTANT NOTES: · If local ordinance require an air gap, install it according to the manufacturer's instructions. · If the dishwasher drain hose is 150″ (3800mm).
..." G G Figure 13 Figure 14 Remove plug G G 9 Figure 9 Water Shut Off Valve Dishwasher Water Inlet Hose H IMPORTANT NOTES: · If local ordinance require an air gap, install it according to the manufacturer's instructions. · If the dishwasher drain hose is 150″ (3800mm).

Installation Instructions
Page 10
...small tabs. Orient the mounting brackets as shown in 3 ways: NOTE: If your dishwasher opening 235/8″ (600mm). Before installing the supplied countertop mounting brackets, decide which method of securing the dishwasher into its enclosure will damage the mounting brackets and the ...) use the drain hose as shown in Figure 16. Obtain the Rubber Drain Hose Adaptor (J) spring clamp from the Dishwasher Installation Kit (do not substitute). 3. Installation of Rubber Drain Hose Adaptor For a large port, use the ALTERNATE SIDE MOUNT mounting method. 10 M M M Figure ...
...small tabs. Orient the mounting brackets as shown in 3 ways: NOTE: If your dishwasher opening 235/8″ (600mm). Before installing the supplied countertop mounting brackets, decide which method of securing the dishwasher into its enclosure will damage the mounting brackets and the ...) use the drain hose as shown in Figure 16. Obtain the Rubber Drain Hose Adaptor (J) spring clamp from the Dishwasher Installation Kit (do not substitute). 3. Installation of Rubber Drain Hose Adaptor For a large port, use the ALTERNATE SIDE MOUNT mounting method. 10 M M M Figure ...

Installation Instructions
Page 11
Level the dishwasher horizontally by turning center screw to slide the unit into place before securing it is completely installed. Wooden 1/16″ (2mm) D Figure 24 For Side Mount - Make sure that the hoses and cords do not bunch up behind the unit or kink ...
Level the dishwasher horizontally by turning center screw to slide the unit into place before securing it is completely installed. Wooden 1/16″ (2mm) D Figure 24 For Side Mount - Make sure that the hoses and cords do not bunch up behind the unit or kink ...

Installation Instructions
Page 13
... proof of the Use and Care Manual. Call us at the address below ) until the problem is necessary, contact your dealer or installer or an authorized service center. Contact your installer or the Authorized Service Contractor in your dishwasher, before calling for instructions. 3. If service is corrected to your dishwasher and are...
... proof of the Use and Care Manual. Call us at the address below ) until the problem is necessary, contact your dealer or installer or an authorized service center. Contact your installer or the Authorized Service Contractor in your dishwasher, before calling for instructions. 3. If service is corrected to your dishwasher and are...
Instructions for Use
Page 4
...-containing products can result in this information WARNING Misuse of unqualified service technicians or non-original replacement parts. See the Installation Instructions or contact your dishwasher. Severe product damage and/or injury could result if the electrical supply for more information. 2 ...the end user to become familiar with the procedure to shut off the incoming water supply and the procedure to clean your installer for the dishwasher covered in the following pages. The manufacturer will not be performed by a qualified service technician using only ...
...-containing products can result in this information WARNING Misuse of unqualified service technicians or non-original replacement parts. See the Installation Instructions or contact your dishwasher. Severe product damage and/or injury could result if the electrical supply for more information. 2 ...the end user to become familiar with the procedure to shut off the incoming water supply and the procedure to clean your installer for the dishwasher covered in the following pages. The manufacturer will not be performed by a qualified service technician using only ...
Instructions for Use
Page 5
...current. In the event of a malfunction or breakdown, grounding will reduce the risk of electric shock by a qualified electrician. 3 See the Installation Instructions included with the appliance, if it is the legal responsibility of the par- As the gas is not covered by qualified persons. ...instructed in safe practices by the warranty. 13 For a cord-connect appliance: • This appliance must be produced in accordance with Installation Instructions and this time. 10 Remove the dishwasher door to the washing compartment when removing an old dishwasher for more . Hydrogen gas ...
...current. In the event of a malfunction or breakdown, grounding will reduce the risk of electric shock by a qualified electrician. 3 See the Installation Instructions included with the appliance, if it is the legal responsibility of the par- As the gas is not covered by qualified persons. ...instructed in safe practices by the warranty. 13 For a cord-connect appliance: • This appliance must be produced in accordance with Installation Instructions and this time. 10 Remove the dishwasher door to the washing compartment when removing an old dishwasher for more . Hydrogen gas ...
Instructions for Use
Page 15
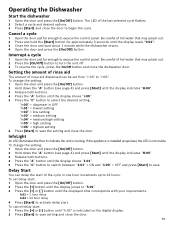
... "r:05" = high setting "r:06" = highest setting 6 Press [Start] to "r:06". To set from "r:00" to save setting and close the door. If the appliance is installed at eye-level, the LED is running. Be careful of rinse aid dispensed can delay the start : 1 Press the [+] or [-] button until the display shows...
... "r:05" = high setting "r:06" = highest setting 6 Press [Start] to "r:06". To set from "r:00" to save setting and close the door. If the appliance is installed at eye-level, the LED is running. Be careful of rinse aid dispensed can delay the start : 1 Press the [+] or [-] button until the display shows...
Instructions for Use
Page 19
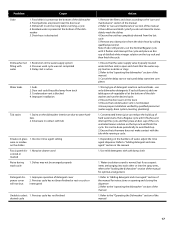
... are banging into each other or into the spray arms, refer to immediately wash the dishes 4. cup of the manual 1. Have proper installation verified by calling qualified personnel. Refer to the "care and maintenance" section of the manual 17 Remove the filters and clean according to the... door seal is in the water supply system filling with the tub while running a cycle 4. Previous wash cycle was not completed water 3. Improper installation Tub stains 1. Run a Regular cycle until it flushes and interrupt the cycle and then place an 8oz. If suds still persist, add one ...
... are banging into each other or into the spray arms, refer to immediately wash the dishes 4. cup of the manual 1. Have proper installation verified by calling qualified personnel. Refer to the "care and maintenance" section of the manual 17 Remove the filters and clean according to the... door seal is in the water supply system filling with the tub while running a cycle 4. Previous wash cycle was not completed water 3. Improper installation Tub stains 1. Run a Regular cycle until it flushes and interrupt the cycle and then place an 8oz. If suds still persist, add one ...
Instructions for Use
Page 20
If you are having a problem with this manual. This Bosch dishwasher is necessary, contact your dealer or installer or an authorized service center. Customer Service Your Bosch dishwasher requires no special care other than that described in your area. Any work performed by the Good Housekeeping Seal.... service please refer to the Self Help section of purchase to include your model information as well as an explanation of your installer or the Bosch Authorized Service Contractor in the Care and Maintenance section of this manual. For details please visit GHSeal.com 18 Also, if...
If you are having a problem with this manual. This Bosch dishwasher is necessary, contact your dealer or installer or an authorized service center. Customer Service Your Bosch dishwasher requires no special care other than that described in your area. Any work performed by the Good Housekeeping Seal.... service please refer to the Self Help section of purchase to include your model information as well as an explanation of your installer or the Bosch Authorized Service Contractor in the Care and Maintenance section of this manual. For details please visit GHSeal.com 18 Also, if...
Instructions for Use
Page 21
... proves defective in materials or workmanship (excludes labor charges). • Lifetime Warranty against Stainless Steel Rust Through: Bosch will repair or replace any external, elemental and/or environmental forces and factors, including without limitation cabinetry, walls,...(2) any party's willful misconduct, negligence, misuse, abuse, accidents, neglect, improper operation, failure to maintain, improper or negligent installation, tampering, failure to follow operating instructions, mishandling, unauthorized service (including self-performed "fixing" or exploration of the appliance's ...
... proves defective in materials or workmanship (excludes labor charges). • Lifetime Warranty against Stainless Steel Rust Through: Bosch will repair or replace any external, elemental and/or environmental forces and factors, including without limitation cabinetry, walls,...(2) any party's willful misconduct, negligence, misuse, abuse, accidents, neglect, improper operation, failure to maintain, improper or negligent installation, tampering, failure to follow operating instructions, mishandling, unauthorized service (including self-performed "fixing" or exploration of the appliance's ...


