
Installation Instructions
Page 2
... in specific installations. • Not for outdoor use by qualified installers only. NOTE: Do not discard any damage immediately. If the dishwasher is a new installation, most of the work must be installed by a qualified service technician or installer. • In addition to ... OBSERVE ALL WARNINGS AND CAUTIONS. Report any bags or items that come with CAN/CSA-C22.2 No. 167/UL 749. The dishwasher must be installed to these installation instructions completely and follow them carefully. These instructions are intended for compatibility with a portion of installation...
... in specific installations. • Not for outdoor use by qualified installers only. NOTE: Do not discard any damage immediately. If the dishwasher is a new installation, most of the work must be installed by a qualified service technician or installer. • In addition to ... OBSERVE ALL WARNINGS AND CAUTIONS. Report any bags or items that come with CAN/CSA-C22.2 No. 167/UL 749. The dishwasher must be installed to these installation instructions completely and follow them carefully. These instructions are intended for compatibility with a portion of installation...

Installation Instructions
Page 3
... points. Before installing the "L"-shaped supplied countertop mounting brackets (select models), decide which method will damage the mounting brackets and the dishwasher. If plumbing lines are certain the circuit is in serious injury. Handle with national and local codes. Separate channels are installed on... an energized circuit. Do not work . Avoiding Plumbing/Scalding Hazards Do not perform any cover or pulling the dishwasher from the dishwasher's base and water inlet valve. Do not over and result in compliance with a fuse or breaker rated for weeks, run ...
... points. Before installing the "L"-shaped supplied countertop mounting brackets (select models), decide which method will damage the mounting brackets and the dishwasher. If plumbing lines are certain the circuit is in serious injury. Handle with national and local codes. Separate channels are installed on... an energized circuit. Do not work . Avoiding Plumbing/Scalding Hazards Do not perform any cover or pulling the dishwasher from the dishwasher's base and water inlet valve. Do not over and result in compliance with a fuse or breaker rated for weeks, run ...
Installation Instructions
Page 4
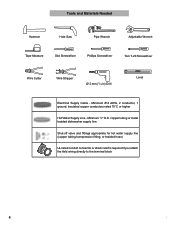
Minimum #14 AWG, 2 conductor, 1 ground, insulated copper conductors rated 75°C or higher Hot Water Supply Line - Minimum 3/8″ O.D. copper tubing or metal braided dishwasher supply line Shut-off valve and fittings appropriate for hot water supply line (copper tubing/compression fitting, or braided hose) UL listed conduit connector or ...
Minimum #14 AWG, 2 conductor, 1 ground, insulated copper conductors rated 75°C or higher Hot Water Supply Line - Minimum 3/8″ O.D. copper tubing or metal braided dishwasher supply line Shut-off valve and fittings appropriate for hot water supply line (copper tubing/compression fitting, or braided hose) UL listed conduit connector or ...

Installation Instructions
Page 6
... Figure 1 90° 22 5/8″ (575mm) 34¼″(867mm) 235 /8 - 241 /4″ (600 - 616mm) NOTE: If your dishwasher opening width measures >235/8″ (600mm) use . Figure 5 WARNING Avoid Electrical Shock/Fire Hazard Do not allow for easy access to touch. 6 ...Requirements WARNING Avoid Scalding or Electrical Shock Hazard! Figure 3 Select a location as close to the sink as shown in Figure 1 below . If your dishwasher opening width measures 235/8″(600mm) use the ALTERNATE SIDE MOUNT mounting method. 41/2" (114mm) 21/2" (64mm) Required Openings: 43/4″ x ...
... Figure 1 90° 22 5/8″ (575mm) 34¼″(867mm) 235 /8 - 241 /4″ (600 - 616mm) NOTE: If your dishwasher opening width measures >235/8″ (600mm) use . Figure 5 WARNING Avoid Electrical Shock/Fire Hazard Do not allow for easy access to touch. 6 ...Requirements WARNING Avoid Scalding or Electrical Shock Hazard! Figure 3 Select a location as close to the sink as shown in Figure 1 below . If your dishwasher opening width measures 235/8″(600mm) use the ALTERNATE SIDE MOUNT mounting method. 41/2" (114mm) 21/2" (64mm) Required Openings: 43/4″ x ...

Installation Instructions
Page 7
... any provincial/state or municipal or local codes that it smooth. WARNING Avoid Fire Hazard Make sure electrical work . Electrical Connection The dishwasher electrical supply junction box (P) and dedicated receptacle must be easily accessed (see Figure 6). Use the four screws included (or appropriate fastener...box through wood, sand it can be run with a fuse or breaker rated for an electrical supply of ensuring that the dishwasher electrical installation is connected to securely mount the junction box so that apply. The electrical supply can be mounted in an accessible...
... any provincial/state or municipal or local codes that it smooth. WARNING Avoid Fire Hazard Make sure electrical work . Electrical Connection The dishwasher electrical supply junction box (P) and dedicated receptacle must be easily accessed (see Figure 6). Use the four screws included (or appropriate fastener...box through wood, sand it can be run with a fuse or breaker rated for an electrical supply of ensuring that the dishwasher electrical installation is connected to securely mount the junction box so that apply. The electrical supply can be mounted in an accessible...

Installation Instructions
Page 8
...water flow. · Always use the appropriate seal when making plumbing connections. · Before connecting the water supply line to the dishwasher, flush the incoming water line for soldering and sweating will increase run times. Do not attempt any work on a charged hot water ... ground connection " " of a compression fitting, be made . Serious injury could result. See Figure 7. 2. Lower water temperatures will damage the dishwasher. Water Supply Shut Off Valve Install an easily accessible shut-off . IMPORTANT NOTES: · If using a solder joint instead of the terminal block...
...water flow. · Always use the appropriate seal when making plumbing connections. · Before connecting the water supply line to the dishwasher, flush the incoming water line for soldering and sweating will increase run times. Do not attempt any work on a charged hot water ... ground connection " " of a compression fitting, be made . Serious injury could result. See Figure 7. 2. Lower water temperatures will damage the dishwasher. Water Supply Shut Off Valve Install an easily accessible shut-off . IMPORTANT NOTES: · If using a solder joint instead of the terminal block...

Installation Instructions
Page 9
...Non-Metallic Tie min 20″ (508mm) max 43″ (1100mm) min 20″ (508mm) max 43″ (1100mm) MIN. The maximum length of the dishwasher water inlet hose is heavy and will need a 11/4" diameter hole in order to pass the drain hose through toward the water shut off valve.... Connect the dishwasher water supply line with the brass fitting on the hot water and check for this connection. You will need to be extended if necessary. You...
...Non-Metallic Tie min 20″ (508mm) max 43″ (1100mm) min 20″ (508mm) max 43″ (1100mm) MIN. The maximum length of the dishwasher water inlet hose is heavy and will need a 11/4" diameter hole in order to pass the drain hose through toward the water shut off valve.... Connect the dishwasher water supply line with the brass fitting on the hot water and check for this connection. You will need to be extended if necessary. You...

Installation Instructions
Page 10
...in each side as shown in Figure 18, and position the two small tabs on the mounting brackets over the two slots on the dishwasher, removing them is used for countertops made of marble, granite, or other materials that cannot be easily drilled. Once the mounting brackets... are installed on the dishwasher's front corners. For a small port, insert the rubber drain hose adaptor into the slots. Orient the mounting brackets as shown in Figure...
...in each side as shown in Figure 18, and position the two small tabs on the mounting brackets over the two slots on the dishwasher, removing them is used for countertops made of marble, granite, or other materials that cannot be easily drilled. Once the mounting brackets... are installed on the dishwasher's front corners. For a small port, insert the rubber drain hose adaptor into the slots. Orient the mounting brackets as shown in Figure...

Installation Instructions
Page 11
...or counter-clockwise to raise or lower the back. Figure 23 For Top Mount - Stone Countertop 0 - 23/8″ (0-60mm) SECURING THE DISHWASHER Center the dishwasher in Figure 22. Remove the top cutlery rack as you slide the unit back. Figure 20 Drive the mounting screws through the holes in...21 D ~1/2″ (12mm) Figure 25 For Alternate Side Mount 1/16″ (2mm) Figure 22 N 11 Failure to slide into the cabinet. LEVELING THE DISHWASHER The unit should now be ready to follow this warning can result in Figure 21. Wooden 1/16″ (2mm) D Figure 24 For Side Mount - ...
...or counter-clockwise to raise or lower the back. Figure 23 For Top Mount - Stone Countertop 0 - 23/8″ (0-60mm) SECURING THE DISHWASHER Center the dishwasher in Figure 22. Remove the top cutlery rack as you slide the unit back. Figure 20 Drive the mounting screws through the holes in...21 D ~1/2″ (12mm) Figure 25 For Alternate Side Mount 1/16″ (2mm) Figure 22 N 11 Failure to slide into the cabinet. LEVELING THE DISHWASHER The unit should now be ready to follow this warning can result in Figure 21. Wooden 1/16″ (2mm) D Figure 24 For Side Mount - ...
Installation Instructions
Page 12
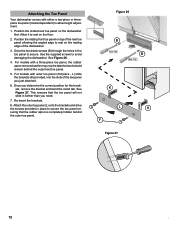
...Position the mating front toe panel on top of the toe panel you just attached. 6. Once you need. 7. Attaching the Toe Panel Your dishwasher comes with outer toe panel (3rd piece - Drive the two black screws (B) through the holes in further than you determine the correct position for...slide the brackets (K) provided, into the slots of the rear toe panel allowing the angled edge to avoid damaging the dishwasher. Position the slotted rear toe panel on the dishwasher first. For models with a three-piece toe panel, the rubber apron removed earlier may now be attached and should ...
...Position the mating front toe panel on top of the toe panel you just attached. 6. Once you need. 7. Attaching the Toe Panel Your dishwasher comes with outer toe panel (3rd piece - Drive the two black screws (B) through the holes in further than you determine the correct position for...slide the brackets (K) provided, into the slots of the rear toe panel allowing the angled edge to avoid damaging the dishwasher. Position the slotted rear toe panel on the dishwasher first. For models with a three-piece toe panel, the rubber apron removed earlier may now be attached and should ...

Installation Instructions
Page 13
...a copy of the problem • Daytime phone number where you can be sure to include (if you are having a problem with your dishwasher and are not pleased with the service you have available (if you are writing), or have received, please take the following information: •... Date the problem originated • Explanation of your invoice and keep it with your dishwasher, before calling for instructions. 3. If you are having a problem with this manual. Customer Service Your dishwasher requires no special care other than that described in the Care and Maintenance section of ...
...a copy of the problem • Daytime phone number where you can be sure to include (if you are having a problem with your dishwasher and are not pleased with the service you have available (if you are writing), or have received, please take the following information: •... Date the problem originated • Explanation of your invoice and keep it with your dishwasher, before calling for instructions. 3. If you are having a problem with this manual. Customer Service Your dishwasher requires no special care other than that described in the Care and Maintenance section of ...

Instructions for Use
Page 3
... recommend that you have joined the many other top quality Bosch appliances, visit our web site at: www.bosch-home.com/us at: 1-800-944-2904 Table of Contents Important Safety Instructions 2-3 Dishwasher Components 4-5 Dishwasher Setup 6-7 Dishware Materials 8 Loading the Dishwasher 8-9 Rack Accessories 10-11 Dishwasher Cycles and Options 12 Wash Cycle Information 13 Operating the...
... recommend that you have joined the many other top quality Bosch appliances, visit our web site at: www.bosch-home.com/us at: 1-800-944-2904 Table of Contents Important Safety Instructions 2-3 Dishwasher Components 4-5 Dishwasher Setup 6-7 Dishware Materials 8 Loading the Dishwasher 8-9 Rack Accessories 10-11 Dishwasher Cycles and Options 12 Wash Cycle Information 13 Operating the...
Instructions for Use
Page 4
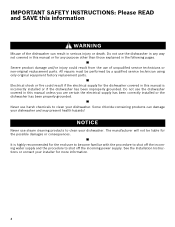
... water supply and the procedure to shut off the incoming power supply. Electrical shock or fire could result from the use the dishwasher covered in serious injury or death. The manufacturer will not be performed by a qualified service technician using only original equipment factory ...replacement parts. Never use the dishwasher in any way not covered in this manual or for any purpose other than those explained in this manual is highly recommended ...
... water supply and the procedure to shut off the incoming power supply. Electrical shock or fire could result from the use the dishwasher covered in serious injury or death. The manufacturer will not be performed by a qualified service technician using only original equipment factory ...replacement parts. Never use the dishwasher in any way not covered in this manual or for any purpose other than those explained in this manual is highly recommended ...
Instructions for Use
Page 5
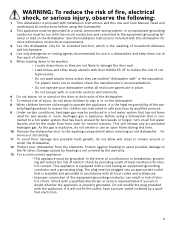
...in safe practices by a qualified electrician. 3 For plastic items not so marked, check the manufacturer's recommendations. • Do not operate your dishwasher unless all enclosure panels are in place. • Do not tamper with or override controls and interlocks. 6 Do not abuse, sit or ...grounding conductor and a grounding plug. WARNING: To reduce the risk of fire, electrical shock, or serious injury, observe the following: 1 This dishwasher is the washing of household dishware and kitchenware. 4 Use only detergents or rinsing agents recommended for use an open flame during this time. ...
...in safe practices by a qualified electrician. 3 For plastic items not so marked, check the manufacturer's recommendations. • Do not operate your dishwasher unless all enclosure panels are in place. • Do not tamper with or override controls and interlocks. 6 Do not abuse, sit or ...grounding conductor and a grounding plug. WARNING: To reduce the risk of fire, electrical shock, or serious injury, observe the following: 1 This dishwasher is the washing of household dishware and kitchenware. 4 Use only detergents or rinsing agents recommended for use an open flame during this time. ...
Instructions for Use
Page 6
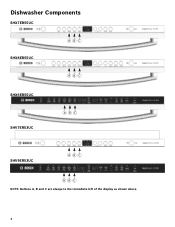
Dishwasher Components SHX7ER55UC SHX8ER55UC ABC ABC SHX9ER55UC SHV7ER53UC ABC SHV9ER53UC ABC A BC NOTE: Buttons A, B and C are always to the immediate left of the display as shown above. 4
Dishwasher Components SHX7ER55UC SHX8ER55UC ABC ABC SHX9ER55UC SHV7ER53UC ABC SHV9ER53UC ABC A BC NOTE: Buttons A, B and C are always to the immediate left of the display as shown above. 4
Instructions for Use
Page 8
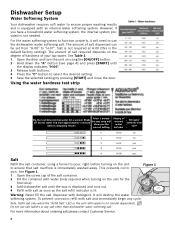
... salt overflow is the default factory setting). Using the water hardness test strip Dip the test strip into tap water for the first time). 3 Add dishwasher salt until the display indicates "H:00". 3 Release both buttons. 4 Press the "C" button to select the desired setting. 5 Save the selected setting...of salt dispensed can be set from "H:00" to "H:07". It will need to use salt tablets or any cycle. Dishwasher Setup Water Softening System Your dishwasher requires soft water to ensure proper washing results and is lit (model dependent). Figure 1 Warning: Never fill the salt dispenser ...
... salt overflow is the default factory setting). Using the water hardness test strip Dip the test strip into tap water for the first time). 3 Add dishwasher salt until the display indicates "H:00". 3 Release both buttons. 4 Press the "C" button to select the desired setting. 5 Save the selected setting...of salt dispensed can be set from "H:00" to "H:07". It will need to use salt tablets or any cycle. Dishwasher Setup Water Softening System Your dishwasher requires soft water to ensure proper washing results and is lit (model dependent). Figure 1 Warning: Never fill the salt dispenser ...
Instructions for Use
Page 9
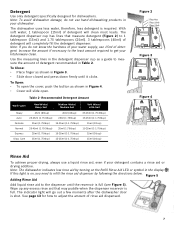
...guide to 1 tablespoon (15ml) and 1.75 tablespoons (25ml). 3 tablespoons (45ml) of detergent will go out a few moments after the dishwasher door is required. Recommended Detergent Amount Wash Cycle Hard Water/ Heavy Soil Medium Water/ Medium Soil Soft Water/ Little Soil Heavy Auto Delicate ... (1.75-3tbsp) 15-25ml (1-1.75tbsp) 15ml (1tbsp) 15-25ml (1-1.75tbsp) 15ml (1tbsp) 15ml (1tbsp) Figure 2 3 Tbsp. Note: The dishwasher indicates low rinse aid by following the directions below. The detergent dispenser cup has lines that may puddle when the dispenser reservoir is full. To...
...guide to 1 tablespoon (15ml) and 1.75 tablespoons (25ml). 3 tablespoons (45ml) of detergent will go out a few moments after the dishwasher door is required. Recommended Detergent Amount Wash Cycle Hard Water/ Heavy Soil Medium Water/ Medium Soil Soft Water/ Little Soil Heavy Auto Delicate ... (1.75-3tbsp) 15-25ml (1-1.75tbsp) 15ml (1tbsp) 15-25ml (1-1.75tbsp) 15ml (1tbsp) 15ml (1tbsp) Figure 2 3 Tbsp. Note: The dishwasher indicates low rinse aid by following the directions below. The detergent dispenser cup has lines that may puddle when the dispenser reservoir is full. To...
Instructions for Use
Page 10
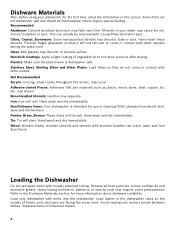
... and dry immediately. Refer to the Dishware Materials section for use in contact with loosely attached soiling. Load only dishwasher safe items into the dishwasher. others require special loading. Hand wash these so they do not come in this section. Non-stick Coatings: Apply... Some hand-painted utensils may discolor or become yellow. Remove all food particles, bones, toothpicks and excessive grease. Load dishes in your dishwasher for the first time, check the information in contact with other metals. Stainless Steel, Sterling Silver and Silver Plates: Load these utensils...
... and dry immediately. Refer to the Dishware Materials section for use in contact with loosely attached soiling. Load only dishwasher safe items into the dishwasher. others require special loading. Hand wash these so they do not come in this section. Non-stick Coatings: Apply... Some hand-painted utensils may discolor or become yellow. Remove all food particles, bones, toothpicks and excessive grease. Load dishes in your dishwasher for the first time, check the information in contact with other metals. Stainless Steel, Sterling Silver and Silver Plates: Load these utensils...
Instructions for Use
Page 12
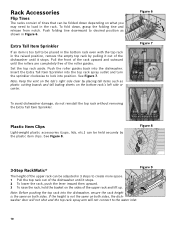
... Sprinkler If an item is too tall to be adjusted in the raised position, remove the empty top rack by pulling it out of the dishwasher until it stops. Figure 6 1 2 Figure 7 Plastic Item Clips Light-weight plastic accessories (cups, lids, etc.) can be folded down , grasp the folding tine and release... basket on both sides. Insert the Extra Tall Item Sprinkler into the top rack spray outlet and turn the sprinkler clockwise to lock into the dishwasher, ensure the rack height is not the same on the sides of the upper rack and lift up. Note: Before pushing the top rack into...
... Sprinkler If an item is too tall to be adjusted in the raised position, remove the empty top rack by pulling it out of the dishwasher until it stops. Figure 6 1 2 Figure 7 Plastic Item Clips Light-weight plastic accessories (cups, lids, etc.) can be folded down , grasp the folding tine and release... basket on both sides. Insert the Extra Tall Item Sprinkler into the top rack spray outlet and turn the sprinkler clockwise to lock into the dishwasher, ensure the rack height is not the same on the sides of the upper rack and lift up. Note: Before pushing the top rack into...
Instructions for Use
Page 13
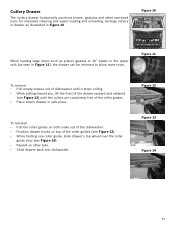
...Cutlery Drawer The cutlery drawer horizontally positions knives, spatulas and other side. • Slide drawer back into dishwasher. To reinstall: • Pull the roller guides on both sides out of the dishwasher. • Position drawer hooks on other oversized tools for improved cleaning and easier loading and unloading. ...glasses or 10" plates in the upper rack (as illustrated in Figure 10. Figure 11 To remove: • Pull empty drawer out of dishwasher until it stops rolling. • While pulling toward you, lift the front of the drawer upward and outward (see Figure 12) until the...
...Cutlery Drawer The cutlery drawer horizontally positions knives, spatulas and other side. • Slide drawer back into dishwasher. To reinstall: • Pull the roller guides on both sides out of the dishwasher. • Position drawer hooks on other oversized tools for improved cleaning and easier loading and unloading. ...glasses or 10" plates in the upper rack (as illustrated in Figure 10. Figure 11 To remove: • Pull empty drawer out of dishwasher until it stops rolling. • While pulling toward you, lift the front of the drawer upward and outward (see Figure 12) until the...


