Use and Care Manual
Page 2
... us if you for the first time. Operating the SHE5AM ... Self Help ...Customer Service ... You have any questions or comments. We highly To learn even more about your dishwasher for selecting a Bosch dishwasher. Dishwasher Components ... Loading the Dishwasher ... Adding Detergent and Rinse Agent ... Detailed Wash Cycle Information/Sanitized ... Operating the Dishwasher ... contained herein is very important. IMPORTANT SAFETY INSTRUCTIONS ... Dishwasher Features and Options ...Dishware Materials ... dishwashers. Wash Cycles and Options ... Thank you have...
... us if you for the first time. Operating the SHE5AM ... Self Help ...Customer Service ... You have any questions or comments. We highly To learn even more about your dishwasher for selecting a Bosch dishwasher. Dishwasher Components ... Loading the Dishwasher ... Adding Detergent and Rinse Agent ... Detailed Wash Cycle Information/Sanitized ... Operating the Dishwasher ... contained herein is very important. IMPORTANT SAFETY INSTRUCTIONS ... Dishwasher Features and Options ...Dishware Materials ... dishwashers. Wash Cycles and Options ... Thank you have...
Use and Care Manual
Page 3
... is provided with the procedure supply. in this time. • Remove the door to the washing compartment when removing an old dishwasher from the elements. See the Installation Instructions included with this Use and Care Manual. lmportant Safety Instructions - Some chloride-containing cleaning products can result in place. • Do not tamper with the circuit conductors and connected to become old enough to operate the appliance, it is...
... is provided with the procedure supply. in this time. • Remove the door to the washing compartment when removing an old dishwasher from the elements. See the Installation Instructions included with this Use and Care Manual. lmportant Safety Instructions - Some chloride-containing cleaning products can result in place. • Do not tamper with the circuit conductors and connected to become old enough to operate the appliance, it is...

Use and Care Manual
Page 4
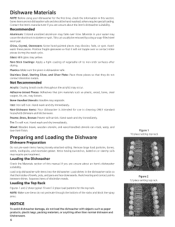
... Drying: A high temperature final rinse, a low temperature stainless steel tub, and the sheeting action of a rinse agent result in North America. of up to a temperature of clean water and protect the main pump and the drain pump 4 Flow-Through HeaterZM: Heats water to 160°F. Dishwasher Components Door Gasket Top Rack Top Rack Spray Arm Bottom Rack Spray Arm Bottom Rack Detergent Dispenser Vent r Filter System (in dishwasher floor) Rinse Agent Dispenser Silverware Basket Model/Serial Number Label Dishwasher Features and Options Noise Reduction System: A two-pump motor...
... Drying: A high temperature final rinse, a low temperature stainless steel tub, and the sheeting action of a rinse agent result in North America. of up to a temperature of clean water and protect the main pump and the drain pump 4 Flow-Through HeaterZM: Heats water to 160°F. Dishwasher Components Door Gasket Top Rack Top Rack Spray Arm Bottom Rack Spray Arm Bottom Rack Detergent Dispenser Vent r Filter System (in dishwasher floor) Rinse Agent Dispenser Silverware Basket Model/Serial Number Label Dishwasher Features and Options Noise Reduction System: A two-pump motor...

Use and Care Manual
Page 5
...Control Audible Cycle Completion Signal yes no Clean Light yes no Refill Rinse Agent Indicator Light yes yes Exposed Front Control Exposed Hidden Top Hidden Top Hidden Tolc Front Control Control Control Control no no no yes yes yes yes yes yes yes yes yes yes yes yes Sanitize Light yes yes yes yes yes yes yes Upper Rack Flip Tines Lower Rack Flip Tines Child Lock Button Suspension Silverware Basket Height Adjustable Upper Rack Time Remaining Indicator...flexible yes no Half Load no yes no yes yes yes yes Extra Dry Heat OPTIDRY TM yes yes yes...
...Control Audible Cycle Completion Signal yes no Clean Light yes no Refill Rinse Agent Indicator Light yes yes Exposed Front Control Exposed Hidden Top Hidden Top Hidden Tolc Front Control Control Control Control no no no yes yes yes yes yes yes yes yes yes yes yes yes Sanitize Light yes yes yes yes yes yes yes Upper Rack Flip Tines Lower Rack Flip Tines Child Lock Button Suspension Silverware Basket Height Adjustable Upper Rack Time Remaining Indicator...flexible yes no Half Load no yes no yes yes yes yes Extra Dry Heat OPTIDRY TM yes yes yes...
Use and Care Manual
Page 6
... dissimilar metals. Remove large food particles, bones, seeds, toothpicks, and excessive grease. Load dishes in this manual if you are unsure about an item's dishwasher suitability. Contact the item's manufacturer if you are unsure about the item's dishwasher suitability. Glass: Milk glass may occur. Non-Stick Coatings: Apply a light coating of the racks and block the spray arms. NOTICE To...
... dissimilar metals. Remove large food particles, bones, seeds, toothpicks, and excessive grease. Load dishes in this manual if you are unsure about an item's dishwasher suitability. Contact the item's manufacturer if you are unsure about the item's dishwasher suitability. Glass: Milk glass may occur. Non-Stick Coatings: Apply a light coating of the racks and block the spray arms. NOTICE To...
Use and Care Manual
Page 7
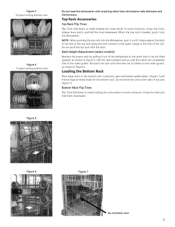
... Adjustment (select models) Remove the empty rack by pulling it can be lifted upward, as shown in the rear of rollers on the roller guides, as shown in the bottom rack. Load pots, pans and bowls upside-down to the point that it out of tub (see Figure 7) Bottom Rack Flip Tines Flip Tines fold down to the water supply...
... Adjustment (select models) Remove the empty rack by pulling it can be lifted upward, as shown in the rear of rollers on the roller guides, as shown in the bottom rack. Load pots, pans and bowls upside-down to the point that it out of tub (see Figure 7) Bottom Rack Flip Tines Flip Tines fold down to the water supply...

Use and Care Manual
Page 8
...setting (Select Models) Figure 9 L;_J._I L;JO.,J 12 place setting (Select Models) Figure 1 1 Figure 10 8 The Standard Silverware Basket This basket fits in the front-middle of positions in the lower rack, greatly increasing the lower rack's loading versatility. To split the Flexible Silverware Basket: 1. Place knives with their handles... basket tops down . The Flexible Silverware Basket This basket is designed for placing the two halves in Figures 8 (for standard basket) and 9 (for flexible basket). The basket splits along its length, resulting in opposite directions,...
...setting (Select Models) Figure 9 L;_J._I L;JO.,J 12 place setting (Select Models) Figure 1 1 Figure 10 8 The Standard Silverware Basket This basket fits in the front-middle of positions in the lower rack, greatly increasing the lower rack's loading versatility. To split the Flexible Silverware Basket: 1. Place knives with their handles... basket tops down . The Flexible Silverware Basket This basket is designed for placing the two halves in Figures 8 (for standard basket) and 9 (for flexible basket). The basket splits along its length, resulting in opposite directions,...

Use and Care Manual
Page 9
Figure 12 Add Detergent _3TBSMAX • Use fresh powdered detergent for best results • 1 tablespoon will clean _' most loads ', I,_ /__;/__ l y
Figure 12 Add Detergent _3TBSMAX • Use fresh powdered detergent for best results • 1 tablespoon will clean _' most loads ', I,_ /__;/__ l y

Use and Care Manual
Page 10
... Sanitation refer to delay the start time of this manual for further information. To activate, select the Half Load button in a few minutes after the dishwasher door is a full load. and kitchenware that was of condensation drying will go out in addition to the Dishware Materials Cleans items having loosely attached normal soiling. They are dishwasher safe. NOTE: After filling the rinse agent dispenser, the indicator light will follow. Wash Cycle...
... Sanitation refer to delay the start time of this manual for further information. To activate, select the Half Load button in a few minutes after the dishwasher door is a full load. and kitchenware that was of condensation drying will go out in addition to the Dishware Materials Cleans items having loosely attached normal soiling. They are dishwasher safe. NOTE: After filling the rinse agent dispenser, the indicator light will follow. Wash Cycle...

Use and Care Manual
Page 11
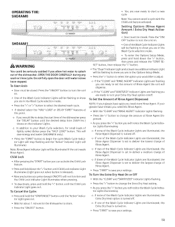
... Rinse Agent. • With the "CLEAN" and "RINSEAGENT" Indicator Lights flashing. • Press the " OPERATING THE SHX3AM, I @BOSCH off . OPEN THE DOOR CAREFULLY during any wash or rinse cycle. pressing the start the cycle Note: Rinse Agent Indicator Light will dispense. To Start Unit: • Door must be flashing to start a new cycle. Setting Options (Rinse Agent Amount / Extra Dry Heat Activation / Cycle Completion Signal Tone Level) • Door must be seriously scalded if you allow hot water to splash out of Rinse Agent the unit will be flashing to adjust...
... Rinse Agent. • With the "CLEAN" and "RINSEAGENT" Indicator Lights flashing. • Press the " OPERATING THE SHX3AM, I @BOSCH off . OPEN THE DOOR CAREFULLY during any wash or rinse cycle. pressing the start the cycle Note: Rinse Agent Indicator Light will dispense. To Start Unit: • Door must be flashing to start a new cycle. Setting Options (Rinse Agent Amount / Extra Dry Heat Activation / Cycle Completion Signal Tone Level) • Door must be seriously scalded if you allow hot water to splash out of Rinse Agent the unit will be flashing to adjust...

Use and Care Manual
Page 12
... dishwasher the "DELAY" button until water noises have stopped. OPERATING THE SHE5AM & SHE5AL @i@D Half Load Child Lock -- Press the "ON/OFF" button to select the desired wash cycle. • If desired select the "HALF LOAD" or DELAY START" features at this point. if the unit needs Child Lock • After pressing the "START" button you would like to begin the cycle (Wash Cycle Indicator Light will stop flashing) Note: Rinse Agent Indicator Light will save energy, water. Auto -- Do not fully open the door until the desired delay time (1-24...
... dishwasher the "DELAY" button until water noises have stopped. OPERATING THE SHE5AM & SHE5AL @i@D Half Load Child Lock -- Press the "ON/OFF" button to select the desired wash cycle. • If desired select the "HALF LOAD" or DELAY START" features at this point. if the unit needs Child Lock • After pressing the "START" button you would like to begin the cycle (Wash Cycle Indicator Light will stop flashing) Note: Rinse Agent Indicator Light will save energy, water. Auto -- Do not fully open the door until the desired delay time (1-24...
Use and Care Manual
Page 13
... addition Indicator Light will be closed. One of the dishwasher. Press the "" button to turn the unit on. Child Lock • After pressing the "START" button you are flashing you need more Rinse Agent. If you need less Rinse Agent. • With the "CLEAN" and "RINSEAGENT" Indicator Lights flashing. • Press the " If your Extra Dry Heat option on the Indicator Lights. To Start Unit: • Door must be illuminated if the unit needs Rinse Agent. loads of Rinse Agent Dispensed NOTE: If your Wash Cycle...
... addition Indicator Light will be closed. One of the dishwasher. Press the "" button to turn the unit on. Child Lock • After pressing the "START" button you are flashing you need more Rinse Agent. If you need less Rinse Agent. • With the "CLEAN" and "RINSEAGENT" Indicator Lights flashing. • Press the " If your Extra Dry Heat option on the Indicator Lights. To Start Unit: • Door must be illuminated if the unit needs Rinse Agent. loads of Rinse Agent Dispensed NOTE: If your Wash Cycle...

Use and Care Manual
Page 14
...-out Water may occasionally splash out of your dishwasher require occasional are You must remove the spray arms to its installed position. Check/Clean the Stainless Steel Inner Door and Tub Clean the outer edges of time in a location that experiences freezing temperatures (e.g., in Figure 17A. Check/Clean Occasionally unobstructed. Turn the locking nut counter-clockwise 1/8 turn and remove it, as shown in the spray nozzles. 5. If the spray nozzles need cleaning...
...-out Water may occasionally splash out of your dishwasher require occasional are You must remove the spray arms to its installed position. Check/Clean the Stainless Steel Inner Door and Tub Clean the outer edges of time in a location that experiences freezing temperatures (e.g., in Figure 17A. Check/Clean Occasionally unobstructed. Turn the locking nut counter-clockwise 1/8 turn and remove it, as shown in the spray nozzles. 5. If the spray nozzles need cleaning...

Use and Care Manual
Page 15
... and remove the debris. Lift out the assembly as shown in Figure 21 and 22. 4. turn counterclockwise. Toreinstatllhebottomsprayarm: 1. You should occasionally inspect it for foreign objects and clean it under the lower rack and is easily accessible, During normal use, the filter system is located on a surface such as shown in the Large Object Trap, turn . 3. Check/Clean the Filter System This dishwasher has a filter...
... and remove the debris. Lift out the assembly as shown in Figure 21 and 22. 4. turn counterclockwise. Toreinstatllhebottomsprayarm: 1. You should occasionally inspect it for foreign objects and clean it under the lower rack and is easily accessible, During normal use, the filter system is located on a surface such as shown in the Large Object Trap, turn . 3. Check/Clean the Filter System This dishwasher has a filter...
Use and Care Manual
Page 16
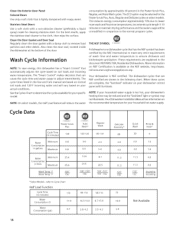
... Power Scrub Plus, Auto, Regular and Delicate cycles on the recommended temperature for your specific model. Your Dishwasher Installation Manual has information on select models. Clean the Door Gasket and Door Seal Regularly clean the door gasket with a damp cloth to the cloth, then wipe the surface. The "Smart Control" makes decisions that can cause the cycle time and water usage to determine the cycles available for your household hot water supply. NOTE: On select models...
... Power Scrub Plus, Auto, Regular and Delicate cycles on the recommended temperature for your specific model. Your Dishwasher Installation Manual has information on select models. Clean the Door Gasket and Door Seal Regularly clean the door gasket with a damp cloth to the cloth, then wipe the surface. The "Smart Control" makes decisions that can cause the cycle time and water usage to determine the cycles available for your household hot water supply. NOTE: On select models...
Use and Care Manual
Page 17
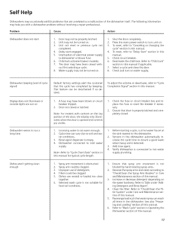
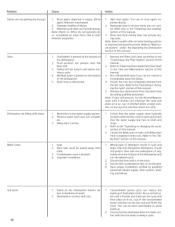
... problems that are unrelated to dishwasher or blown fuse. 6. Child lock activated (select models). 7. Check circuit breaker. 6. Check the fuse or circuit breaker box and replace the fuse or reset the breaker if necessary. 2. Sensors in this manual. 5. Ensure that spray arm movement is empty. 4. Refer to "Canceling or changing the cycle" section in the dishwasher automatically increase the cycle time to hot water supply plumbing. Before starting a cycle, run a long time 1. Verify dishwasher is connected to ensure a good wash...
... problems that are unrelated to dishwasher or blown fuse. 6. Child lock activated (select models). 7. Check circuit breaker. 6. Check the fuse or circuit breaker box and replace the fuse or reset the breaker if necessary. 2. Sensors in this manual. 5. Ensure that spray arm movement is empty. 4. Refer to "Canceling or changing the cycle" section in the dishwasher automatically increase the cycle time to hot water supply plumbing. Before starting a cycle, run a long time 1. Verify dishwasher is connected to ensure a good wash...
Use and Care Manual
Page 18
... hard water stains. Use only dishwasher detergents. Run a normal cycle until it flushes end interrupt the cycle end place on 8 oz. cup of rinse agent improves drying. 2. Dishes left too long in the Care and Maintenance section of this manual. 3. Residual water is present at the bottom of the dishwasher. 5. Rearrange load to ensure items are present near the door seal. 3. Remove any obstructions from track. 3. Note: If odor still persists, run the desired cycle. 2. Delay-start time completes (times...
... hard water stains. Use only dishwasher detergents. Run a normal cycle until it flushes end interrupt the cycle end place on 8 oz. cup of rinse agent improves drying. 2. Dishes left too long in the Care and Maintenance section of this manual. 3. Residual water is present at the bottom of the dishwasher. 5. Rearrange load to ensure items are present near the door seal. 3. Remove any obstructions from track. 3. Note: If odor still persists, run the desired cycle. 2. Delay-start time completes (times...
Use and Care Manual
Page 19
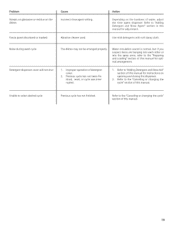
..., reset, or cycle was interrupted. Refer to the "Preparing and Loading" section of this manual for adjustment. Water circulation sound is normal, but if you suspect items are banging into each other or into the spray arms, refer to "Adding Detergent and RinseAid" section of this manual for instructions on the dishes Cause Incorrect rinse agent setting. Problem Streaks on glassware or residue on opening and closing the dispenser. 2. Fascia panel...
..., reset, or cycle was interrupted. Refer to the "Preparing and Loading" section of this manual for adjustment. Water circulation sound is normal, but if you suspect items are banging into each other or into the spray arms, refer to "Adding Detergent and RinseAid" section of this manual for instructions on the dishes Cause Incorrect rinse agent setting. Problem Streaks on glassware or residue on opening and closing the dispenser. 2. Fascia panel...
Use and Care Manual
Page 20
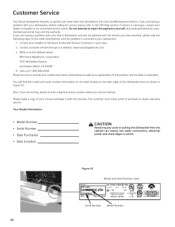
... the problem is necessary, contact your Bosch dishwasher and are not pleased with this manual. You will find the model and serial number information Figure 32. Contact customer service through our website, www.boschappliances.com. 3. Customer Service Your Bosch dishwasher requires no special care other than that described in Also, if you are writing, please include a daytime phone number where you can expose hot water connections, power and sharp...
... the problem is necessary, contact your Bosch dishwasher and are not pleased with this manual. You will find the model and serial number information Figure 32. Contact customer service through our website, www.boschappliances.com. 3. Customer Service Your Bosch dishwasher requires no special care other than that described in Also, if you are writing, please include a daytime phone number where you can expose hot water connections, power and sharp...
Use and Care Manual
Page 21
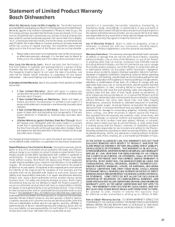
... Warranty: Bosch also provides these additional limited warranties: • 2 Year Limited Warranty: Bosch will replace the stainless steel door if the door should rust through (excludes labor charges). service visits to teach you do not attempt to repair manufacturer-defective Product only, using purchaser, provided that the Product was purchased: (1) for your normal, household (non-commercial) use, and has in fact atall times only been used for normal household purposes; (2) new...
... Warranty: Bosch also provides these additional limited warranties: • 2 Year Limited Warranty: Bosch will replace the stainless steel door if the door should rust through (excludes labor charges). service visits to teach you do not attempt to repair manufacturer-defective Product only, using purchaser, provided that the Product was purchased: (1) for your normal, household (non-commercial) use, and has in fact atall times only been used for normal household purposes; (2) new...


