
Installation Instructions
Page 3
... codes for stainless steel braided hose or PEX hot water supply lines. Separate channels are properly made. If using copper tubing or other material for water supply, defer to a licensed plumber for weeks, run with all electrical connections are provided under the dishwasher. Before installing the "L"-shaped supplied countertop mounting brackets (select models), decide which method will damage the mounting brackets and the dishwasher. WARNING Avoiding General Hazards Do not use extension cords. If plumbing lines...
... codes for stainless steel braided hose or PEX hot water supply lines. Separate channels are properly made. If using copper tubing or other material for water supply, defer to a licensed plumber for weeks, run with all electrical connections are provided under the dishwasher. Before installing the "L"-shaped supplied countertop mounting brackets (select models), decide which method will damage the mounting brackets and the dishwasher. WARNING Avoiding General Hazards Do not use extension cords. If plumbing lines...

Installation Instructions
Page 15
Ne pas jeter! Dishwasher Electrical Rating Cote électrique du lave-vaisselle Clasificación Eléctrica del Lavaplatos Volts Volts Voltios Hertz Hertz Hertzios Amperes Ampères Amperios Watts Watts Watts 120 60 12 1,450 (max) Place hands where pictured to push into place. Guide the water line and drain hose toward the sink, and electric line through the proper channel. Do...
Ne pas jeter! Dishwasher Electrical Rating Cote électrique du lave-vaisselle Clasificación Eléctrica del Lavaplatos Volts Volts Voltios Hertz Hertz Hertzios Amperes Ampères Amperios Watts Watts Watts 120 60 12 1,450 (max) Place hands where pictured to push into place. Guide the water line and drain hose toward the sink, and electric line through the proper channel. Do...
Instructions for Use
Page 3
... Basket 7 Rack Accessories 8 Adding Detergent and Rinse Aid 9-10 Dishwasher Cycles and Options 11 Wash Cycle Information 12 Operating the Dishwasher 12-13 Care and Maintenance 14-15 Self Help 16-17 Customer Service 18 Warranty Information 19 Congratulations and thank you from their dishwashers. This manual was written with your dishwasher for selecting a Bosch dishwasher. To learn more about your dishwasher and available accessories, as well as many consumers who demand quiet...
... Basket 7 Rack Accessories 8 Adding Detergent and Rinse Aid 9-10 Dishwasher Cycles and Options 11 Wash Cycle Information 12 Operating the Dishwasher 12-13 Care and Maintenance 14-15 Self Help 16-17 Customer Service 18 Warranty Information 19 Congratulations and thank you from their dishwashers. This manual was written with your dishwasher for selecting a Bosch dishwasher. To learn more about your dishwasher and available accessories, as well as many consumers who demand quiet...

Instructions for Use
Page 4
... repairs must be liable for the end user to become familiar with the procedure to shut off the incoming water supply and the procedure to shut off the incoming power supply. Some chloride-containing products can result in this manual is highly recommended for the possible damages or consequences. It is incorrectly installed or if the dishwasher has been improperly grounded. See the Installation Instructions...
... repairs must be liable for the end user to become familiar with the procedure to shut off the incoming water supply and the procedure to shut off the incoming power supply. Some chloride-containing products can result in this manual is highly recommended for the possible damages or consequences. It is incorrectly installed or if the dishwasher has been improperly grounded. See the Installation Instructions...
Instructions for Use
Page 5
... equipped with Installation Instructions and this time. 10 Remove the dishwasher door to the washing compartment when removing an old dishwasher for service or discarding. 11 To avoid floor damage and possible mold growth, do not allow wet areas to remain around or under the dishwasher. 12 Protect your dishwasher unless all enclosure panels are marked "dishwasher safe" or the equivalent. Before using the dishwasher. 2 This...
... equipped with Installation Instructions and this time. 10 Remove the dishwasher door to the washing compartment when removing an old dishwasher for service or discarding. 11 To avoid floor damage and possible mold growth, do not allow wet areas to remain around or under the dishwasher. 12 Protect your dishwasher unless all enclosure panels are marked "dishwasher safe" or the equivalent. Before using the dishwasher. 2 This...

Instructions for Use
Page 6
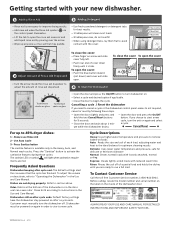
Dishwasher Components SHE68R5xUC* SHV68R53UC SHX68R5xUC* Wash Cycles Additional Features Model Heavy Auto Delicate Normal Express Rinse Adjustable Top Rack Bottle Holder Delay Start Extra Tall Item Sprinkler Flip Tines Half Load Option InfoLight Sanitize Option Silverware Basket SHE68R5xUC* X X X X X X RackMatic X X X X X SHV68R53UC X X X X X X RackMatic X X X X X SHX68R5xUC* X X X X X X RackMatic X X X X X X X Flexible X X Flexible X X Flexible Top rack Bottom rack Rinse aid dispenser * "x" can be any number 4 Vent Spray arm Detergent ...
Dishwasher Components SHE68R5xUC* SHV68R53UC SHX68R5xUC* Wash Cycles Additional Features Model Heavy Auto Delicate Normal Express Rinse Adjustable Top Rack Bottle Holder Delay Start Extra Tall Item Sprinkler Flip Tines Half Load Option InfoLight Sanitize Option Silverware Basket SHE68R5xUC* X X X X X X RackMatic X X X X X SHV68R53UC X X X X X X RackMatic X X X X X SHX68R5xUC* X X X X X X RackMatic X X X X X X X Flexible X X Flexible X X Flexible Top rack Bottom rack Rinse aid dispenser * "x" can be any number 4 Vent Spray arm Detergent ...
Instructions for Use
Page 7
.... Bone-Handled Utensils: Handles may occur. Pewter, Brass, Bronze: These items will stain. Dishwasher Features Delay Start: Delay the start option. Flip Tines: increase the rack flexibility to accommodate larger/taller items. Flow-Through Heater™: heats water to meet sanitized conditions. SaniDry™: A high temperature final rinse, a low temperature stainless steel tub and the sheeting action of clean water and protect the main pump and the drain pump from...
.... Bone-Handled Utensils: Handles may occur. Pewter, Brass, Bronze: These items will stain. Dishwasher Features Delay Start: Delay the start option. Flip Tines: increase the rack flexibility to accommodate larger/taller items. Flow-Through Heater™: heats water to meet sanitized conditions. SaniDry™: A high temperature final rinse, a low temperature stainless steel tub and the sheeting action of clean water and protect the main pump and the drain pump from...

Instructions for Use
Page 8
... bottom rack first. Loading the Top Rack Ensure items do not load the dishwasher with tall baking sheets. Loading the Dishwasher Do not pre-wash items with loosely attached soiling. Loading the Bottom Rack Place large items in using the door. Flexible Silverware Basket Top Rack Bottom Rack Additional Loading Pattern - Load pots, pans and bowls upside down. Flexible Silverware Basket (10 place settings) Top Rack Bottom Rack 6 Load dishes in the dishwasher racks so the insides...
... bottom rack first. Loading the Top Rack Ensure items do not load the dishwasher with tall baking sheets. Loading the Dishwasher Do not pre-wash items with loosely attached soiling. Loading the Bottom Rack Place large items in using the door. Flexible Silverware Basket Top Rack Bottom Rack Additional Loading Pattern - Load pots, pans and bowls upside down. Flexible Silverware Basket (10 place settings) Top Rack Bottom Rack 6 Load dishes in the dishwasher racks so the insides...
Instructions for Use
Page 10
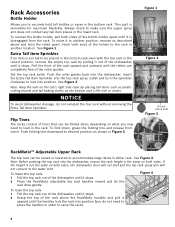
... position. To remove the bottle holder, pull both sides, the dishwasher door will not shut and the top rack spray arm will not connect to the water inlet. Note: Keep the vent on the tub's right side clear by pulling it out of the bottle holder apart until the handles lock the rack into the dishwasher. NOTICE To avoid dishwasher damage, do not need to load in order...
... position. To remove the bottle holder, pull both sides, the dishwasher door will not shut and the top rack spray arm will not connect to the water inlet. Note: Keep the vent on the tub's right side clear by pulling it out of the bottle holder apart until the handles lock the rack into the dishwasher. NOTICE To avoid dishwasher damage, do not need to load in order...

Instructions for Use
Page 11
... rear end of detergent will slide open the cover, push the blue button inward (not down firmly until it clicks. Figure 6 To Open • To open . 1 Table 1 - Recommended Detergent Amount Wash Cycle Hard Water/ Heavy Soil Medium Water/ Medium Soil Soft Water/ Little Soil/ with the cover. 3 Tbsp. Figure 5 Adding Detergent • 1 tablespoon (15ml) will completely fill the detergent dispenser. Adding Detergent and Rinse Aid Detergent Use only detergent specifically designed for dishwashers...
... rear end of detergent will slide open the cover, push the blue button inward (not down firmly until it clicks. Figure 6 To Open • To open . 1 Table 1 - Recommended Detergent Amount Wash Cycle Hard Water/ Heavy Soil Medium Water/ Medium Soil Soft Water/ Little Soil/ with the cover. 3 Tbsp. Figure 5 Adding Detergent • 1 tablespoon (15ml) will completely fill the detergent dispenser. Adding Detergent and Rinse Aid Detergent Use only detergent specifically designed for dishwashers...
Instructions for Use
Page 13
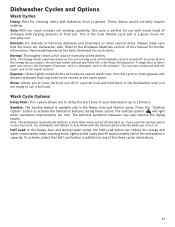
... three cycles listed above. 11 If you to rinse the food soil off and back on . Express: Cleans lightly soiled dishes and reduces overall wash time. Press the "Sanitize Option" button to Auto Wash when turned off of food soil. The sanitize symbol will default to Auto Wash with the Sanitize option selected when you to delay the start time of the dishwasher's capacity. To activate, select the Half Load button in the Rinse Aid dispenser. Auto...
... three cycles listed above. 11 If you to rinse the food soil off and back on . Express: Cleans lightly soiled dishes and reduces overall wash time. Press the "Sanitize Option" button to Auto Wash when turned off of food soil. The sanitize symbol will default to Auto Wash with the Sanitize option selected when you to delay the start time of the dishwasher's capacity. To activate, select the Half Load button in the Rinse Aid dispenser. Auto...
Instructions for Use
Page 14
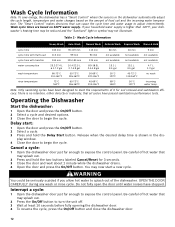
... dishwasher automatically adjust the cycle length, temperature and water changes based on 120°F water supply. Delay start a new cycle. play window. 4 Close the door to turn the unit off. 3 Wait at least 10 seconds before fully opening the dishwasher door. 4 To resume the cycle, press the On/Off button and close the dishwasher door. 12 Interrupt a cycle: 1 Open the dishwasher door just far enough to expose the control panel. OPEN THE DOOR CAREFULLY during any wash or rinse cycle. Wash Cycle Information Note: To save energy...
... dishwasher automatically adjust the cycle length, temperature and water changes based on 120°F water supply. Delay start a new cycle. play window. 4 Close the door to turn the unit off. 3 Wait at least 10 seconds before fully opening the dishwasher door. 4 To resume the cycle, press the On/Off button and close the dishwasher door. 12 Interrupt a cycle: 1 Open the dishwasher door just far enough to expose the control panel. OPEN THE DOOR CAREFULLY during any wash or rinse cycle. Wash Cycle Information Note: To save energy...
Instructions for Use
Page 15
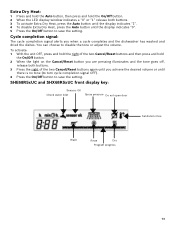
... not open door Sanitation rinse Wash Rinse Dry Program progress 13 Extra Dry Heat: 1 Press and hold the Auto button, then press and hold the On/Off button. 2 When the light on the Cancel/Reset button you are pressing illuminates and the tone goes off, release both buttons. 3 To activate Extra Dry Heat, press the Auto button until the display indicates "1". 4 To disable Extra Dry Heat, press the Auto button until there is no tone (to turn cycle completion...
... not open door Sanitation rinse Wash Rinse Dry Program progress 13 Extra Dry Heat: 1 Press and hold the Auto button, then press and hold the On/Off button. 2 When the light on the Cancel/Reset button you are pressing illuminates and the tone goes off, release both buttons. 3 To activate Extra Dry Heat, press the Auto button until the display indicates "1". 4 To disable Extra Dry Heat, press the Auto button until there is no tone (to turn cycle completion...
Instructions for Use
Page 16
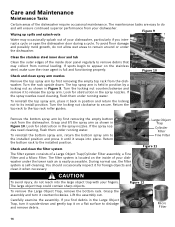
... stainless steel, make sure the rinse agent is full and functioning properly. To remove the Large Object Trap, remove the bottom rack. Clean the stainless steel inner door and tub Clean the outer edges of the inside of your fingers. If the spray nozzles need cleaning, flush them under running water. Turn the locking nut clockwise to remove debris that may occasionally splash out of your dishwasher. Check and clean the filter system The filter...
... stainless steel, make sure the rinse agent is full and functioning properly. To remove the Large Object Trap, remove the bottom rack. Clean the stainless steel inner door and tub Clean the outer edges of the inside of your fingers. If the spray nozzles need cleaning, flush them under running water. Turn the locking nut clockwise to remove debris that may occasionally splash out of your dishwasher. Check and clean the filter system The filter...
Instructions for Use
Page 17
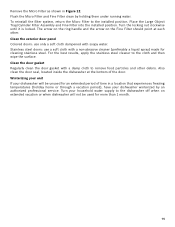
... locked. The arrow on the ring handle and the arrow on extended vacation or when dishwasher will be used for more than 1 month. 15 Clean the exterior door panel Colored doors: use a soft cloth with a non-abrasive cleaner (preferably a liquid spray) made for cleaning stainless steel. Turn your household water supply to remove food particles and other . Clean the door gasket Regularly clean the door gasket with soapy water. To reinstall the filter...
... locked. The arrow on the ring handle and the arrow on extended vacation or when dishwasher will be used for more than 1 month. 15 Clean the exterior door panel Colored doors: use a soft cloth with a non-abrasive cleaner (preferably a liquid spray) made for cleaning stainless steel. Turn your household water supply to remove food particles and other . Clean the door gasket Regularly clean the door gasket with soapy water. To reinstall the filter...
Instructions for Use
Page 18
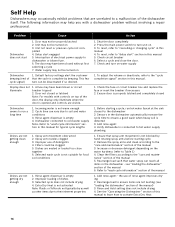
...increase the cycle time to Table 1) 4. Rinse and Hold setting does not include drying 4. Problem Cause Dishwasher does not start engaged 5. Spray arm nozzles clogged 3. To reset, refer to hot water supply plumbing 1. Before starting cycle 2. Verify dishwasher is not blocked by beeping. Ensure that spray arm movement is connected to "delay start" section in this manual 5. Door may have been closed without involving a repair professional. Delay start 1. Interruption of electrical power supply to soil and water conditions 3. To adjust the volume...
...increase the cycle time to Table 1) 4. Rinse and Hold setting does not include drying 4. Problem Cause Dishwasher does not start engaged 5. Spray arm nozzles clogged 3. To reset, refer to hot water supply plumbing 1. Before starting cycle 2. Verify dishwasher is not blocked by beeping. Ensure that spray arm movement is connected to "delay start" section in this manual 5. Door may have been closed without involving a repair professional. Delay start 1. Interruption of electrical power supply to soil and water conditions 3. To adjust the volume...
Instructions for Use
Page 19
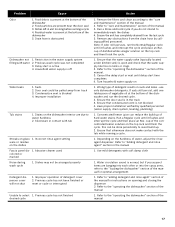
... "care and maintenance" section of hard water stains. Refer to avoid build up of the manual 3. Incorrect rinse agent setting ware or residue on the top rack and then finish the cycle. 1. Refer to "Adding detergent and rinse agent" section in suds and leaks - Suds 2. Ensure that the water supply valve (typically located under kitchen sink) is open and check that condensation vent is active 4. Turn household water supply on glass- 1. Delay start time completes 4. Improper installation...
... "care and maintenance" section of hard water stains. Refer to avoid build up of the manual 3. Incorrect rinse agent setting ware or residue on the top rack and then finish the cycle. 1. Refer to "Adding detergent and rinse agent" section in suds and leaks - Suds 2. Ensure that the water supply valve (typically located under kitchen sink) is open and check that condensation vent is active 4. Turn household water supply on glass- 1. Delay start time completes 4. Improper installation...
Instructions for Use
Page 20
... by unauthorized personnel may void the warranty. You will replace the product or refund the purchase price. Please make a copy of your area. 4 Write us or www.bosch-appliances.ca 3 Contact your installer or the Bosch Authorized Service Contractor in the Care and Maintenance section of the dishwasher door. The customer much show proof of the problem and the date it with your...
... by unauthorized personnel may void the warranty. You will replace the product or refund the purchase price. Please make a copy of your area. 4 Write us or www.bosch-appliances.ca 3 Contact your installer or the Bosch Authorized Service Contractor in the Care and Maintenance section of the dishwasher door. The customer much show proof of the problem and the date it with your...
Instructions for Use
Page 21
... of Warranty Product: Bosch is ", or previously returned model), and not for any travel time or other connecting facilities, for proper foundation/flooring, and for customer service and technical ability (note that you do not attempt to repair the Product yourself, or use of the Product in conjunction with air or water-going vessels); (2) any party's willful misconduct, negligence, misuse, abuse, accidents, neglect, improper operation...
... of Warranty Product: Bosch is ", or previously returned model), and not for any travel time or other connecting facilities, for proper foundation/flooring, and for customer service and technical ability (note that you do not attempt to repair the Product yourself, or use of the Product in conjunction with air or water-going vessels); (2) any party's willful misconduct, negligence, misuse, abuse, accidents, neglect, improper operation...
Short Instructions
Page 1
.... --Close the door to the ideal balance for optimum cleaning results Delicate: Uses lower water temperature and pressure, safe for best results. --1 tablespoon will light when sanitation requirements are not drying properly: Refer to "Operating the Dishwasher" in the door seal can cause odor. Dishes are met. Before calling, locate the model number and serial number on the label on the inside the rinse aid dispenser to start a new cycle, turn the unit on after cycle end: The default settings...
.... --Close the door to the ideal balance for optimum cleaning results Delicate: Uses lower water temperature and pressure, safe for best results. --1 tablespoon will light when sanitation requirements are not drying properly: Refer to "Operating the Dishwasher" in the door seal can cause odor. Dishes are met. Before calling, locate the model number and serial number on the label on the inside the rinse aid dispenser to start a new cycle, turn the unit on after cycle end: The default settings...

