Instructions for Use
Page 3
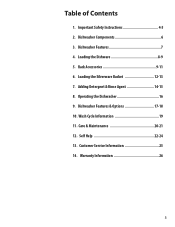
Operating the Dishwasher 16 9. Warranty Information 26 3 Wash Cycle Information 19 11. Loading the Dishware 8-9 5. Important Safety Instructions 4-5 2. Self Help 22-24 13. Loading the Silverware Basket 12-13 7. Dishwasher Features & Options 17-18 10. Care & Maintenance 20-21 12. Dishwasher Features 7 4. Dishwasher Components 6 3. Rack Accessories 9-11 6. Customer Service Information 25 14. Adding Detergent & Rinse Agent 14-15 8. Table of Contents 1.
Operating the Dishwasher 16 9. Warranty Information 26 3 Wash Cycle Information 19 11. Loading the Dishware 8-9 5. Important Safety Instructions 4-5 2. Self Help 22-24 13. Loading the Silverware Basket 12-13 7. Dishwasher Features & Options 17-18 10. Care & Maintenance 20-21 12. Dishwasher Features 7 4. Dishwasher Components 6 3. Rack Accessories 9-11 6. Customer Service Information 25 14. Adding Detergent & Rinse Agent 14-15 8. Table of Contents 1.

Instructions for Use
Page 4
... chemicals to clean your dishwasher. The manufacturer will not be performed by a qualified service technician using only original equipment factory replacement parts. ■ Electrical shock or fire could result from the use steam cleaning products to clean your dishwasher and may present health hazards! See the installation Instructions or contact your installer for more information. ■ Never use of the dishwasher can damage your dishwasher. All repairs must be...
... chemicals to clean your dishwasher. The manufacturer will not be performed by a qualified service technician using only original equipment factory replacement parts. ■ Electrical shock or fire could result from the use steam cleaning products to clean your dishwasher and may present health hazards! See the installation Instructions or contact your installer for more information. ■ Never use of the dishwasher can damage your dishwasher. All repairs must be...

Instructions for Use
Page 5
... to the washing compartment when removing an old dishwasher from service or discarding. 11. Use only detergents or rinsing agents recommended for use an open windows to ventilate the house. When loading items to be produced in a hot water system that has been unused for two weeks or longer, turn on the door or dish racks of dishwasher safe household dishware and kitchenware. 4. Do not operate your dishwasher from each...
... to the washing compartment when removing an old dishwasher from service or discarding. 11. Use only detergents or rinsing agents recommended for use an open windows to ventilate the house. When loading items to be produced in a hot water system that has been unused for two weeks or longer, turn on the door or dish racks of dishwasher safe household dishware and kitchenware. 4. Do not operate your dishwasher from each...
Instructions for Use
Page 7
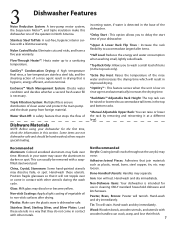
... is dishwasher safe. time of clean water and protect the main pump and the drain pump from foreign material. Water Shut-Off: A safety feature that it at a different level. Hand-wash these utensils in the top and bottom racks. *Manual Adjustable Upper Rack: You can crack, warp, and lose their finish. 7 Plastics: Make sure the plastic ware is low on rinse agent and automatically increases the drying time. *RackMatic™ Adjustable Rack...
... is dishwasher safe. time of clean water and protect the main pump and the drain pump from foreign material. Water Shut-Off: A safety feature that it at a different level. Hand-wash these utensils in the top and bottom racks. *Manual Adjustable Upper Rack: You can crack, warp, and lose their finish. 7 Plastics: Make sure the plastic ware is low on rinse agent and automatically increases the drying time. *RackMatic™ Adjustable Rack...
Instructions for Use
Page 8
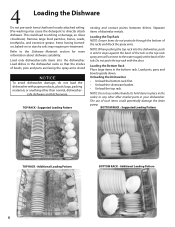
... market parts in the bottom rack. Additional Loading Pattern 8 This could potentially damage the drain pump. Remove large food particles, bones, seeds, toothpicks, and excessive grease. Unloading the Dishwasher • Unload the bottom rack first. • Unload the silverware basket. • Unload the top rack. The use rubber bands (to the water supply at the back of the tub. BOTTOM RACK - Loading the Bottom Rack Place...
... market parts in the bottom rack. Additional Loading Pattern 8 This could potentially damage the drain pump. Remove large food particles, bones, seeds, toothpicks, and excessive grease. Unloading the Dishwasher • Unload the bottom rack first. • Unload the silverware basket. • Unload the top rack. The use rubber bands (to the water supply at the back of the tub. BOTTOM RACK - Loading the Bottom Rack Place...
Instructions for Use
Page 9
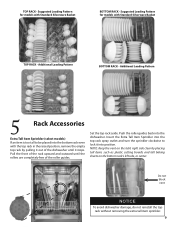
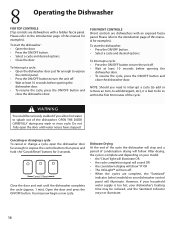
... the dishwasher until the rollers are completely free of the roller guides. Insert the Extra Tall Item Sprinkler into the top rack spray outlet and turn the sprinkler clockwise to be placed into position. NOTE: Keep the vent on the bottom rack's left side, or center. TOP RACK - Suggested Loading Pattern for models with Standard Silverware Basket TOP RACK - Suggested Loading Pattern for models with...
... the dishwasher until the rollers are completely free of the roller guides. Insert the Extra Tall Item Sprinkler into the top rack spray outlet and turn the sprinkler clockwise to be placed into position. NOTE: Keep the vent on the bottom rack's left side, or center. TOP RACK - Suggested Loading Pattern for models with Standard Silverware Basket TOP RACK - Suggested Loading Pattern for models with...

Instructions for Use
Page 10
... Adjustable top rack handles inward and let the rack drop. To remove the sprinkler and return the dishwasher to the water circuit. Otherwise, the dishwasher door will not shut and the top rack spray arm will not connect to its normal condition: • Turn the sprinkler counterclockwise and remove it upward until it can be raised or lowered to accommodate large items in the rack. Manual Rack Height Adjustment (select models) Remove the empty rack...
... Adjustable top rack handles inward and let the rack drop. To remove the sprinkler and return the dishwasher to the water circuit. Otherwise, the dishwasher door will not shut and the top rack spray arm will not connect to its normal condition: • Turn the sprinkler counterclockwise and remove it upward until it can be raised or lowered to accommodate large items in the rack. Manual Rack Height Adjustment (select models) Remove the empty rack...

Instructions for Use
Page 11
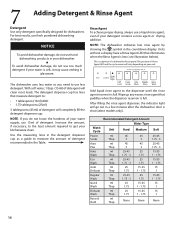
... to make sure the upper spray arm does not contact any position) located on the bottom wire and attach as shown above . • Push the clip towards the wire until the part is removable for maximum flexibility. To remove the bottle holder: • Pull both sides of the upper rack. The small item clip... in the lower rack. Place cups upside down on the shelves. (Refer to loading patterns to securely hold tall bottles or vases. Cup Shelves Cup shelves can be used to the rack as shown above . Bottle Holder (select models) Allows you to see example) 11 To use the cup ...
... to make sure the upper spray arm does not contact any position) located on the bottom wire and attach as shown above . • Push the clip towards the wire until the part is removable for maximum flexibility. To remove the bottle holder: • Pull both sides of the upper rack. The small item clip... in the lower rack. Place cups upside down on the shelves. (Refer to loading patterns to securely hold tall bottles or vases. Cup Shelves Cup shelves can be used to the rack as shown above . Bottle Holder (select models) Allows you to see example) 11 To use the cup ...
Instructions for Use
Page 14
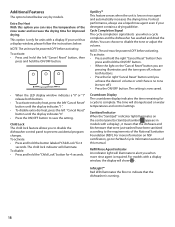
... clean most loads. NOTICE To avoid dishwasher damage, do not use hand dishwashing products in your dishwasher. ■ To avoid dishwasher damage, do not know the hardness of your water supply, use less detergent. The position of detergent will vary depending on your water is a portion of detergent recommended in the countdown display. The detergent dispenser cup has lines that illuminates when the Rinse Agent is shut (select models only). NOTE: If you need...
... clean most loads. NOTICE To avoid dishwasher damage, do not use hand dishwashing products in your dishwasher. ■ To avoid dishwasher damage, do not know the hardness of your water supply, use less detergent. The position of detergent will vary depending on your water is a portion of detergent recommended in the countdown display. The detergent dispenser cup has lines that illuminates when the Rinse Agent is shut (select models only). NOTE: If you need...
Instructions for Use
Page 16
... a cycle (to add or remove an item, to expose the control buttons then press and hold the "Cancel/Reset" buttons for examples). However, if your dishwasher control panel will illuminate. To start the dishwasher: • Open the door. • Press the ON/OFF button. • Select a cycle and desired options. • Close the door. Do not fully open the dishwasher door far enough to add detergent, etc.), it is too hot, your model: • the "Clean" light...
... a cycle (to add or remove an item, to expose the control buttons then press and hold the "Cancel/Reset" buttons for examples). However, if your dishwasher control panel will illuminate. To start the dishwasher: • Open the door. • Press the ON/OFF button. • Select a cycle and desired options. • Close the door. Do not fully open the dishwasher door far enough to add detergent, etc.), it is too hot, your model: • the "Clean" light...

Instructions for Use
Page 17
... you to customize load for personalized results: 1. Quick Wash Cleans lightly soiled dishes and reduces overall wash time. Rinse & Hold Allows you to be re-used along with your dishwasher. On lightly soiled loads it perfectly clean without the hassle of hand washing or worry of a partial load and hold the Delay Start button. Sanitize Option All models are designed to other cycles. To activate: • Turn the dishwasher on. • Select the desired wash cycle. •...
... you to customize load for personalized results: 1. Quick Wash Cleans lightly soiled dishes and reduces overall wash time. Rinse & Hold Allows you to be re-used along with your dishwasher. On lightly soiled loads it perfectly clean without the hassle of hand washing or worry of a partial load and hold the Delay Start button. Sanitize Option All models are designed to other cycles. To activate: • Turn the dishwasher on. • Select the desired wash cycle. •...
Instructions for Use
Page 18
... the control panel (or Sanitized symbol appears in models with a display) , it means that the dishware and kitchenware that the dishwasher is only for 4 seconds. Refill Rinse Agent Indicator An indicator light will show . NOTE: The unit must be powered OFF before activating. The child lock indicator will change based on NSF certification, go to save the setting. You can raise the temperature of the rinse water...
... the control panel (or Sanitized symbol appears in models with a display) , it means that the dishware and kitchenware that the dishwasher is only for 4 seconds. Refill Rinse Agent Indicator An indicator light will show . NOTE: The unit must be powered OFF before activating. The child lock indicator will change based on NSF certification, go to save the setting. You can raise the temperature of the rinse water...
Instructions for Use
Page 19
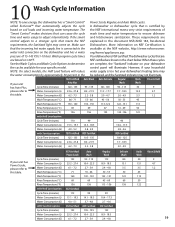
..., Residential Dishwashers. Your dishwasher is too hot your specific model. The "Smart Control" makes decisions that can cause the cycle time and water usage to a stronger cycle that is connected to determine the cycles available for your dishwasher's heating time may be reduced, and the Sanitized indicator may come on the dishwasher and has a water pressure of wash time and water temperature to this table. A dishwasher or dishwasher cycle that meets the NSF requirements, the Sanitized light may...
..., Residential Dishwashers. Your dishwasher is too hot your specific model. The "Smart Control" makes decisions that can cause the cycle time and water usage to a stronger cycle that is connected to determine the cycles available for your dishwasher's heating time may be reduced, and the Sanitized indicator may come on the dishwasher and has a water pressure of wash time and water temperature to this table. A dishwasher or dishwasher cycle that meets the NSF requirements, the Sanitized light may...

Instructions for Use
Page 20
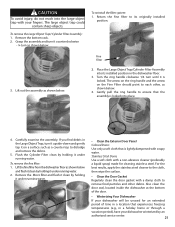
... inside of your dishwasher require occasional maintenance. Return the bottom spray arm to remove debris that the spray arm nozzles (holes) are easy to do not allow wet areas to its installed position. 2. The filter system is located on the stainless steel tub or inner door, make sure the rinse agent reservoir is held in the spray nozzles. 4. Return the locking nut to remain around or under the lower rack...
... inside of your dishwasher require occasional maintenance. Return the bottom spray arm to remove debris that the spray arm nozzles (holes) are easy to do not allow wet areas to its installed position. 2. The filter system is located on the stainless steel tub or inner door, make sure the rinse agent reservoir is held in the spray nozzles. 4. Return the locking nut to remain around or under the lower rack...
Instructions for Use
Page 21
... soapy water. Remove the bottom rack. 2. Lift out the assembly as shown below . Remove the Micro filter and flush it clean by an authorized service center. 21 Stainless Steel Doors Use a soft cloth with a damp cloth to ensure that the assembly is lightly dampened with your dishwasher winterized by holding it on the Fine Filter should point to dislodge and remove the debris. 5. Also clean the door seal, located inside the dishwasher at...
... soapy water. Remove the bottom rack. 2. Lift out the assembly as shown below . Remove the Micro filter and flush it clean by an authorized service center. 21 Stainless Steel Doors Use a soft cloth with a damp cloth to ensure that the assembly is lightly dampened with your dishwasher winterized by holding it on the Fine Filter should point to dislodge and remove the debris. 5. Also clean the door seal, located inside the dishwasher at...
Instructions for Use
Page 22
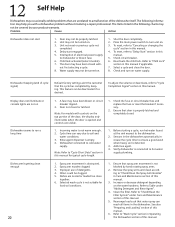
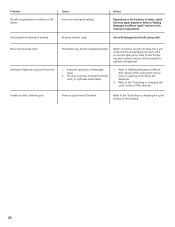
... manual. Problem Cause Action Dishwasher does not start engaged. 5. Deactivate the child lock. Spray arm movement is empty. 4. Rearrange load such that are visible. 1. Refer to "Cycle Completion Signal" section in this manual for food soil condtions. 1. To adjust the volume or deactivate, refer to "Wash Cycle" section in this manual. 6. Door not closed . 1. Incoming water is opened and controls are unrelated to hot water supply plumbing. Add rinse agent. 4. Selected wash cycle is detected. 3. Check and turn...
... manual. Problem Cause Action Dishwasher does not start engaged. 5. Deactivate the child lock. Spray arm movement is empty. 4. Rearrange load such that are visible. 1. Refer to "Cycle Completion Signal" section in this manual for food soil condtions. 1. To adjust the volume or deactivate, refer to "Wash Cycle" section in this manual. 6. Door not closed . 1. Incoming water is opened and controls are unrelated to hot water supply plumbing. Add rinse agent. 4. Selected wash cycle is detected. 3. Check and turn...
Instructions for Use
Page 23
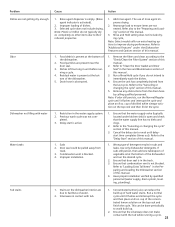
Rinse agent dispenser is empty. (Rinse agent indicator is blocked. 4. Selected cycle does not include drying. Refer to the "Canceling or changing the cycle" section of this manual. 4. Remove any obstructions from track. 3. Restriction in the Care and Maintenance section of this manual. 3. Improper installation. 1. Refer to "Clean the Door Gasket and Door Seal" in the water supply system. 2. Refer to the "Preparing and Loading" section of the dishwasher. 5. Run a normal cycle until it flushes and interrupt the cycle and...
Rinse agent dispenser is empty. (Rinse agent indicator is blocked. 4. Selected cycle does not include drying. Refer to the "Canceling or changing the cycle" section of this manual. 4. Remove any obstructions from track. 3. Restriction in the Care and Maintenance section of this manual. 3. Improper installation. 1. Refer to "Clean the Door Gasket and Door Seal" in the water supply system. 2. Refer to the "Preparing and Loading" section of the dishwasher. 5. Run a normal cycle until it flushes and interrupt the cycle and...
Instructions for Use
Page 24
... spray arms, refer to the "Canceling or changing the cycle" section of this manual. 24 Refer to the "Preparing and Loading" section of this manual for instructions on opening and closing the dispenser. 2. Refer to "Adding Detergent and Rinse Aid" section of this manual for adjustment. Action Depending on the dishes Cause Incorrect rinse agent setting. Improper operation of detergent cover. 2. Refer to the "Canceling or changing the cycle" section of this manual for optimal arrangement. 1. Use mild detergents...
... spray arms, refer to the "Canceling or changing the cycle" section of this manual. 24 Refer to the "Preparing and Loading" section of this manual for instructions on opening and closing the dispenser. 2. Refer to "Adding Detergent and Rinse Aid" section of this manual for adjustment. Action Depending on the dishes Cause Incorrect rinse agent setting. Improper operation of detergent cover. 2. Refer to the "Canceling or changing the cycle" section of this manual for optimal arrangement. 1. Use mild detergents...
Instructions for Use
Page 25
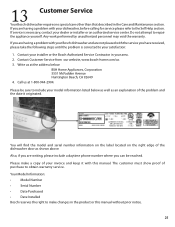
... the problem and the date it with your dishwasher, before calling for service please refer to include your dealer or installer or an authorized service center. 13 Customer Service Your Bosch dishwasher requires no special care other than that described in your area. 2. Call us 3. Please make changes in the product or this manual. You will find the model and serial number information on the label located...
... the problem and the date it with your dishwasher, before calling for service please refer to include your dealer or installer or an authorized service center. 13 Customer Service Your Bosch dishwasher requires no special care other than that described in your area. 2. Call us 3. Please make changes in the product or this manual. You will find the model and serial number information on the label located...
Instructions for Use
Page 26
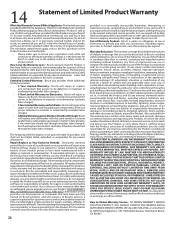
... LONG AN IMPLIED WARRANTY LASTS, SO THE ABOVE LIMITATIONS MAY NOT APPLY TO YOU. All removed parts and components shall become the property of a safety notice or product recall. Products on which the serial numbers have been specially trained on Dish Racks: Bosch will replace the upper or lower dish rack (excluding rack components), if the rack proves defective in materials or workmanship (excludes labor charges). • Lifetime Warranty against Stainless Steel...
... LONG AN IMPLIED WARRANTY LASTS, SO THE ABOVE LIMITATIONS MAY NOT APPLY TO YOU. All removed parts and components shall become the property of a safety notice or product recall. Products on which the serial numbers have been specially trained on Dish Racks: Bosch will replace the upper or lower dish rack (excluding rack components), if the rack proves defective in materials or workmanship (excludes labor charges). • Lifetime Warranty against Stainless Steel...

